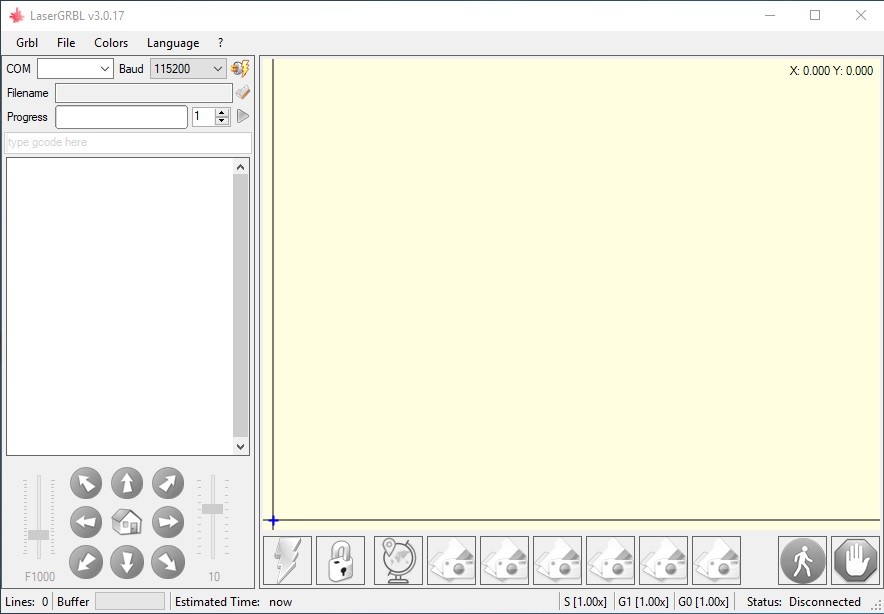
LaserGRBL software video lesson
Laser GRBL – getting started
Is a free software that can be used with most laser engravers.
Download Link: https://lasergrbl.com/download/
Laser GRBL – general overview

How to connect first plug laser in to usb the click the lightning bolt.
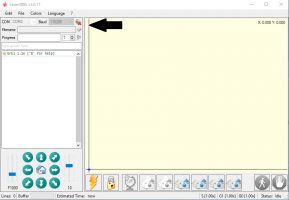
If this dose not connect like in this picture. Then you will need to change band rate.
or it may need firmware updated. link for firmware.
Link:
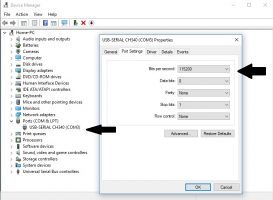
Device manager
When open go down to ports and right-click this is what it should be set to if not
change the setting to match this picture. comport will be the one you have plugged in to.
Trace frame is a must to any engraving so you can line up your work right.
here is how to add the code in and the code as well.
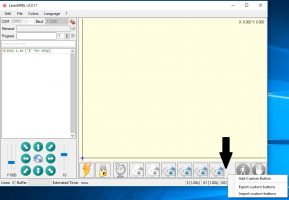
First Right-click here and click add custom bottom.
Code for Trace Frame and how it should be setup.
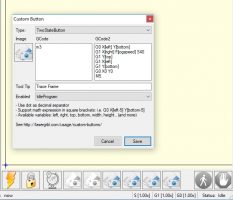
Other code can be added as well which is here below. and meanings.
G0 X[left] Y[bottom] F3000 <<<<< Speed
M3 S1 <<<<<< S1 = 1% power
F3000 <<<<< Speed
G1 X[left] Y[top]
G1 X[right] Y[top]
G1 X[right] Y[bottom]
G1 X[left] Y[bottom]
G0 X[left] Y[bottom]
M5
G0 X0 Y0 F3000 <<<<< Speed
here is a copy so you can copyright in and add button
G0 X[left] Y[bottom] F3000
M3 S1
F3000
G1 X[left] Y[top]
G1 X[right] Y[top]
G1 X[right] Y[bottom]
G1 X[left] Y[bottom]
G0 X[left] Y[bottom]
M5
G0 X0 Y0 F3000
LaserGRBL Software – first launch

To start using your laser machine you need to connect to it your computer via a USB cable. Once connected, we run LaserGrbl, select the COM port, to which our laser is connected, and click the “Connect” icon.

If the connection is successful you will see the info about your machine and its firmware.

For the correct operation of all the machine elements and correct sizing, you need to adjust the configuration of your machine. To do this, select GRBL Configuration in the GRBL tab.

Here you can configure the GRBL firmware or import the existing one. For this we select and import the file with the configuration of our machine. It is also possible to enter the speed, acceleration, steps and other parameters manually.
In the left bottom corner we set the laser movement speed. The right runner adjusts the step size of the laser head when you click the movement buttons.

Next, we test the carriage movement using the arrows in the left bottom corner. For resetting we click the Home icon (this function is activated if you have end switches installed).
The next step is to prepare the work field. For this we place a piece of wood on the work table and check if the machine responds to the ON and OFF commands.
 For this there are several buttons on the bottom bar tool.
«Focus» turns on the laser for focusing (3%).
«Blink» is a short pulse (10%).
It is important that you follow the safety rules when operating a laser. Wear your safety goggles!
Let’s laser our first image.

Having placed the workpiece on the work table, we import an image (let it be the ENDURANCE logo). We click the Open File icon in the left (левом??) upper corner.

 To speed up engraving we convert the image to a vector file. As a result we get an outline image of the logo. Now in the Vectorize options we check Smoothing and enter 10. We do it to remove unevenness in small-sized images.

In the same window we can select a filling mode. There is a wide choice of options. So you can choose those you like most.
Now we click Next and set the maximum engraving speed 700 mm/min. The maximum speed value depends on the engraver type. You might have a different one.
In «Laser options» we change the laser start command М3 for М4. You do it only once. The program will remember this parameter.

Next we choose an image size to our liking. Our choice here is 94 by 94. Further on, we create an image. The logo image we have selected before is displayed in our work field.

The next step is to position the workpiece for engraving in one corner of the work field (table?). After this we run the programe (by clicking the button in the upper left corner). Устанавливаем материал, на котором хотим получить гравировку, в угол рабочего поля (или рабочего стола???) и нажимаем на «пуск», в левом верхнем углу.

After the start of the engraving process, you can watch its progress and stop it on an emergency basis if needed.
While using the LaserGRBL software, we have not noticed any bugs or fails. So, we can tell that the program is highly reliable. All its functions and options are user-friendly and trouble-free.
That’s about all. In this article we’ve reviewed only part of the program features. If you are interested in more information, please, comment. We can give more details if needed.
Here we stop and wish you successful experiments and tests!
And one more important thing: don’t forget about the safety rules when working with the laser!
GRBL compatible MakerBase MKS DLC ver 2.0 board. Uploading GRBl 1.1f firmware.
Fully compatible with LaserGRBL software
An important things you need to know about GRBL parameters, firmware settings
G-code examples and images for laser engraving and laser cutting
Uploading firmware on different boards: GRBL / Marlin. Settings, parameters.
