
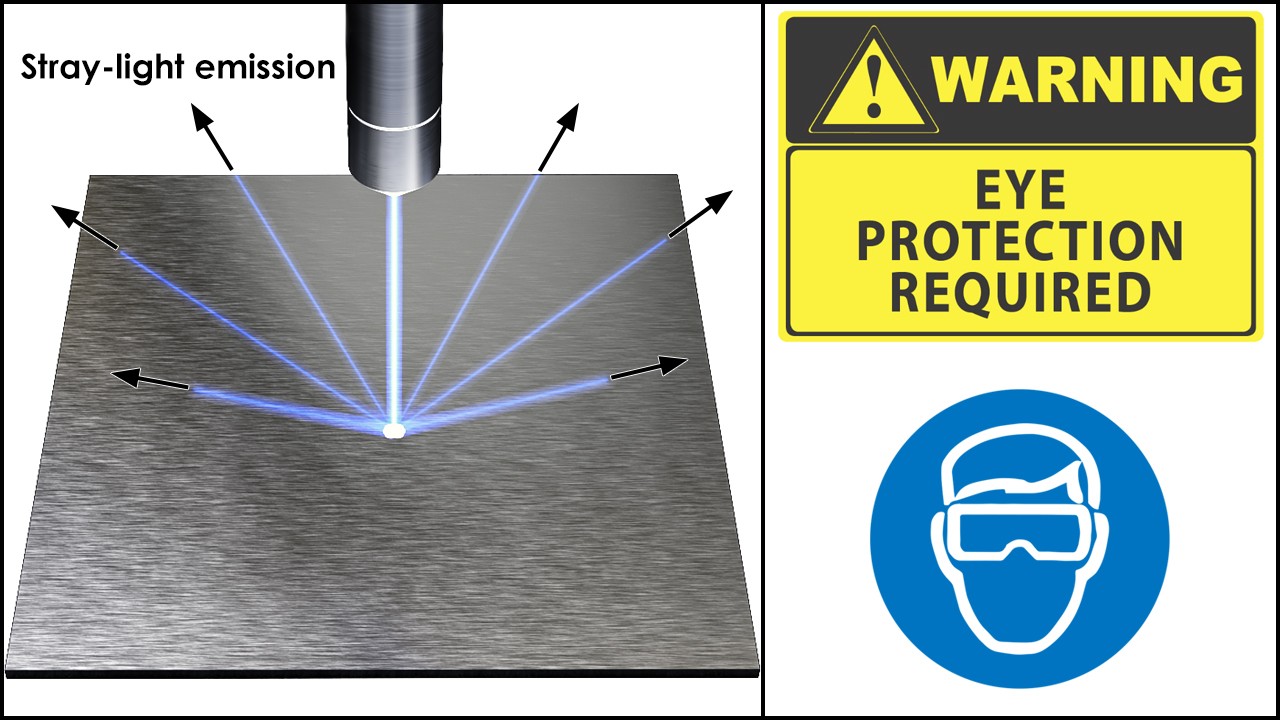


Laser radiation (light) from a hobby-grade laser cutter CAN and WILL cause permanent eyesight damage if it hits the naked eye. Reflected laser radiation is equally harmful. A bare metal or glass 3D printer bed is, for all safety concerns, a huge reflective surface that could act as a light collector lens with unexpected beam exit paths.
Always wear eye protection rated for the laser wavelength that it’s been used. Even if you encase the build area with laser-shielding panels, always use personal eye protection.
An electric key-switch cost less than 10 US dollars and can prevent accidental laser activation. It’s a must-have if your laser is permanently mounted/hardwired. Remember: Other people could use the printer and activate the laser without even knowing it.
Laser cutting is a thermal process with great heat and smoke output. KEEP A FIRE EXTINGUISHER NEARBY. At the very least it should be rated for A & C fires. Dry-chemical extinguishers will suffocate the fire and most likely kill your electronics for good, clean agent extinguishers are better on that regard but could be harmful to the ozone layer. Consult your local fire safety code.
PROCEED AT YOUR OWN RISK. I’m not endorsing nor vouching for the safety characteristics of any of the products/methods mentioned on this site.
QUICK START Dxf2Gcode
What you need:
- Some 2D or 2.5D CAD software can export to .DXF file format.
- Dxf2Gcode (sourceforge.net) – I’ve successfully tested the process with the 2015-6-9 build, let me know if future versions break compatibility).
- Control software for your printer that wont’ freak out when it sees G-Codes coordinates placing the print/tool head below the bed height or that never extrudes a single mm of filament. So far PrintRun Pronterface (pronterface.com) works fine for this, CURA and Repetier Host doesn’t. – Funny bit: Repetier Host will still give you a time estimate for the job to complete. Let me know if you find another control software that works.
- These little files (robots-everywhere.com) that modify Dxf2Gcode behavior (big ‘thank you’ to Matteo for hosting them). They are plain text files, don’t be afraid to look under the hood
- config.cfg goes to your config directory (rename the original config.cfg for safekeeping). This file sets the default settings for any DXF you process trough Dxf2Gcode. The ones I put there are:
- Start the laser at your Z end-stop hardwired height.
- Do 5 passes for each cut, taking away 0.05 mm from the top surface each pass.
- Move the laser at 3,000 mm/minute while cutting.
- Move the laser at 200 mm/minute when not cutting (laser is OFF).
- Change the meaning of the “%” character when found inside a DXF layer name (more about that down below).
- Laser Cut Heater.cfg goes into your postpro_config directory and will generate ready-to print G-Code for a laser hooked to your heater port on the first installed extruder. It will set your laser height at 85 mm above the hardwired Z end-stop height. (You should edit those 85 mm to whatever is YOUR optimum focusing height).
- Laser Cut Fan.cfg also goes into your postpro_config folder and -you guessed- will do the same but for a laser hooked to the part fan port on your first extruder. But it does something extra:
- Since the laser intensity is regulated by software on that port, it will give you a 10 seconds pause with the laser set at 2% of it’s full power intensity parked over the bed origin (X0,Y0) spot. This way you can visually verify and correct the start point before each job.
- config.cfg goes to your config directory (rename the original config.cfg for safekeeping). This file sets the default settings for any DXF you process trough Dxf2Gcode. The ones I put there are:
How-to (the short version):
- Set your CAD app to draw in mm or inches (most apps will default to meters, keep that in mind).
- The 0,0,0 coordinates origin of the CAD file will coincide with your printer’s bed homing position. Also keep that in mind when placing your drawings.
- (Optional) You can have laser settings pre-set from the CAD file by renaming the layers using the notation explained at sourceforge.net – The provided config.cfg changes the “:” to “%” so that Dxf2Gcode becomes compatible with the official DXF format definition that doesn’t allow “:” as part of a layer name. For example, instead of using “Md: 1” you now use “Md% 1”. Per the definition, layer names can’t be longer than 256 characters, BTW.
- Export you drawing as a DXF file.
- Open your drawing in Dxf2Gcode. If the drawings looks funky go back to your CAD app and make liberal use of the explode/decompose command to reduce it to lines, arcs and splines. Hatches and text objects are not supported by Dxf2Gcode at this time, so you need to explode/decompose those as well.
- (Optional) Inside Dxf2Gcode you can select shapes or entire layers and change the laser settings for that selection. Settings are in the “layers” tab (even when you are not selecting an entire layer). Removing the check-mark will ignore the selection for G-Code output purposes.
- Go to “Export” menu and choose “Export Shapes”. You’ll now see two new G-Code flavors under the “Save as type” menu.
- Load the exported G-Code into PrintRun Pronterface.
- Put on your laser eye protective gear.
- Hit print and enjoy
- (Optional) If you are going to be re-printing the same G-Code in a series (let’s say you are engraving 300 wood boxes with the same design, or you are cutting/engraving very thick materials, you might want to comment out the first “G0 Z 0.000” on the exported g-code (should be around the 5th line of the file) so that the printer doesn’t lower the head/lens at the start of each print.
Introduction
So.. lately I’ve been experimenting with small scale additive manufacturing on a robotic Cartesian system (which is a fancy way to say that I’ve been geeking out with a desktop 3D printer) and it has been brought to my attention that once you get computerized control over the X, Y & Z planes additive manufacturing is just a fraction of all that you can do.
Think about it and you will see the same underlying principles applied to all CNC CAM techniques, both additive and subtractive. In fact, is not uncommon to find ‘transformer machines’ that can go from one manufacturing technique to another just by switching out the tool-head. Check this obscenely oversimplified table:
| Controlled Axis | Example Machine | Usual initial design software tool |
| 1 | CNC Lathe | 2D Cad Software |
| 2 | Old-school large format plotter | 2D CAD software |
| 2 | Laser/Plasma/Waterjet cutter | 2D CAD software |
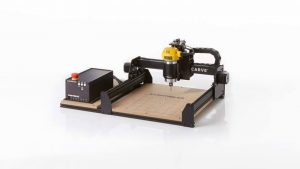
| 3 | CNC Mill / Router / Laser engraver | 2.5D CAD sofware |
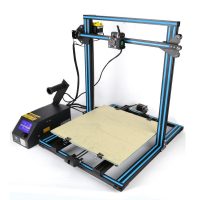
| 3 | 3D Printer | 3D CAD Software |
| 4 or more | 4 or 5 axis robot miller | 3D CAD Software |
As you can see, control wise, there isn’t that much difference between a CNC Mill and a Laser Engraver, the main difference between them is that on the first the cutting action is made by a rotating drill bit attached to the spindle and is physically touching the work piece, while on the second the cutting action is done by focused energy coming out of the lens, itself attached to the laser housing. More-so, both should remain at a certain (supposedly) constant distance from the workpiece. For the mill that distance is called “Tool Lenght” and on the laser it’s called “Optimal Focus Distance”.
To clarify, take a long look at this diagram:
How it works
Dxf2Gcode is mostly designed for CNC Mills and it’s cousins. In essence the provided “post-processor” files take a design originally meant to be milled and introduce some changes into the output to account for the “minimal” differences between milling and laser engraving/cutting.
Ideally, everything happens in this sequence:
- The designer creates the CAD files assuming that the top surface of the work-piece is always at 0.00 Z height. This way the design becomes independent of the final “Start Mill Depth”, as it may change at production time.
- At production time, the Laser operator already knows both the “Optimal Focus Distance” for the Laser and the “Start Mill Depth” for the Workpiece, and add them together to get the “Focusing Offset” or “Net Initial Focusing Height”.
- This offset is either set-once-and-forgotten within the post-processor file or is changed on a case-by-case basis by editing the G-Code output (the lines dealing with the “Focusing Offset” are clearly marked, just open the output with a text editor and will be easy to spot.
- The output G-Code tells the printer to raise the Laser to the operator determined “Focusing Offset” and re-programs that height as the new virtual 0.00 Z height.
- The design is cut/engraved as usual.
- Once finished, the “Focusing Offset” is de-programmed from the printer and the machine is once again ready to be used either as a printer or as a laser tool.
Dxf2Gcode Settings Translated
Since Dxf2Gcode’s interface is designed with CNC Milling in mind, some mental translation needs to be done in order to correctly alter the lasering settings, as follows:
| Setting | Explanation | Sensible Value |
| Tool Number (drop list) | The extruder/fan where your laser is getting power from. | “1”, for single extruder printers.Could be changed to “2” but you need to edit the post-processor files. It’s possible to run dissimilar lasers side-to-side this way. |
| Z Retraction Area | The laser beam can “disappear” on command, so it doesn’t need to physically retract like a milling drill. | 0 |
| Z Workpiece Top | As explained before, the CAD is assumed to be workpiece agnostic, so leave it at 0. | 0 |
| Z Infeed Depth | How deep can you laser cut/sublimate cleanly in a single pass without excessive smoke or material deformation.This should be a negative number. | Start with your focused spot diameter, adjust up/down depending on the workpiece material light absorption properties. |
| Z Final Mill Depth | Measuring from the workpiece top, how deep you want your cut.Should also be a negative number. | If larger than the “Z Infeed Depth” extra passes will be generated as needed, each one deeper than the previous. |
| Feed Rate XY | How fast will travel the laser over the workpiece while it is cutting.This number is in mm/minute. | As fast as possible while still achieving the desired “Z Infeed Depth” for the given material.Anything slower will produce rough / smoked / over-burn edges. |
| Feed Rate Z | The post-processor uses this as the speed to move the laser housing while the laser is turned off.Should be slow enough to avoid laser over/under shoots due to unwanted inertia or electronics/firmware reaction latency. | Start fast and adjust downward until you get precise start/stop points for each shape.Could be considered as the Draft vs. Final Quality setting for the engraving. |
Dxf2Gcode GUI
· config.cfg
· Post-processors
· Storing the settings inside your CAD file
· Batch conversion
Mastering Coherent Light:
- Material Light Absorption
- Material heat conductivity
- Focus distance, beam geometry and smoke: Going fast versus going deep
T2Laser software laser cutting video guide
https://www.youtube.com/watch?v=PmyJsz-jR1g
Subscribe on our Youtube channel and do not miss our news and guidance.
If you are not able to watch our video – let us know. All video are free for Endurance customers. We have more than 500 video guidance and tutorials.
High-quality standard
Multi-level testing system.
Industrial components.
Ultra reliable
The guaranteed duration of the continuous operation ~48-72 hours.
True continuous power output
Our products have the rated power output as advertised – unlike Chinese analogues.
TTL mode
Can be turned on and off with 3.5-24V.
Variable power output.
Plug and play
Universal and compatible mount.
Compatible with most 3D printers and CNC machines.
Friendly return policy
Do not like the laser?
Simply return within 30 days and get a full refund.
Real-time advice
We assist and give advice by Phone / Email / Facebook messenger / Telegram / Whatsapp / Viber.
Professional support
We help to install and tune the laser. We offer qualified after-sales support.
Everything you need
We ship everything you need in one parcel to get started.
Immediate delivery
We ship all units within 4-24 hours. DHL express delivery allows you to get the package in 3-5 days.
Lifetime warranty
All our lasers are tested and could work up to 10000 hours.
Upgrade option
Do you have an old model? Upgrade your unit with more powerful one.
Our customers installed and run our lasers on the following machines:
Prusa mk3s, Monoprice maker select v2, x-сarve 1000×1000, Creality 3D cr-10S cr-10, TAZ5, CNC Shark 4HD, Robo3DR1+, Ender-3, Ender 3-PRO, Ender-2, Snapmaker, Tronxy x5s, Anycubic Photon, Solidoodle 2, Wanhao 4S, A large CNC machine controlled using Mach3 and an Ethernet Smooth Stepper, Ultimaker 2, CNCC Laseraxe, Monoprice maker select v2, Eleksmaker a3’s, Openbuilds Ox, Acro for laser, Tinyg controller for CNC and GRBL for laser.
MPCNC, CTC flashforge replica, openbuilds ARCO, WanHao Duplicator i3, Anet A8, 3080 china cnc, Printer is a Davinci 1.0a with repetier, full size Rambo 1.3 laser, prusa i3 printer, retrofitted Bridgeport Intact milling machine and retrofitted manual to CNC 14×40 metal, Stepcraft 420, craftbot+, anycubic photon, phrozen xl, Anycubic 4max, ReXYZ S22, Shapeoko 3 XXL, Creality Ender 3, Home made cnc 600*400*150, Creality Ender 3, Folgertech FT-5, Tevo Little Monster, Hyper Cube, Alfawise U30 printer, Ender 3 Pro, XYZ Davinci A1.0, Custom Delta 3D printer, 300×300 D-bot 3D printer, OpenBuilds MiniMill with Duet electronics, OpenBuilds C-Beam, CREALITY ENDER 3, Creality 10 s5, creality s10 pro, anycubic i3 mega, 750mm X-Carve, 4ft x 4ft diy gecko g540 controller, pmdx -411 interface, mach4 software, bobcad cad program, Ultimaker 2, TRex 2, TronxyX5S, Anet A6 blue, 100 cm X 100 cm chinese laser frame with laseraxe board, creality ender 3, greetech A10M, Tronxy xy-2, Open builds lead 1010 1000 x 1000mm cnc, Edge AVID CNC Pro 48″ x 144″, Prusa MK3S with MMU2, Bibo 2. Laser, generic delta printers, Bever zero CNC building, Lulzbot TAZ 6, Ultimaker S5, Next Wave Black Diamond CNC with 4th axis, Axiom V5 Pro, WH Di3 with 32bit Marlin board, home build CoreXY, Duet2 WIfi board, Voron 2, Ender 3 pro, sain smart MX3, Openbuild Lead 1075, Ender 5pro.
