 laser module")
Teeth Aligner laser cutter – Endurance 3 watt UV *355 nm laser machine
Ultra accurate laser cutter (3 watt 355 nm UV laser module)
Fast and accurate laser metal engraving with 3 watt 355nm UV laser module
https://youtu.be/PoEJviuxTgs
Kapton laser processing with 355 nm UV Endurance laser module.
Creating QR and bar codes on plastics using an Endurance 3 watt (355 nm) UV laser installed on a DIY galvo head


Shenzhen JPT Opto-electronics
Seal-355-3E
User manual

Laser Parameters
| Parameter List | |
| Laser Type | 3W UV-AIO |
| Model Number | Seal-355-3E |
| Wavelength | 355nm |
| Mean Power | >3W@30kHZ |
| Pulse Duration | <18ns@30kHz |
| Frequency Range | 20KHz-150KHz |
| Spatial Mode | TEM00 |
| Beam Quality(M2) | M2≤1.2 |
| Beam Circularity | >90% |
| Beam Full Divergence Angle | ≤2mrad[1] |
| Beam Diameter | Without expander 0.7±0.1mm[2] |
| Beam Expander Inside | 6X |
| Polarization Ratio | >100:1 |
| Polarization Orientation | Horizontal |
| Average Power Stability | RMS≤3%@24hr |
| Pulse-to-Pulse Stability | RMS≤3%@30KHz |
| Operating Temp.&RH | 10℃~40℃;<80% |
| Storage Temp.&RH | -15℃~50℃;<90% |
| Cooling Mode | Water-cooling |
| Cooling Capacity Requirement | 500W |
| Electricity Requirement | DC12V |
| Average Power Consumption | <180W |
| Three-Dimensional Size | 263mm*120mm*107mm(L* W* H) |
| weight | ≈5.95kg |
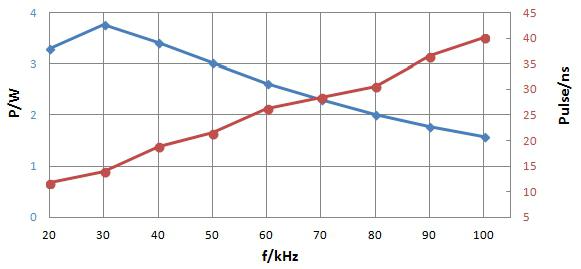
Figure 3W uv laser power, pulse width and frequency relationship
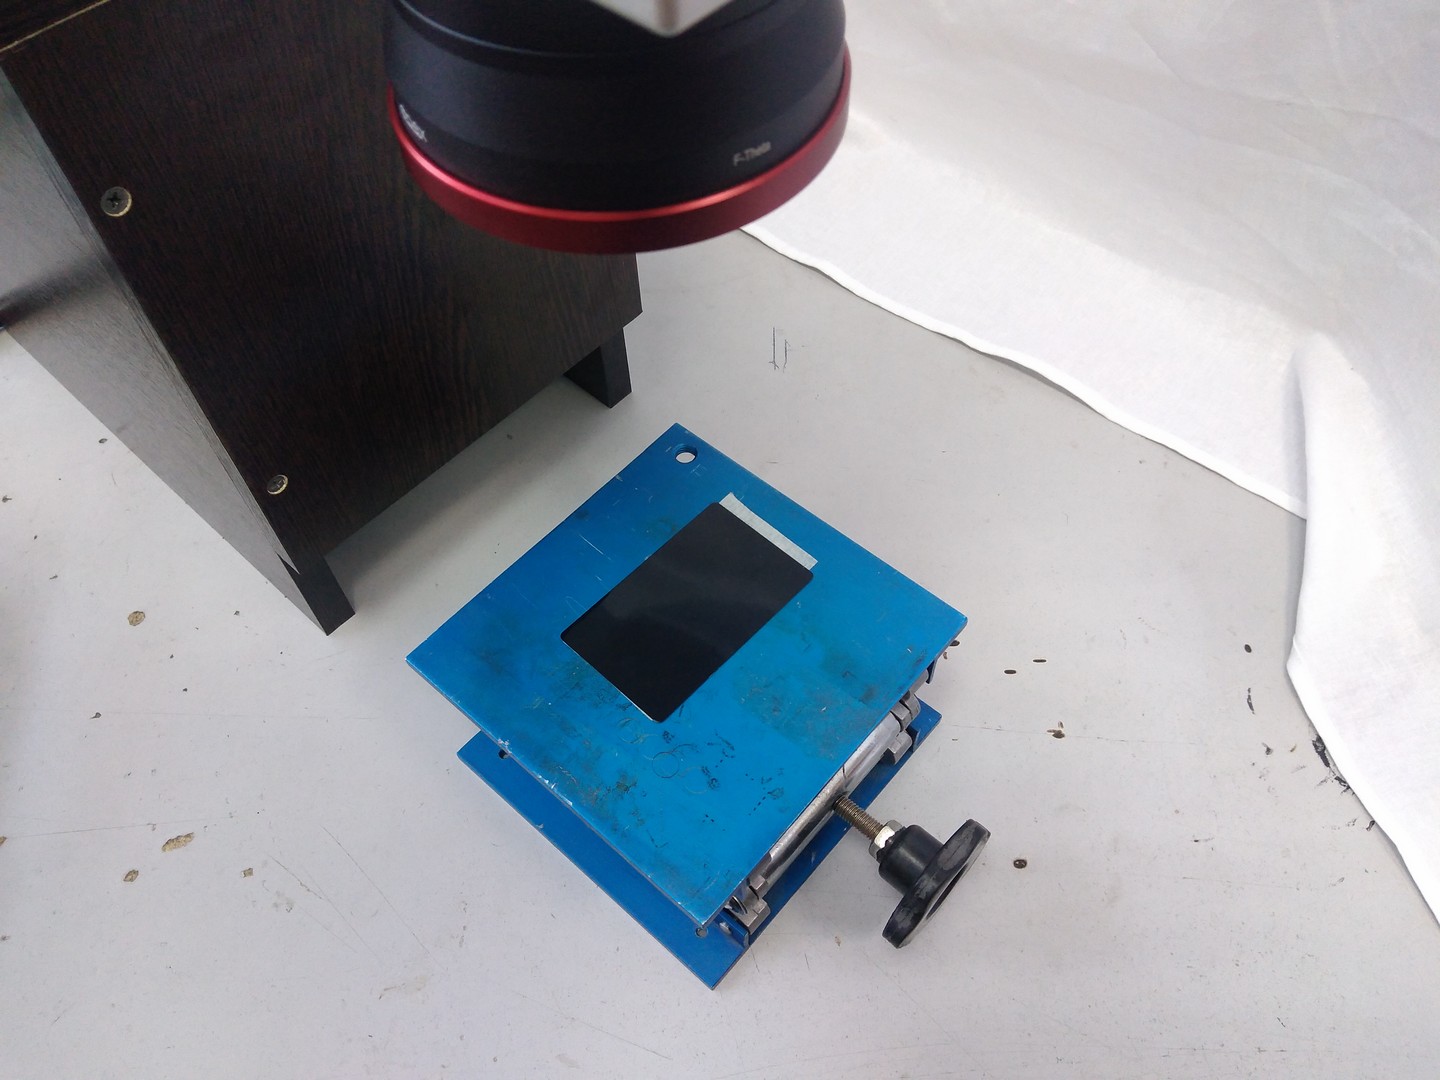
Focal range is 216-218 mm.
| PWM Frequency | Power | ||||
| kHz | PWM pulse width, mks | ||||
| 1 | 2 | 3 | 4 | 5 | |
| 20 | 3,53 | 3,47 | 3,41 | 3,36 | 3,36 |
| 30 | 3,88 | 3,75 | 3,61 | 3,49 | 3,42 |
| 40 | 3,83 | 3,64 | 3,44 | 3,25 | 3,1 |
| 50 | 3,63 | 3,38 | 3,1 | 2,82 | 2,59 |
| 60 | 3,34 | 3,01 | 2,67 | 2,36 | 2,1 |
| 70 | 3,02 | 2,66 | 2,3 | 1,97 | 1,66 |
| 80 | 2,73 | 2,32 | 1,95 | 1,6 | 1,27 |
| 90 | 2,46 | 2,03 | 1,64 | 1,28 | 0,95 |
| 100 | 2,22 | 1,8 | 1,39 | 1,03 | 0,72 |
| 110 | 2,01 | 1,57 | 1,17 | 0,81 | 0,52 |
| 120 | 1,81 | 1,36 | 0,97 | 0,65 | 0,37 |
| 130 | 1,63 | 1,21 | 0,82 | 0,51 | 0,28 |
| 140 | 1,45 | 1,05 | 0,69 | 0,4 | 0,19 |
| 150 | 1,35 | 0,96 | 0,6 | 0,33 | 0,16 |
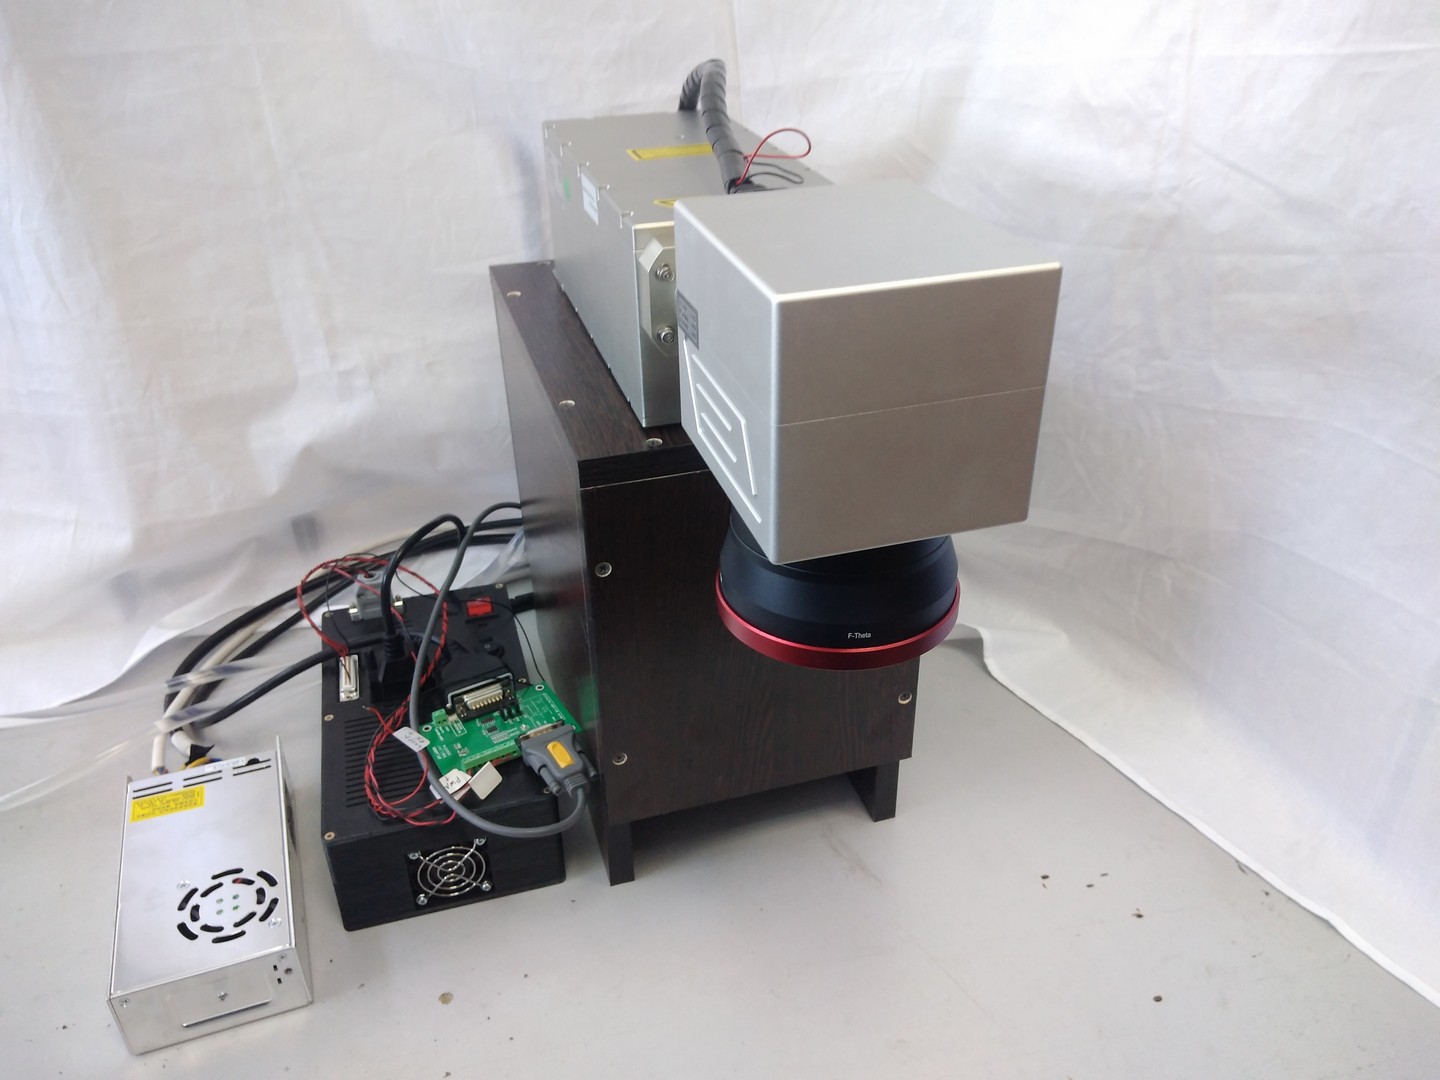
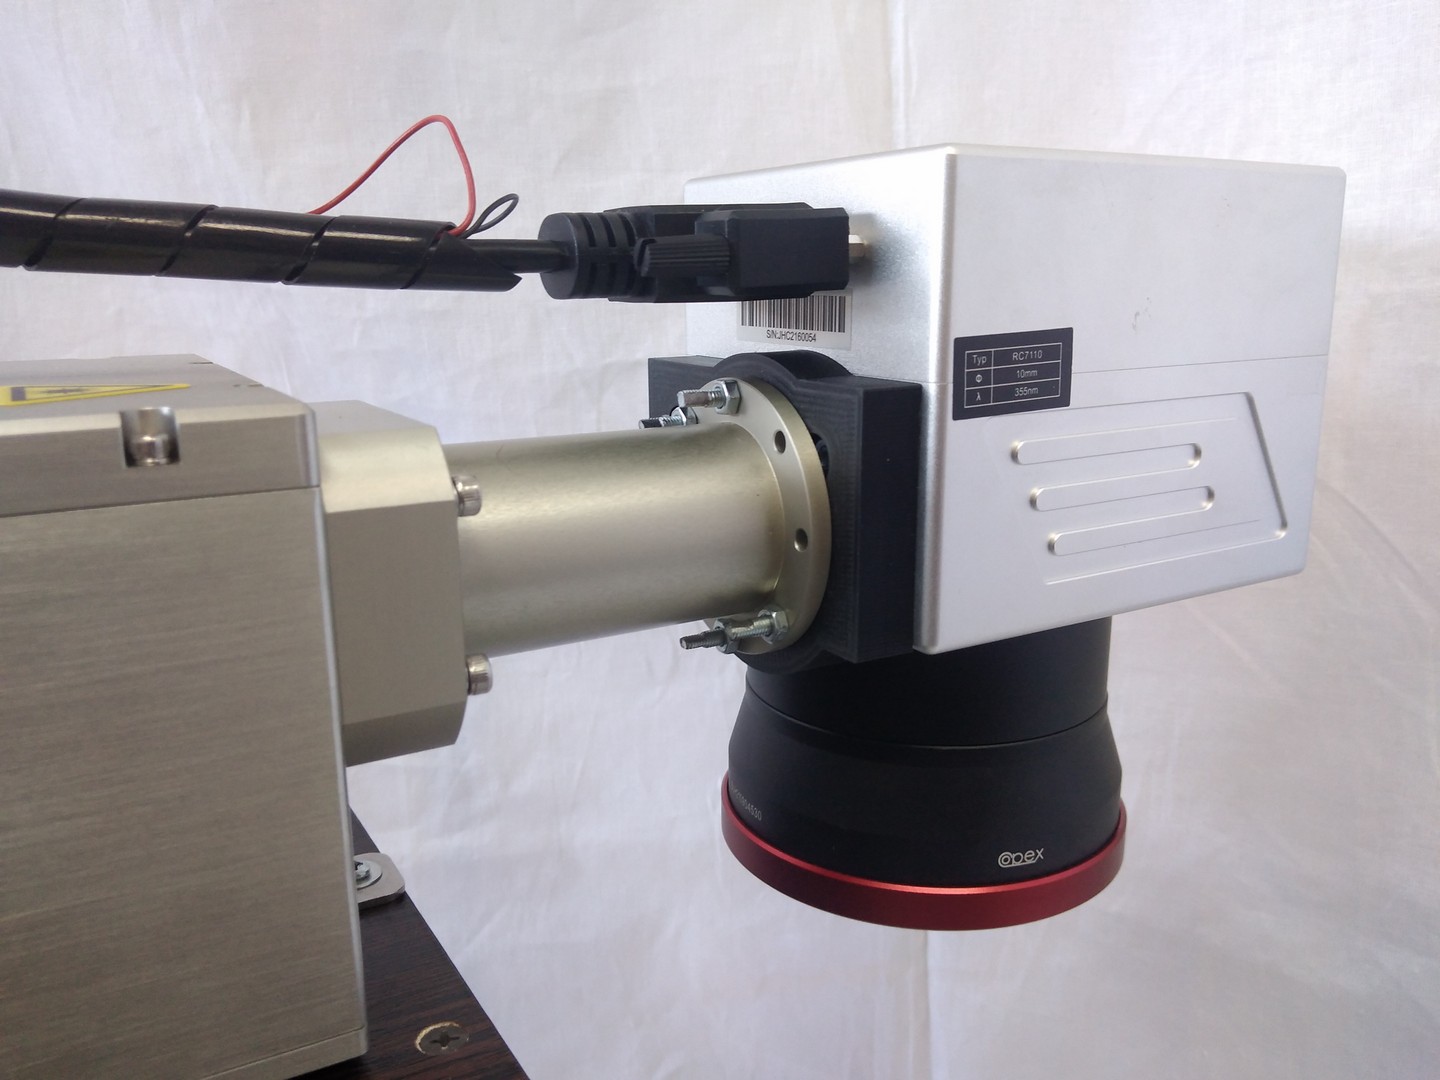
355 nm 3 watt UV laser module installation

Security information
Please read this manual carefully before using this product.
In this user manual, important product safety operation specifications, as well as other reference information are provided. In order to ensure your personal safety during the operation of this product and to achieve the best performance of the product, please follow the following cautions and warnings and other relevant operating specifications in this manual.
- Do not disassemble the equipment without permission. All maintenance can only be carried out within the company. The upgrade can be carried out by technical support personnel on site. If the equipment is disassembled without permission, the damage will not be covered by the warranty.
- The output wavelength of the laser is 355 nm (invisible light), with an average output power of more than 3W, categorized as IV laser. It not only does great harm to the eyes, but also burns the skin. The reflected and scattered light of the device may cause harm to the human body.
- Please wear laser safety glasses during use.
- It is forbidden to place inflammable and explosive articles on laser path and low ignition point substances such as black paper, cloth and leather.
- The laser could be operated only when the external requirements are satisfied, such as power supply, chiller and protection.
- There may be strong reflected energy when laser emits on the mental. Please use shelter or working platform with CLASS IV during use.
- Please check whether the grounding protection, button and other safety measures are normal.
- Please switch off the power and check if there is any abnormal situation.
- Caution:Even when the indicator light is set, there will be a weak output of the ultraviolet indicator light at the laser output port.
Laser safety label
| Label figure | Label information |
 | Laser label (placed on the top cover of laser module near the output port). |
 | Warning! if you do not follow the “warning” correctly, it may lead to physical injury to you or others. Do not use beyond the scope of ‘Security information’, unless you fully understand the product and use it in the specified environment. |
 | Danger! This product should be integrated in the terminal equipment and needs to use 12V power supply, supporting switching power supply for 220V input. High voltage danger. Beware of electric shock! |
 | Precaution! To prevent accidental exposure to laser or reflected laser, laser protective glasses with specific wavelength (355-1064nm) should be worn when using, maintaining and repairing the laser. |
 | Danger! The laser has enough energy to burn the skin. And in a certain distance, the laser can ignite the volatile substances, which may cause the explosion of volatile substances. It is forbidden to place inflammable and explosive dangerous goods in the laser processing area and use volatile substances carefully. |
 | Warning! Visible or invisible laser emitted by laser can cause serious damage to eyes and skin and may cause blindness. Reflected, scattered and diffuse light are also dangerous. Please note: the human eye is not visible to the laser whose wavelength is beyond 400-700nm (visible). That is, the laser may actually exist, but the human eye can not see the laser. |
 | Warnings (placed on the top cover of the laser module). |
 | Safety Warning |

Laser safety glasses
Introduction
Compared with IR lasers, the UV laser is directly breaking the chemical bond in materials. This process generates much less heat and separate matter into atom level, without destroying the environment. The UV laser has the advantages of short wavelength, easy focusing, small spot size, intense energy and high resolution. Because of its high processing accuracy, narrow line width, high quality and precision, small heat-affected area, good long-term stability, it can process various irregular patterns and heterogeneous patterns. It is mainly used in fine micro-processing, especially in high-quality drilling, cutting and grooving. It has been successfully applied in metals, semiconductors, ceramics, glass and a variety of polymer materials.
Seal-355-3E laser is all-solid-state UV lasers with end-pumped structure. Stable and compact resonator design makes high electro-optical conversion efficiency, good beam quality, high reliability, good consistency and maintenance-free operation. The new integrated structure design not only saves installation space for customers, but also greatly enhances the anti-interference ability of laser head. The introduction of a new optical cavity self-purification system greatly improves the service life of the laser.
Technical parameter
Table 1. Parameters for Seal-355-3 and Seal-355-5
| Parameter List | |
| Laser Type | 3W UV laser, All-in-one |
| Model Number | Seal-355-3E |
| Wavelength | 355nm |
| Average Output Power | >3W@30 kHz |
| Pulse Duration | <18ns@30 kHz |
| Frequency Range[1] | 20 kHz – 150 kHz |
| Spatial Mode | TEM00 |
| Beam Quality (M2) | M2≤1.2 |
| Beam Roundness | >90% |
| Beam Full Divergence Angle | ≤2 mrad[2] |
| Bam Diameter (1/e2) | Non-expand: 0.7±0.1 mm[3] |
| Internal beam expander | 6X[4] |
| Polarization Ratio | >100:1 |
| Polarization Orientation | Horizontal |
| Average Power Stability | RMS≤3%@24hr |
| Pulse-to-Pulse Stability | RMS≤3%@30 kHz |
| Operating Temp.&RH | 0℃~40℃; <80% |
| Storage Temp.&RH | -15℃~50℃; <90% |
| Cooling Mode | Water-cool |
| Cooling Capacity | 500 W |
| Electricity Requirement | DC 12V |
| Average Power Consumption | < 180 W |
| Three-Dimensional Size | 263 mm*120mm*107 mm (L* W* H)[5] |
| Weight | ≈5.95 kg |
- Refers to the better pulse stability during this frequency range.
- Refers to the direct output beam from the window, without beam expand.
- The measured position is at the laser output window.
- Refers to standard beam expander, 6X. And 10X could be customized.
- Refers to the dimension without expander.

Fig.1 The relationship between output power and pulse width for Seal-355-3E
Installation
Dimension

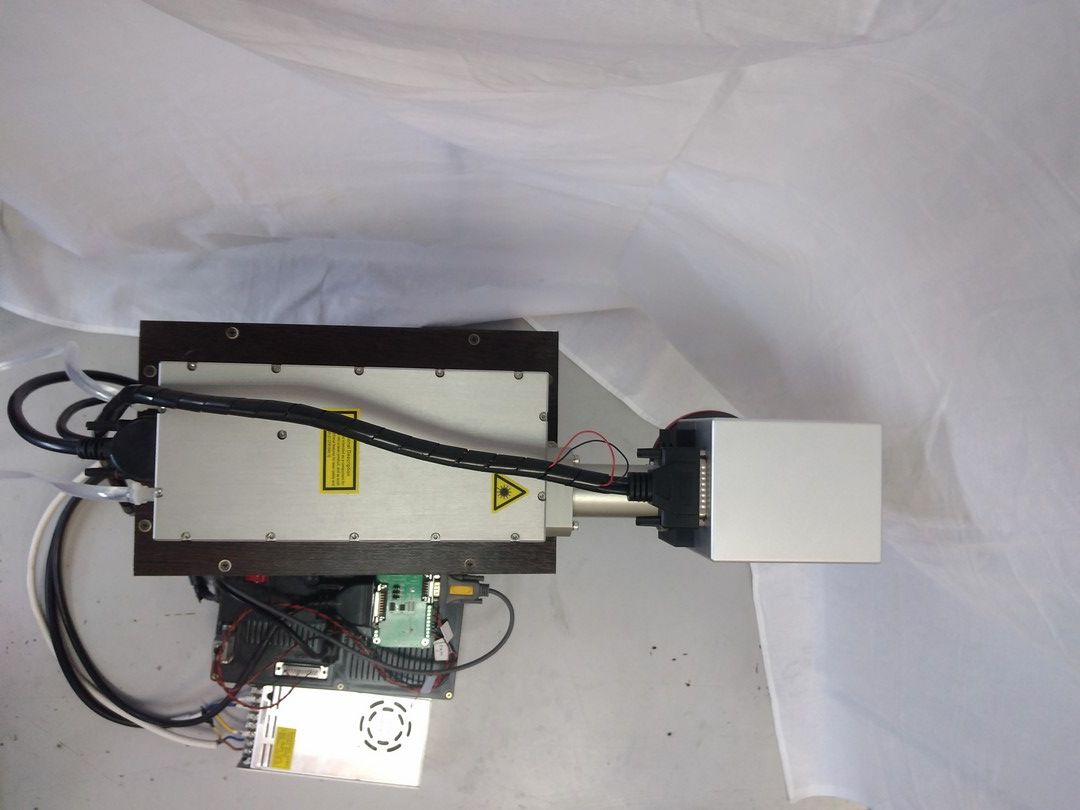
Fig.2 Laser case
Installation
- Fix method: Fix three M6 screw holes on both sides of laser housing on the worktable with M6*20 screw (suggested length) and corresponding cushion flat pad, as shown in the figure below.

Fig.3 Fixing position for Laser case
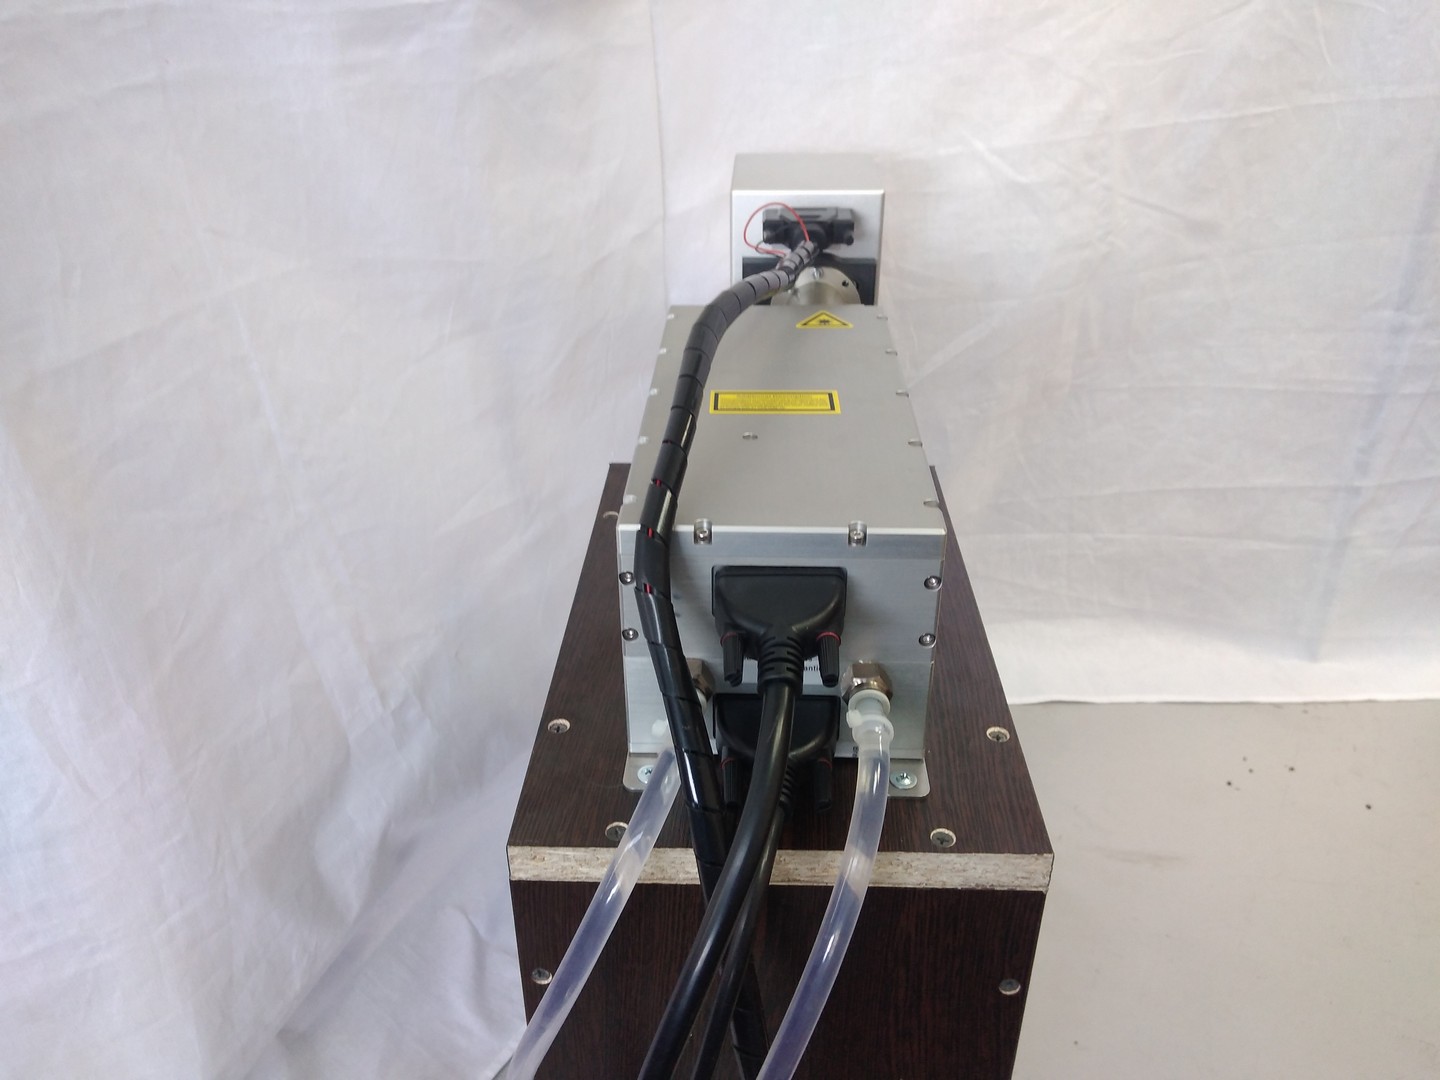
- Chiller Connection Method: Connect the output and input of the chiller (external diameter 10mm) to the connector (through joint) on the laser output head in turn, as shown in the figure below (Please notice the chiller is power off during this process).
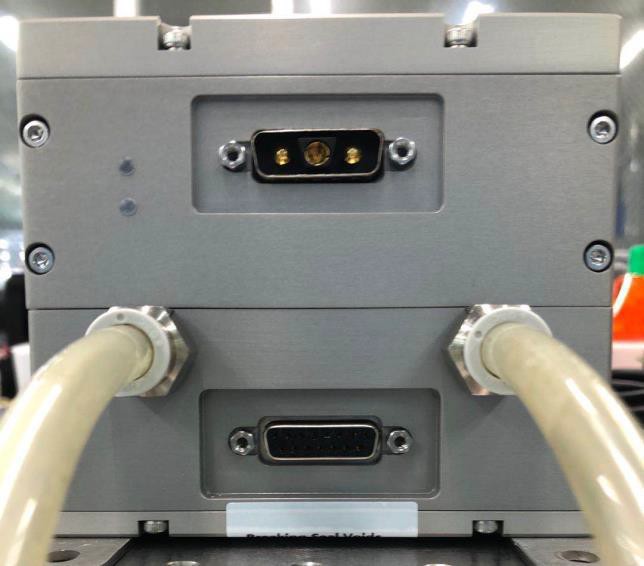

Fig.4 Chiller connection - Power Cord Connection Method: Connect the 3V3 plug to the laser and tighten the screw. The other end is connected to the power supply (+12V) according to the positive and negative marks.
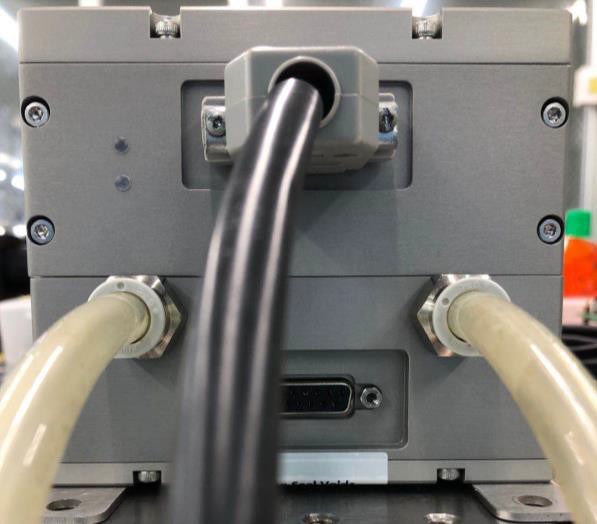

Fig.5 Power supply connection - Control Board Connection: Connect the DB15 signal wires to the laser, tighten the screws, and connect the adapter card at the other end.

- Dismantle the beam expander:


In order to facilitate the use of customers, the 3W ultraviolet integrated laser produced by our company will be presented with a set of beam expander (including 10 x beam expander and one installation sleeve of beam expander) and has been adjusted for customers. If the customer does not need the device, you can disassemble it by yourself, as shown in the following picture.

Remove the screw
Fig.7 Beam expander housing remove
*Notice: Beam expander and installation sleeve are not covered by warranty
Interface and GUI control
Interface Explanation

Fig. 8 Laser interface
*Indicator light
Temperature alarm, when the temperature of LD is abnormal or the water temperature is abnormal, it will light up. Should cut off the power of laser immediately and find the issue.
Red light
When the laser works well, it will show this light.
Yellow light

Table 2 DB15 Pin out
| Pin | Type | Definition | Description | Comment |
| 1,4,5 | Reserve | N/A | N/A | N/A |
| 2, 10 | Ground, Digit | GND | The GND for PIN3 | Return circuit |
| 3 | Output, Digit | ALARM_LED | Alarm signal output | High;Alarm; Low:normal TTL output |
| 6 | Input, Digit | GATE | Laser on | High;Guide beam Low:Laser 5V TTL input |
| 7 | Input, Digit | TRIGGER | Modulation | 5V TTL input |
| 8 | Input, Digit | FPS | First pulse killer | External marking card provide, TTL |
| 9 | Output, Digit | TX_OUT | Conmmand Output | Command |
| 9~13 | Reserve | N/A | N/A | N/A |
| 14~15 | Ground, Digit | GND | The GND for PIN6 / PIN7 / PIN8 | GND extern |
Interface
The function of GUI control is internal debugging and monitoring. All parameters have been debugged before ship out. Customers only need to ensure that the external control signals are properly connected, and can be used easily according to the correct operation.

Figure 11 GUI function explanation
Table 3 GUI function explanation
| No. | Description |
| 1 | GUI software version |
| 2 | Switch button for interface 2 and 3 |
| 3 | Switch button for Chinese and English version |
| 4 | Adjust the pulse width of Q switch, to realize the output power |
| 5 | Adjust the repetition frequency of Q switch, e.g., “30” represents 30 kHz |
| 6 | Adjust the current value of pump (we don’t suggest customer do this), the unit is “***/10”A, e.g., “400” represents 40.0A |
| 7 | Choose Q-switch trigger mode (the default mode is external control) |
| 8 | On: Q-switch trigger model; Off: CW mode |
| 9 | The start for the current of the pump diode |
| 10 | Real-time current for the pump diode |
| 11 | Use time (laser is one) |
| 12 | Start time (available for Lark series ) |
| 13 | Real-time temperature for LD1 |
| 14 | Real-time temperature for LD2 |
| 15 | Real-time temperature for the laser case |
| 16 | Real-time temperature for the power box (available for Lark series) |
| 17 | Real-time temperature for the second harmonic crystal |
| 18 | Real-time temperature for the triple harmonic crystal |
| 19 | The light is on, representing the laser can output now |
| 20 | When the diode is on, the light is on. |
| 21 | When the temperature of LD1 is too high, the light is on and laser won’t work |
| 22 | When the temperature of LD2 is too high, the light is on and laser won’t work |
| 23 | When the temperature of laser case is too high, the light is on and laser won’t work |
| 24 | When there is communication failure of control units in power supply box, the indicator lights on and the laser stops working |
| 25 | When the temperature of power box is too high, the light is on and laser won’t work (available for Lark series) |
| 26 | Clock abnormal indicator. Yellow – abnormal, white – normal |
| 27 | Serial number and the hardware version for this laser |
| 28 | Valid time. Out of the valid time, the LD and Q-switch could not be open |
| 29 | Show real time |
Notice:
No matter whether you use our GUI to control the laser or not, you need to turn on the start button, shown in the following figure, when the connection lines of the laser and the external connection are finished. Otherwise, the Q-switch and pump can not work and the laser will not work either. When you want to turn off the laser, the start button needs to be pressed down again.
Laser control
Control mode
The output control of laser is mainly controlled by GATE signal, and the output frequency and power are controlled by PWM signal, mainly by changing the frequency cycle and duty cycle of PWM.
Duty ratio: the ratio of the high level holding time to the time of the clock cycle in the output PWM signal. For example, if the frequency of a PWM is 50KHZ, then its clock cycle is 20 mu s. If the time of high level is 6 mu s, then the time of low level is 14 mu s, then the duty cycle is 6:20, that is to say, the duty cycle of PWM is 3:10.
At a certain frequency, the ADJUST = 100% corresponds to the high level of the laser PWM signal when it is 1us, which represents the maximum power, the minimum pulse width and the highest peak power at that frequency. Increasing the high level pulse width (i.e. reducing the ADJUST value), the power of the flat rate laser decreases and the optical pulse width increases.
Through the frequency and duty ratio of the PWM signal (the signal driven by Q), the frequency, power and pulse width of the optical pulse can be controlled.
Control timing
When the laser is in the external control mode, it could control the laser output, frequency and PWM (pulse width modulation) by external signal.
In order to control the laser, it needs the correct timing signal for control card. When the laser works, the GATE corresponds to the Laser and the TRIG corresponding to the PWM. Need the following timing.

Fig.12 Control timing
* For the use of different boards, we have made transfer cards. Customers can get the timing required for laser control through transfer cards.
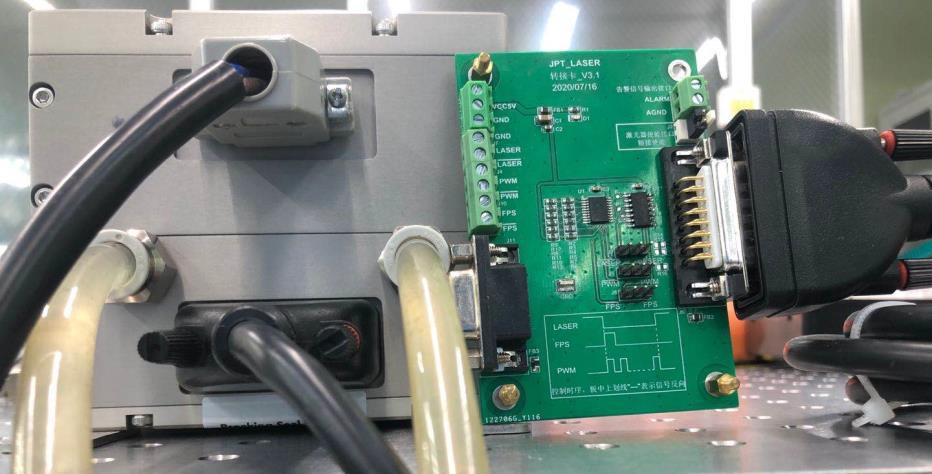
Convert card connection
Connect instruction
① Laser Control Interface of Marking Card Connected by Three Joints on the Left
② The right DB15 plug is connected to the corresponding interface of the laser head. Method:

Fig.13 Convert card
- Convert card VCC +5V to marking control card VCC +5V; convert card GND to marking control card GND.
- “Laser” on convert card means the input laser on signal is the same polarity as the GATE, “-L-a-s-e–r” means the input laser on signal is the converse polarity as the GATE. When the laser on signal to “laser”, use the short cap short circuit PIN2 and PIN3 of J1. When the laser on signal to “-L-a-s-e–r”, use the short cap short circuit PIN1 and PIN2 of J1.
- “PWM” on convert card means the input modulation signal is the same polarity as the TRIG, “ -P-W–M–” means the input modulation signal is the converse polarity as the TRIG. When the modulation signal to “PWM”, use the short cap short circuit PIN2 and PIN3 of J2. When the modulation signal to “P–W–M–”, use the short cap short circuit PIN1 and PIN2 of J2.
- “FPS” on convert card means the input first pulse killer signal is the same polarity as the FPS, “ -F-P-S- ” means the input first pulse killer signal is the converse polarity as the FPS. When the first pulse killer signal to “FPS”, use the short cap short circuit PIN2 and PIN3 of J3. When the first pulse killer signal to “F–P-S-”, use the short cap short circuit PIN1 and PIN2 of J3. When the FPS function is not enabling, please use jumper cap to connect 1,2 pins of J3
Control card connection

Operation
Boot procedure
- Connect chiller with laser water connector, lock tight.
- Turn on chiller and set temperature at 25℃ until it is stable at 25±0.5℃
- Check laser outlook condition. If any particle/sticker blocks output port, please remove it.
- Make sure laser controller and laser head properly connected, check if marking system and laser System been connected properly.
- Switch on 12V DC power supply, turn on the key switch (before operation, we must connect the control card and ensure that the card has been supplied to prevent laser damage). Confirm there is no abnormal indicator, and wait for the laser to get stable then we can use the laser to mark.
*When laser temperature abnormal, the protection will lock the laser, please check if chiller is running or the power cable is connected properly.
Shutdown procedure
1)Stop the processing. 2)Turn off key switch. 3)Turn off power supply. 4)Turn off the chiller.
Caution
- Wear Laser safety glasses all the time;
- Stop marking first, and then turn off the laser.