
Contents
If you’re thinking of building your 3D printer that is both affordable and high quality or you consider buying one and you would like to get more information on the same, you have come to the right place! In this article, we shall list some of the best DIY 3D machines that you can buy and assemble yourself and use in your next project as well as the tips for building your one completely from scratch. You will also get answers on the benefits of assembling your 3D machine as well as the general process you need to follow.
There are many advantages of building 3D printer. By assembling it yourself, you can save a lot of money and ensure that all the components work together perfectly. Additionally, you will have a deeper understanding of how it works, which can come in handy if something goes wrong.
If you are interested in 3D printing and making in general, you have no doubt seen many people build a DIY 3D printer recently. Both the Voron printers, as well as the RatRig Vcore have become immensely popular in recent months. But why? To answer this question, I want to shed some light on what is involved in building one of these open-source printers, based on my own experience of building a Voron 0.1.
Why build your own 3D printer?
Below are the 10 key benefits:
- You’ll save money – A pre-assembled machine can be expensive, but by building it yourself, you can save a lot of money.
- You’ll know how it works – You’ll have a deep understanding of how it works and what each component does. This knowledge could come in handy if something goes wrong.
- You can customize it – If you build your printer, you can customize it to fit your specific needs. This is not possible with a pre-assembled printer.
- It’s more fun – Building something yourself is always more fun than buying it ready-made.
- You’ll learn new skills – Assembling a 3d printer involves a lot of complex tasks, so you’ll learn new skills by doing it.
- It’s a challenge – The entire assembling process is definitely a challenge, but it’s also very rewarding once you’re done.
- Disassembling is Easier: If you can build your 3D printer from the ground up, you can also disassemble it easily. This is important as you can easily do troubleshooting when an issue arises.
- It’s more reliable – When you build your a 3D printer yourself, you can be sure that all the components are compatible and reliable.
- You can make it bigger or smaller – Customization can be done easily. You can make it as big or as small as you want. This is not possible with the pre-assembled one.
- You’ll have a unique printer – No one else will have the same 3D machine as you because you made it yourself. How cool is that?
Building a three-dimensional printer yourself is definitely a rewarding experience, so you should definitely consider building your own!
Having looked at the benefits, we would like now to have a look at the options available for building your 3D printer.
What Options are Available for Building a 3D Printer?
If you’re interested in making a 3D printer, there are two main ways to go about it. You can either create a fully custom one or purchase a kit from one of the top 3D printing companies.
If you choose to go the custom route, you’ll need to source and assemble all of the necessary parts yourself. This can be a challenging and time-consuming process, but it’s also an excellent way to learn about 3D printers and how they work.
If you opt for a kit, on the other hand, you’ll receive everything you need to put together a complete 3D printer, along with step-by-step instructions. This is generally the easier and faster option, but it’s also important to make sure that you select a high-quality kit from a reputable company.
No matter which route you choose, building your a 3D printer is an excellent way to get more involved in the fascinating world of 3D printing.
We are going to discuss each of these two ways in details. Let’s begin with 3D printer kits that you can purchase and build.
7 Best DIY 3D printer kits
When it comes to DIY 3D printer kits, there are a lot of them on the market. But which one is the best DIY kit for you? And which one should you avoid? In this section, we will describe the 7 best DIY printer kits on the market. We will also give you a little bit of information about each kit so that you can make an informed decision before purchasing one.
Creality CR-20

Creality CR-20 Diy 3D printer. Image source: Matterhackers.com
This DIY printer kit is perfect for those who are new to 3d printing. Creality CR-20 comes with clear instructions and you can assemble it easily. Plus, it has a large build volume, making it perfect for larger projects.
Build Volume: 220*220*250mm
Price: $350
Where to buy it from: 3Dprintersonlinestore
Flsun QQ-S

Flsun QQ-S Diy 3D printer Kit. Image source: Youtube
This diy kit is perfect for those who are looking for a high-quality printer without spending a lot of money. It has a large build volume and prints using high-quality filaments.
Build Volume: 255*255*360
Price: $399
Where to buy it from: Amazon
Ender 3 V2

Ender 3 V2. Image source: Top3dshop
Ender 3 V2 is another great diy kit that is perfect for those who are new to diy printing. Ender 3V2 is also easy to assemble and it doesn’t take much time to get machine running.
Build Volume: 220*220*250
Price: $279
Where to Buy it from: Amazon
Tevo Tarantula

Tarantula Diy 3D printer kit. Image source: All3dp
If you are looking for a diy kit that is portable, then the Tevo Tarantula might be the perfect choice for you. This diy kit prints using PLA filaments and has a small footprint, making it perfect for those who want to take their printer with them on the go.
Build Volume: 200*200*280
Price: $220
Where to buy it from: Tevousa
Tronxy X5SA Pro 3D Printer

Tronxy X5SA Pro. Image source: All3dp
This huge 3D printer offers a lot of space to work with. The Tronxy X5SA Pro is a great choice for those who need a large build volume for their projects.
Build Volume: It comes with a generous build area of 330x330x400mm
Price: $399
Where to Buy from: Amazon
Prusa Mini+ diy kit.

Prusa Mini+ Diy 3d printer kit. Image source:Prusaknowledgebase
This diy kit is perfect for those who are looking for a high-quality printer without spending a lot of money. It prints using high-quality filaments and has a large build volume.
Build Volume: 250*210*210
Price: $349
Where to buy it from: Prusa3d Website
Creality Ender 5

Creality Ender 5 3D printer. Image source:3djake
If you’re looking for a large format diy 3D printer that’s easy to set up and use, the Creality Ender 5 is a great option. It’s a reliable machine that produces high-quality prints, and it’s very affordable.
The Ender 5 is a great choice for anyone who wants to print large objects or multiple objects.
Build Volume: 220*220*300
Price: $349
Where to buy it from: Creality Website.
So, which diy printer kit is right for you? Because there are a different kinds available in the market, it can be tough to decide. But with this list, we hope to make the decision a little bit easier for you.
Having looked at the best diy 3D printer kits, let’s now have a look at the plans for building a 3D printer from scratch.
DIY 3D Printer Plans: Key Steps
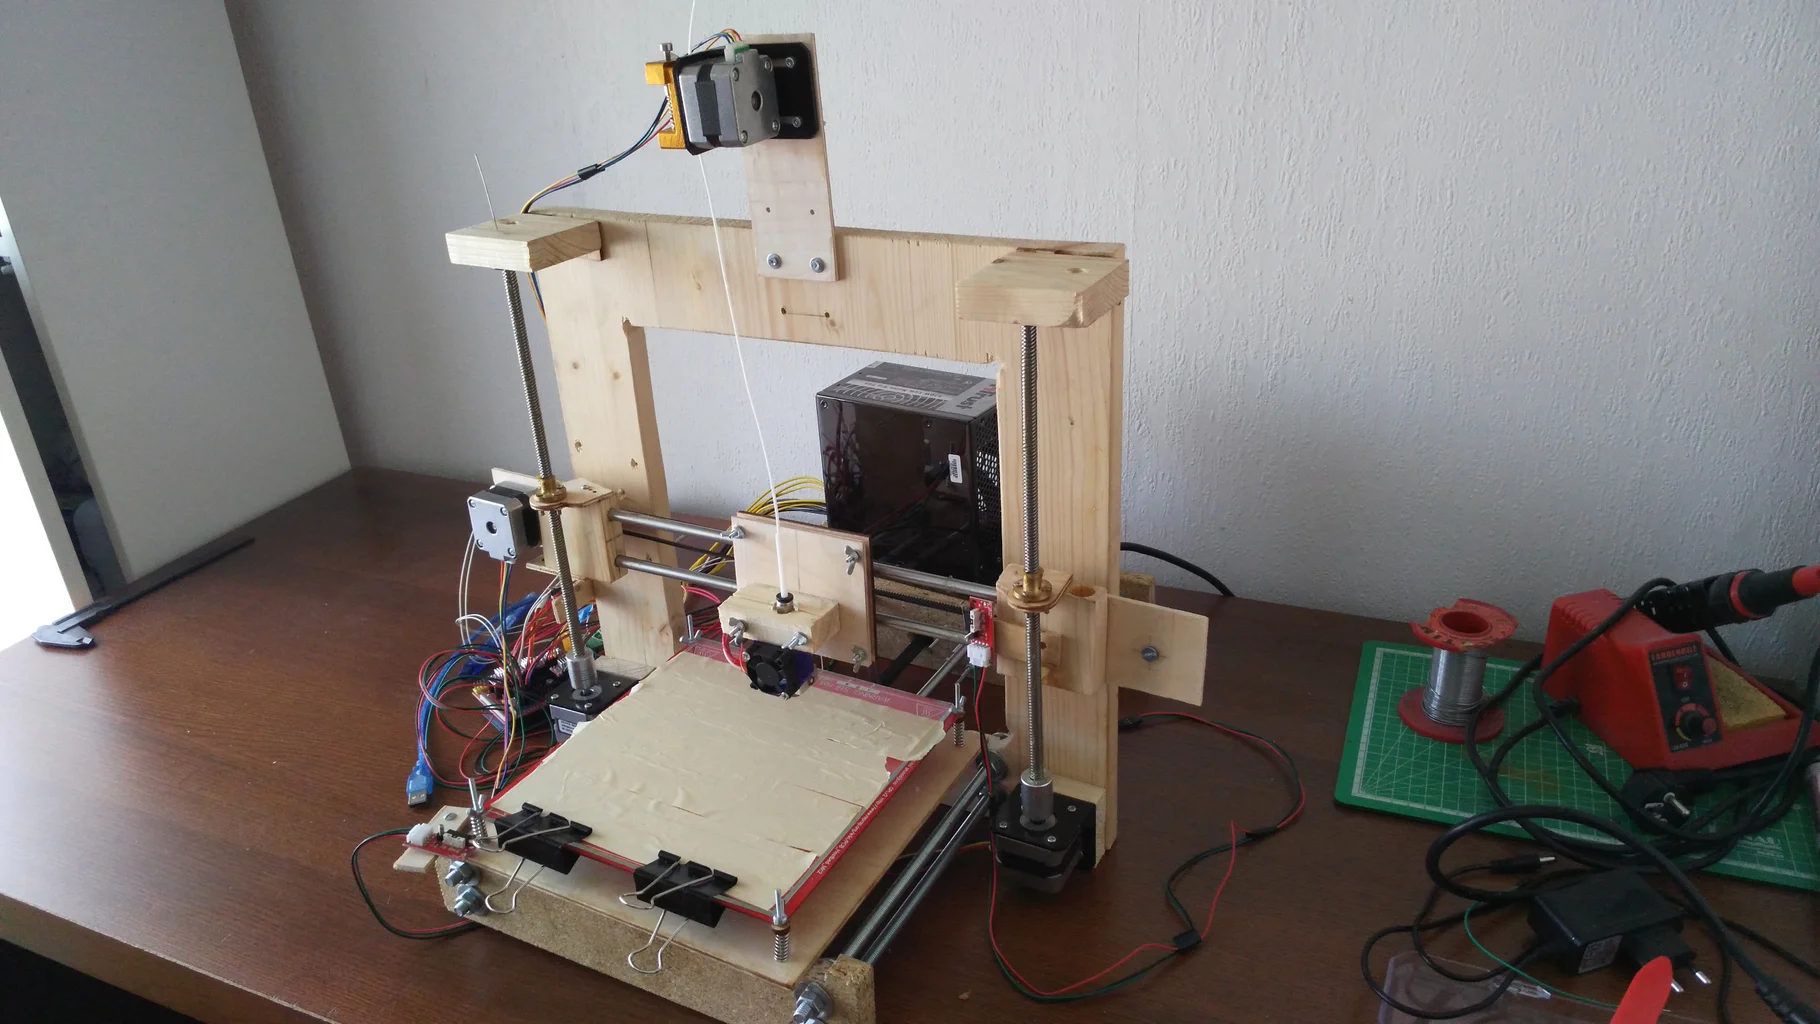
DIY 3D printer. Image source: Instructables
Building a DIY printer can be a very rewarding experience. In this section, we are outlining the key steps for planning and building a 3D printer yourself.
Step One: Look for the Parts
Once you have decided to build your 3D printer and you have noted the specifications, the first step is to gather the required parts. But you need to know that if you are building using the kits described above, you don’t need to worry as all the required parts are included in the kit. But if you are building it completely from scratch, you need to look for the parts.
Extruder

The most expensive part of a 3D printer is typically the extruder. It is responsible for melting and pushing out the filament. It can cost anywhere from $100 to $1000 depending on the nature of the 3D printer you are building.
3D Printer Frame

Sample 3d printer frame. Image source: All3dp
This can be made from aluminum extrusion, wood, or acrylic. The price will range from $50 to $200.
Stepper Motors

3D printer Stepper motor. Image source:Tomostudio.com
These drive the movement of the print head and bed. Prices start at around $10 per motor.
Print Bed

3D printer bed illustration. Image source:3dprintforums.com
This is the surface that the object is printed on. Prices start at around $50.
Electronics

3d printer electronics. Image source:Pibot.com
This includes the controller board, power supply, screws, LCD Screen, and cables. Prices start at around $200
This includes the controller board, LCD Screen, power supply, screws, and cables. Prices start at around $200
Filament

3D printer filament. Image source: 3dnatives
3D printer filament is the material that is used to print objects. Prices start at around $20 per kg.
The total cost of all these parts would be around $600, not including the cost of shipping. However, you can often find complete 3D printer kits for less than this price. Additionally, many companies offer discounts if you purchase multiple parts together. Below are the websites where you can get the above parts.
Another way you can get your parts is by 3d printing them. If you already have a 3D printer and you are good at 3D modeling, you can use 3D modeling software to create the parts, slice them, and 3D print them. If you are not good at 3D designing, you can find STL files for most 3D printers on the internet where you can download and 3D print them. You can get most of these files on 3d model databases like Thingiverse, Myminifactory, Cults3d, etc. Below are some of the parts that you can download and 3D print.
Frame brace for Anet A8

This Anet A8 frame was designed and 3D printed using Acrylic material. More than 98 people have downloaded this file and 3D printed it. You can download it on Thingiverse.
Prusa i3 Bear Upgrade v2.0

Another interesting 3d printed part that is compatible with Prusa MK2s, MK2, MK2.5, AND MK3. At Least 100 people have 3d printed this design. You can download it on Thingiverse.
X-Axis and Bear Extruder

An interesting X-axis and better extruder for Prusa i3. Though its original purpose was for improving the 3D printing quality of the Prusa machines and also to make it easier to maintain, you can also print it and use it when building your 3D printer. You can get it in Thingiverse.
It is also important to note that not all parts can be 3D printed. You will always need to buy some other items. Below is a sample of a 3D printed 3D printer.

A section of a 3D printed 3d printer. Image source: All3dp.com
Here are a few things to keep in mind when printing parts:
- Make sure to use the correct dimensions.
- Have enough filament
- Use supports where necessary, and adjust the print settings according to the type of filament you are using.
Once you have all the parts with you, it’s time to assemble them.
Step 2: Assembling Your 3D Printer
https://vorondesign.com/voron0.1 – Official documentation and printable files.
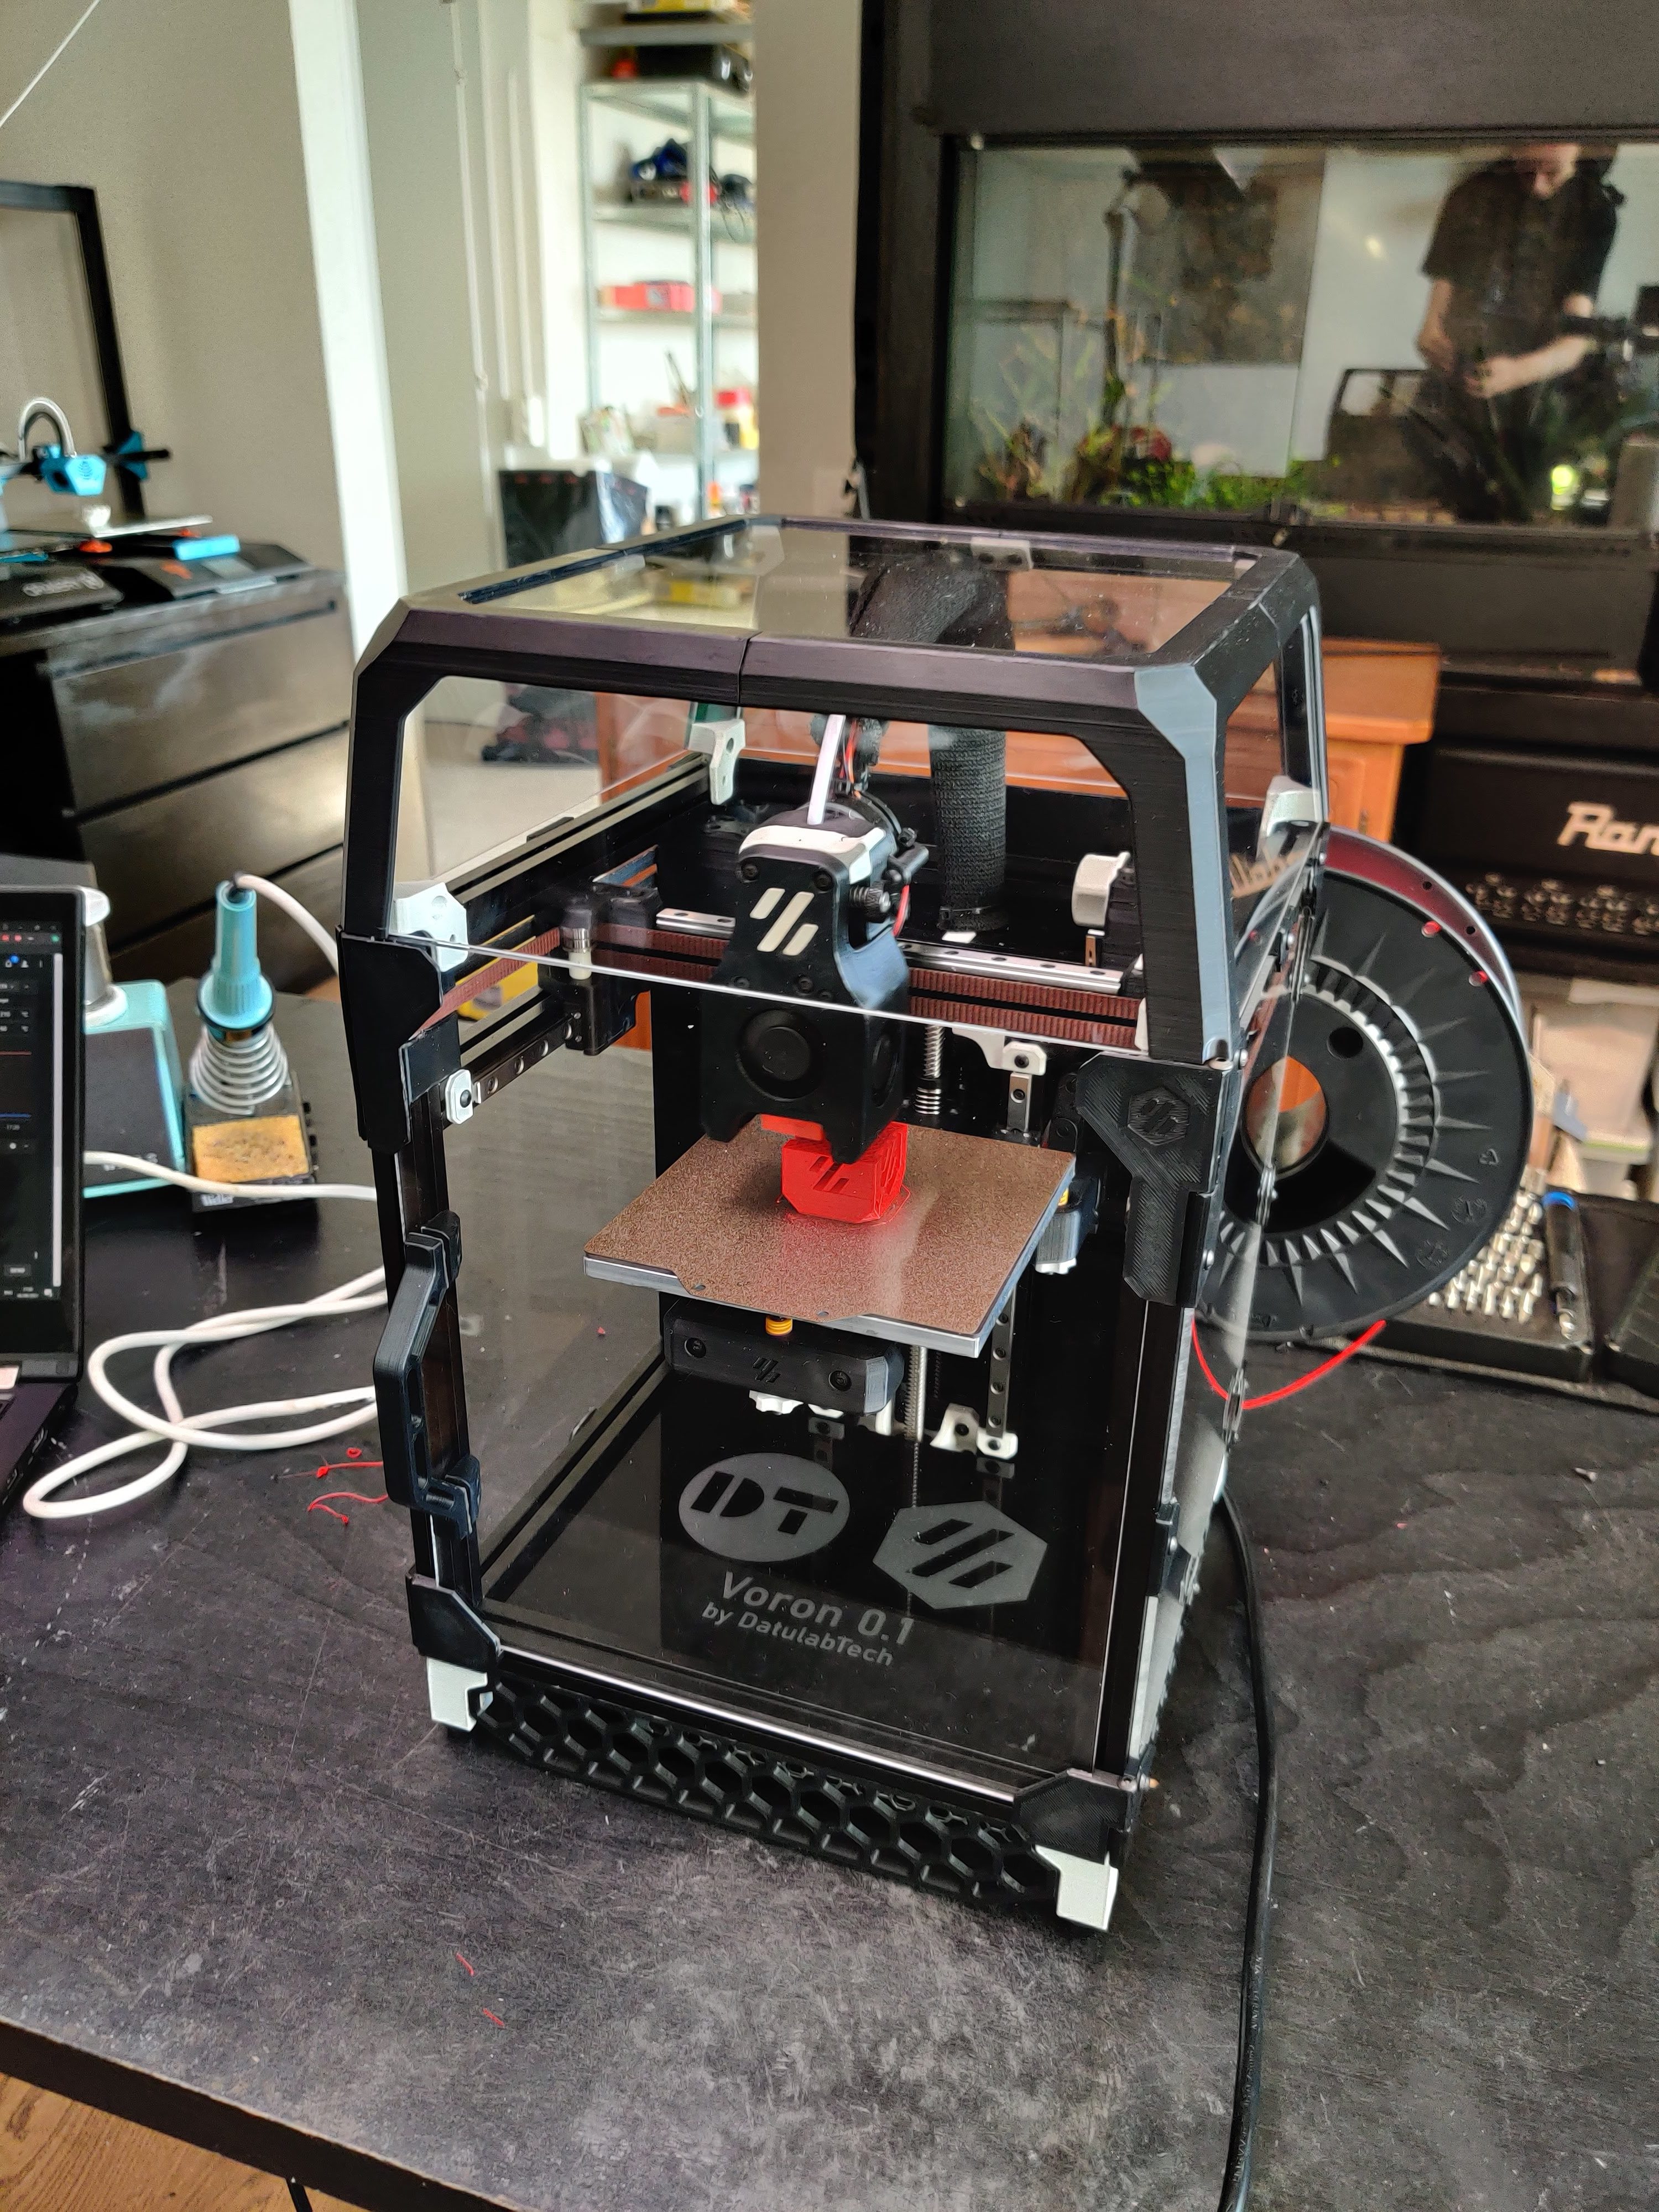
This can be a bit tricky, so take your time and make sure everything fits together correctly. Below is the general process of assembling. The 3D printer that we are going to use as an example is Voron 0.1. You might be wondering, why did we choose this 3D machine?
Voron 0.1 is a 3D printer that you can build yourself. It’s made from open-source parts and it’s a great way to get into 3D printing without spending a lot of money. Voron 0.1 is also very easy to assemble, so you don’t need any prior experience.
Detailed assembly manual>>>>>>
 Loading...
Why the Voron 0.1?
While the Voron 2.4 is probably the most popular model out of their lineup thanks to having a very striking design and an uncompromising feature list, the V0.1 also has its perks.

It crams all the benefits of a CoreXY system in a package that will comfortably fit next to you on your desk. While the relatively small build volume of only 120mm cubed might turn some people away, for most this is large enough for 95% of prints.
The small form factor also has some other benefits apart from looking super cute. Compared to the other Voron printers, the bill of materials for the V0.1 comes out to be quite a bit cheaper, simply due to less material being required. It is also super convenient to be able to just pick up the printer with one hand and flip it over to work on the backside. This, of course, also comes with the matching downside, as everything about this printer is super tiny, so if you don’t like working with small and fiddly components, you might be better off with one of the larger designs.
Advantages of Voron 0.1 Over other 3D printers
- It is very easy to put together and the instructions are very clear.
- It is much cheaper than other DIY printers on the market, which makes it a great option for people who are just starting out in the world of printing.
- Voron has a large build area, which makes it perfect for printing large objects.
- It is very stable and prints accurately, making it a great choice for people who are looking for a high-quality printer.
- Voron is also very reliable and has a low failure rate, making it a great choice for people who are looking for a printer that will last.
Enough of Voron 0.1! Let’s now have a look at the steps to follow when assembling your 3D printer.
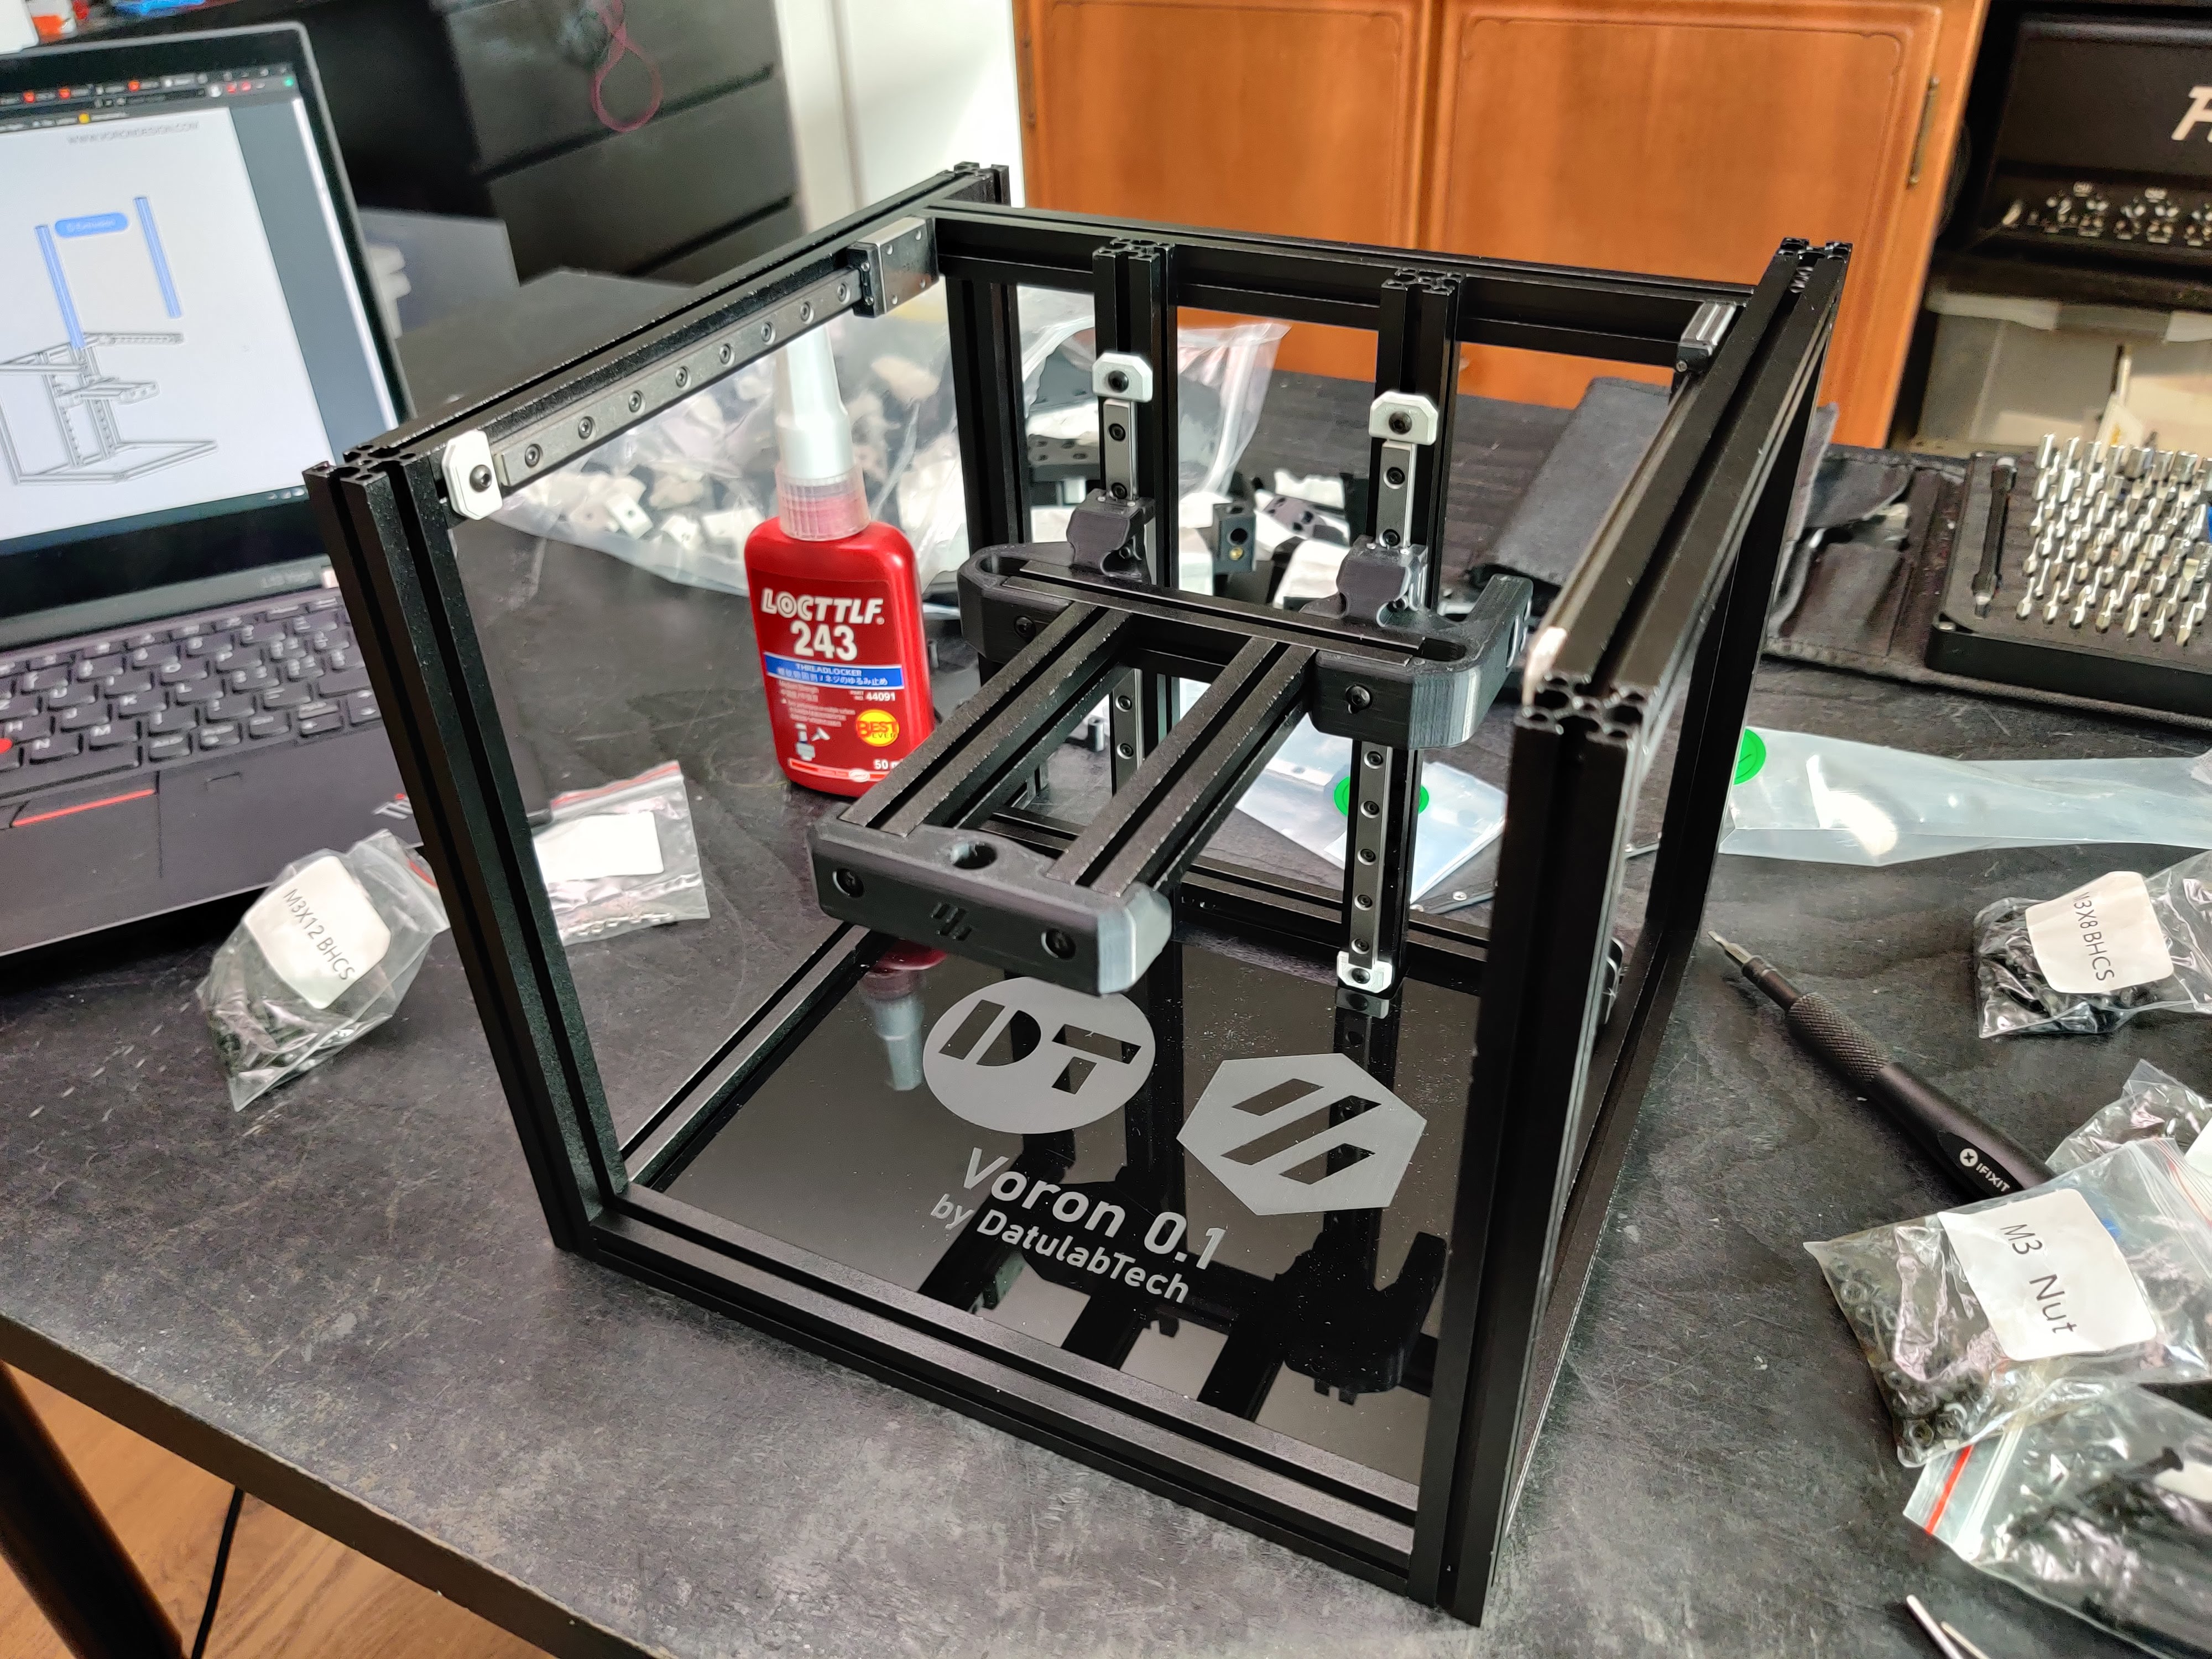
The detailed assembly manual of the Voron 3D printers is one of their big strengths that almost makes them more of a kit printer than a DIY machine. Not only do you get the 3d model with every nut and bolt modeled exactly where it should be, there is a step-by-step illustrated manual for the mechanical assembly.
You do have to be careful though to read every detail and follow the instructions precisely, as no annotation is there by chance. Forgetting to insert a nut into an extrusion might not seem like a big deal at the moment, but three hours later you have to take apart dozens of screws to be able to put that nut in. With everything going smoothly, assembling a V0.1 will take around 10 to 15 hours, depending on your experience with building 3d printers.
a) Assemble the frame of the 3D printer.
Printing the Parts
The first step in actually building a Voron is to print all the plastic parts required. This means that you already need to have a 3d printer before getting started. And while that might seem like somewhat of a flaw, you don’t need a super expensive printer to be able to print the parts.
Having some 3d printing experience before jumping headfirst into a DIY adventure is certainly also not a bad idea. If you still would like to build a Voron as your first printer or have trouble printing the parts, there is the “print it forward” program, where other Voron users print all the parts required to get up and running for a very fair price.
The only catch is that due to high demand there is a bit of a queue at the moment. Another option would be to have the parts printed by a print service or to get one of the sets popping up on Aliexpress.
However, there you should make sure they are of good quality and use the appropriate print settings and material recommended by Voron design. And speaking of material, since all Voron printers are designed to be enclosed, the parts need to be printed with a material that can withstand high temperatures. The recommended filament is ABS or ASA, but there are also people having success with reinforced Nylon or Polycarbonate. PETG and PLA have too low of a melting point and will not work.
This will involve joining together the various parts of the frame using screws, nuts, and bolts as shown below.

b) Assemble the X-axis carriage.

This will involve attaching the X-axis lead screw to the carriage, as well as attaching the X-axis stepper motor to the carriage. You will use the guides to position the rail in the center before fasting the screws.
c) Assemble the Z-axis gantry.
This will involve attaching the Z-axis lead screw to the gantry, as well as attaching the Z-axis stepper motor to the gantry as shown below.

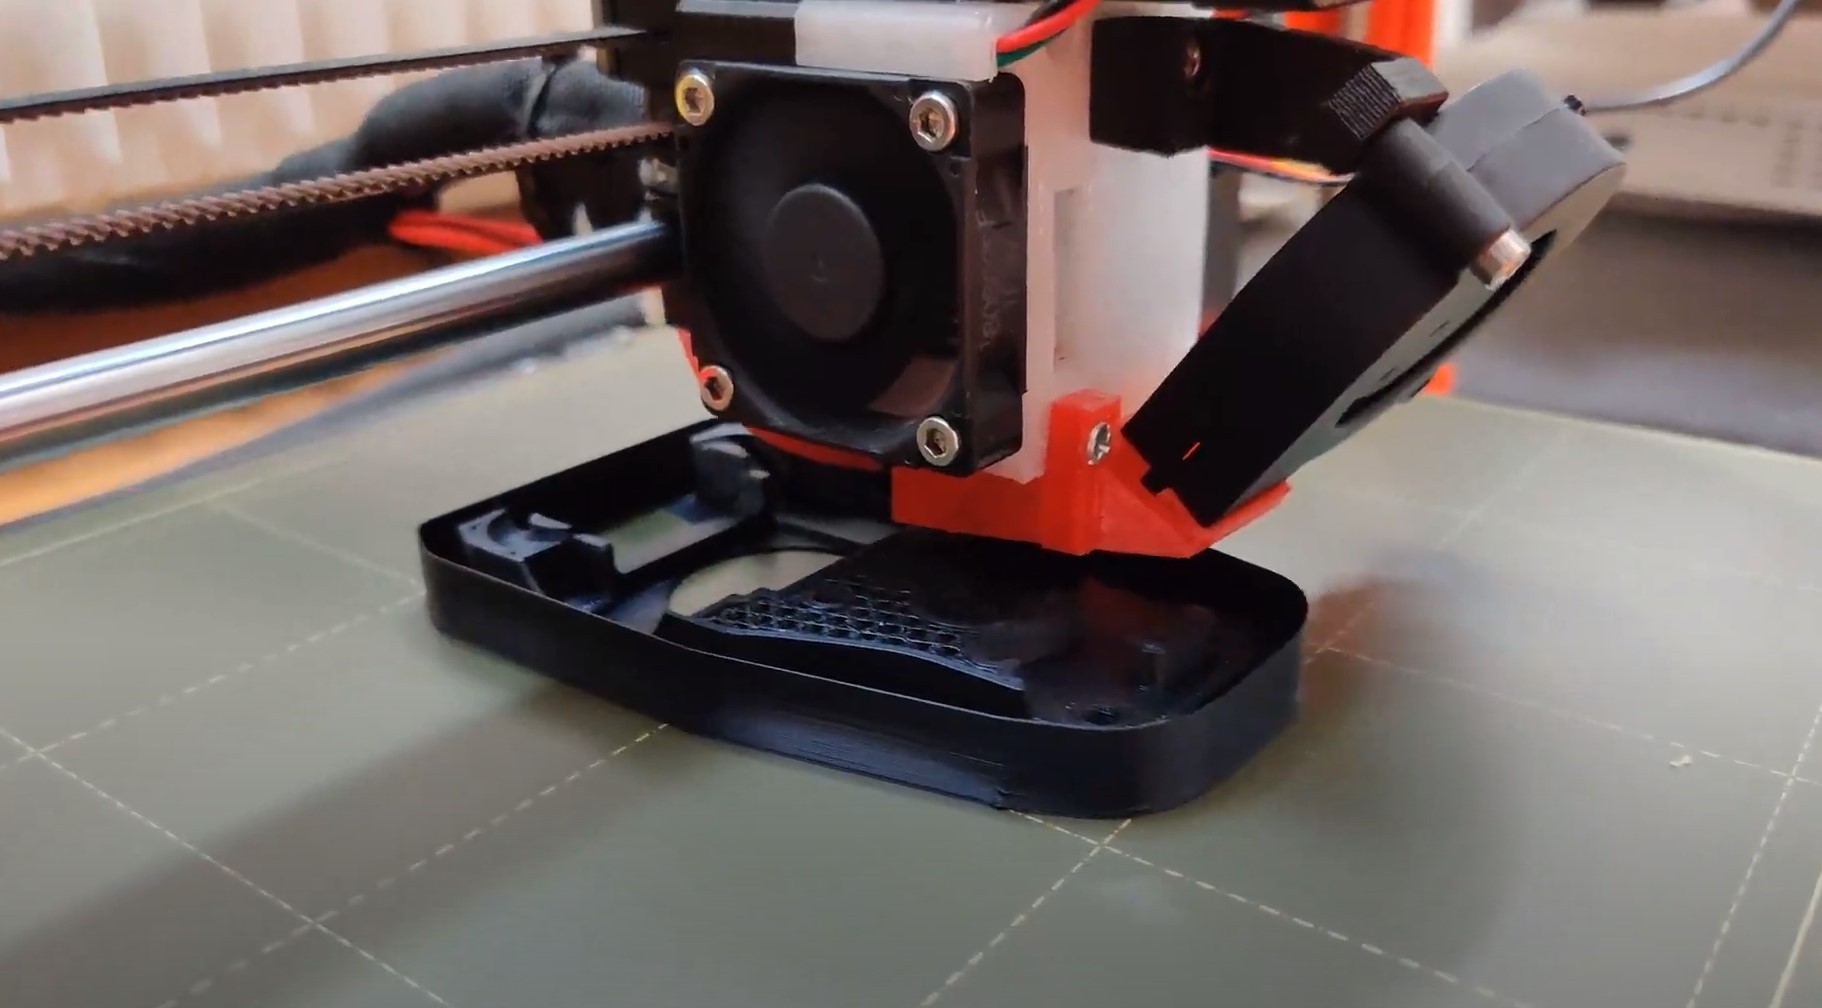
d) Attach the extruder assembly to the X-axis carriage.

Attaching extruder to Voron. Image source: 3DMixers.com
Using the M3x10mm screws, attach the extruder assembly to the X-axis carriage as shown above. Be sure to use the longer screws in the front and back holes, and the shorter screws in the middle holes
e) Attach the hot end assembly to the extruder assembly.
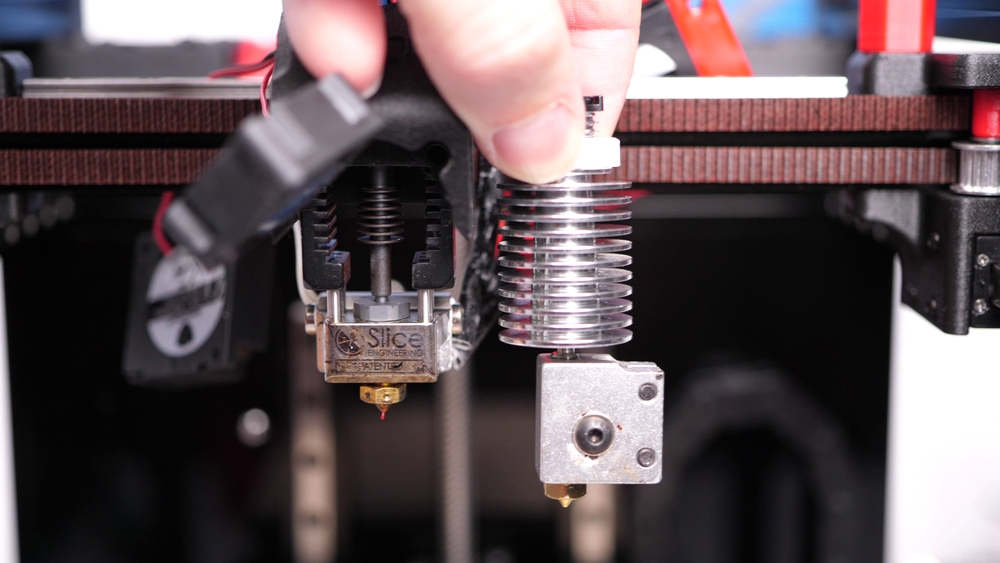
Attaching the hot end in the extruder. Image source: CNC kitchen
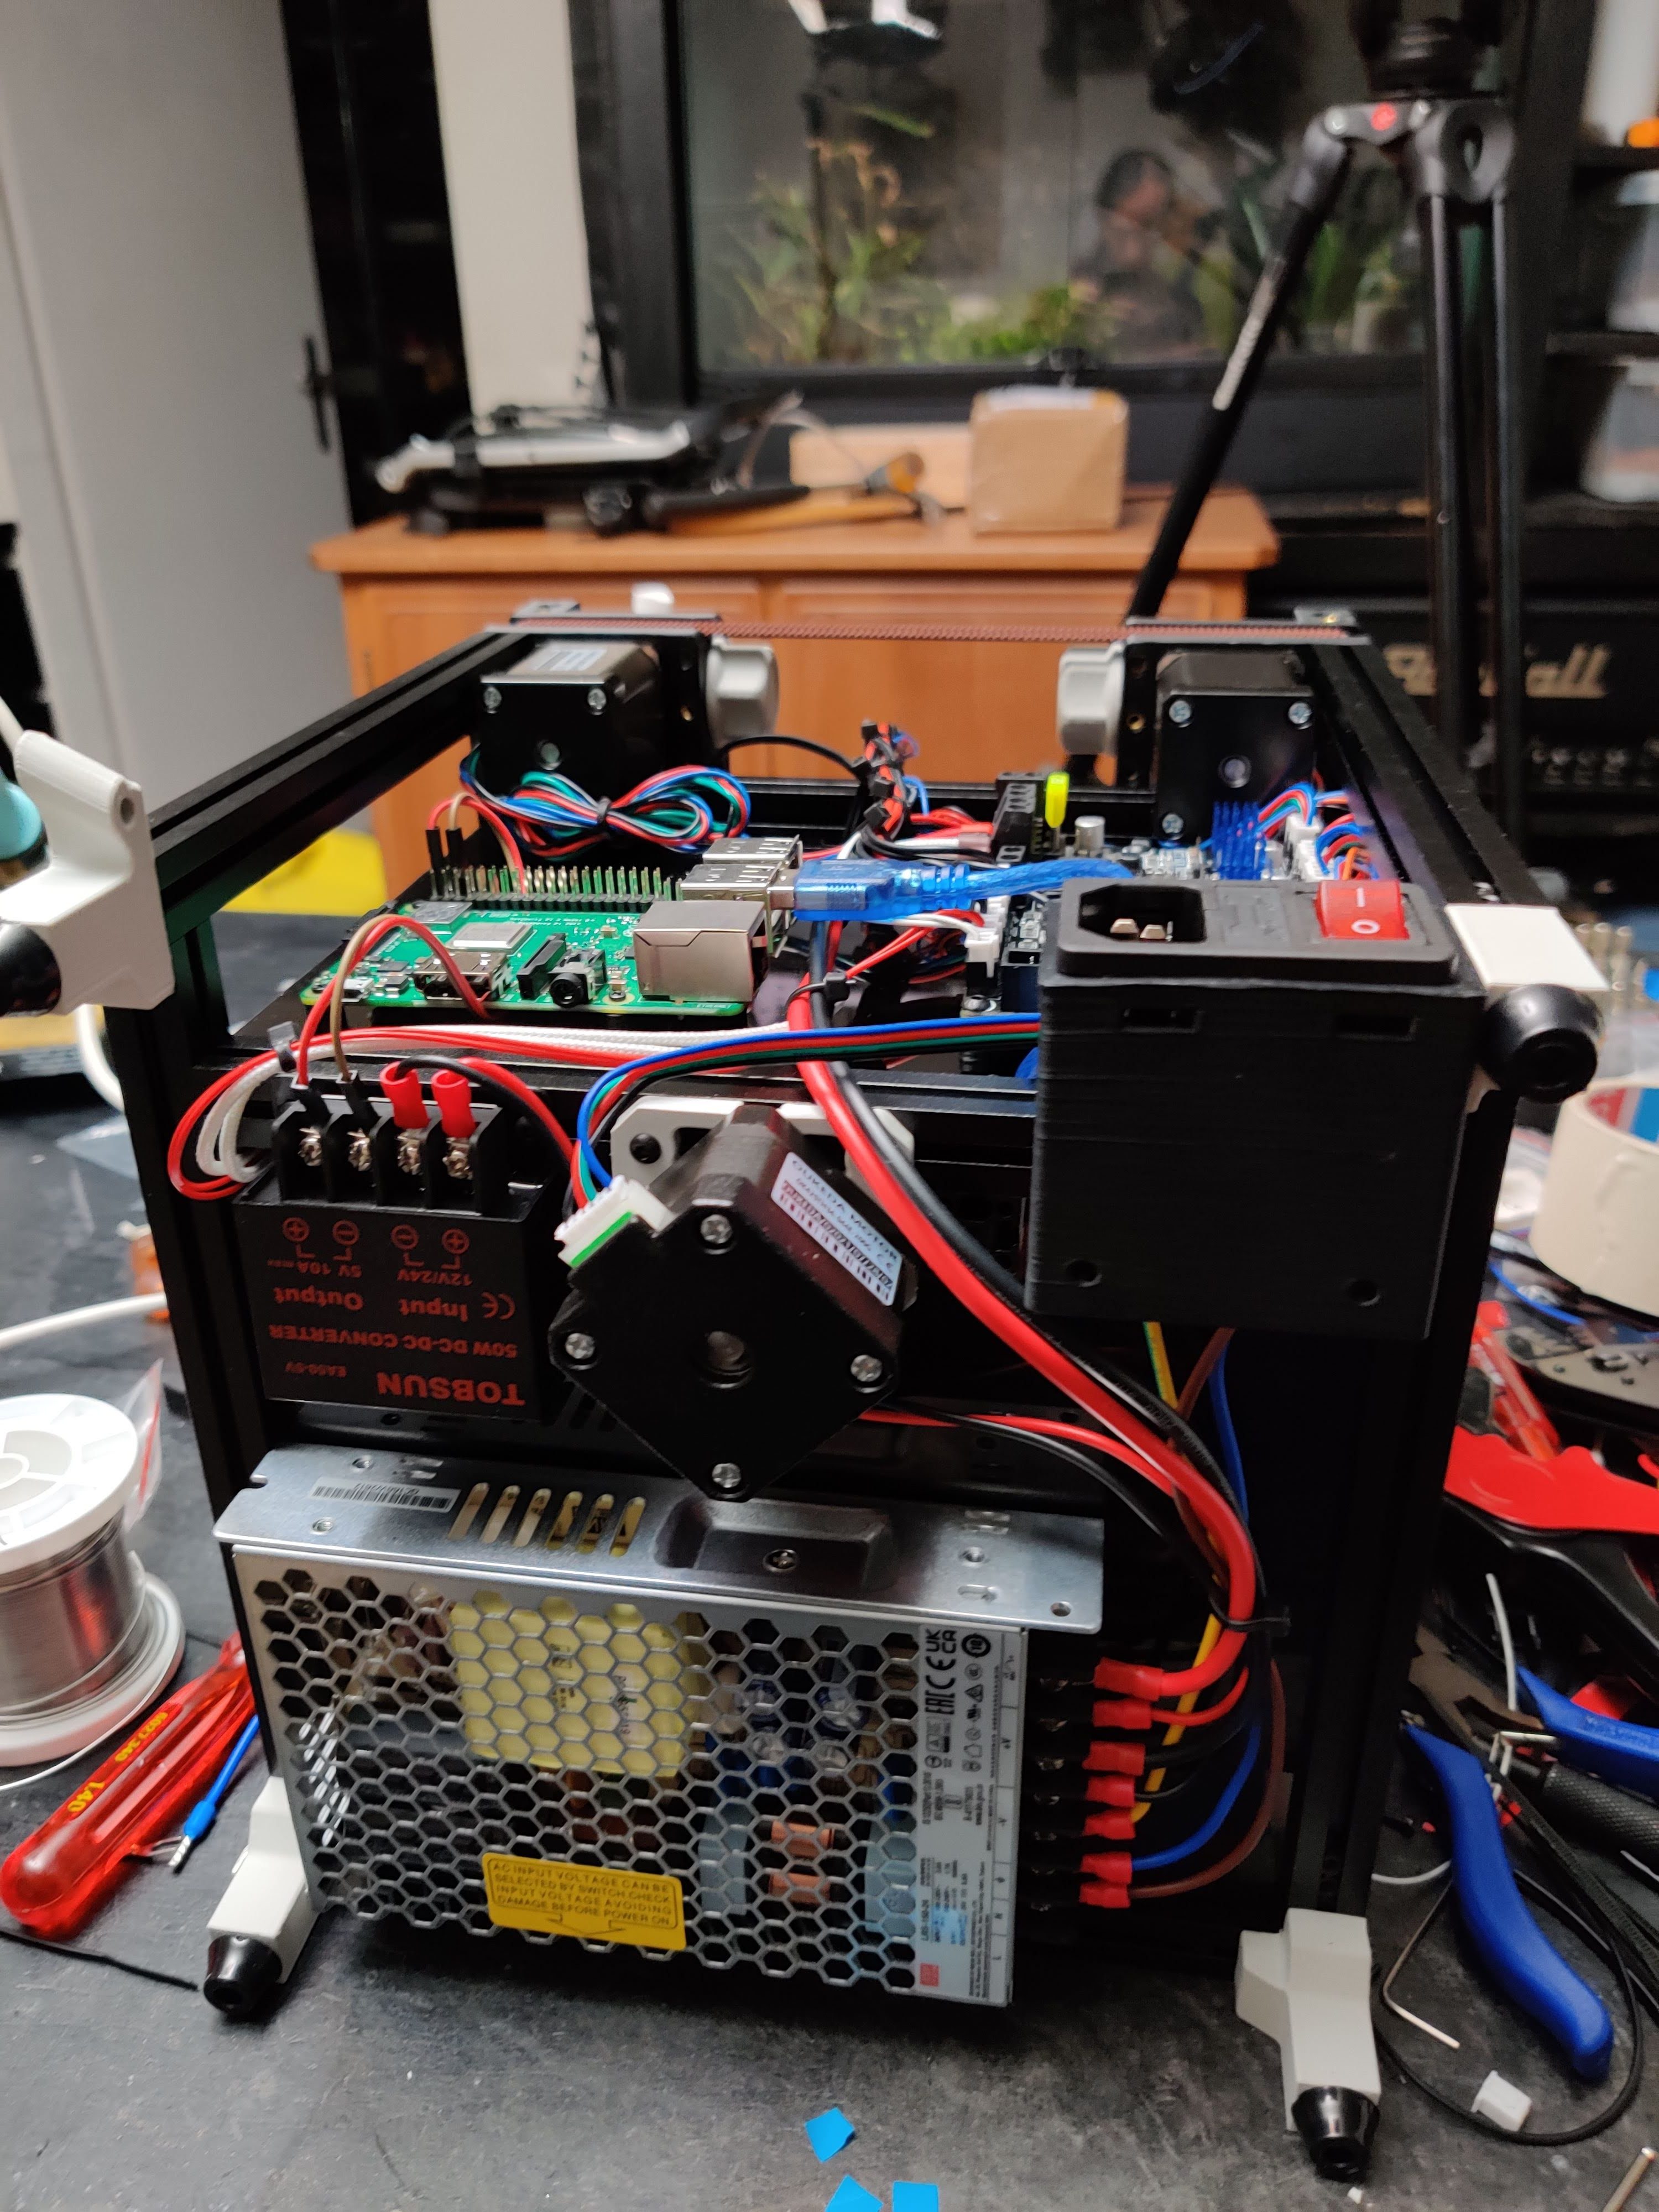
f) Connect the Control Board, LCD Screen, and Power Source
Next, we’ll need to connect the control board, LCD screen, and power supply. First, take the control board and insert it into the connector on the back of the LCD screen. Make sure that the pins on the control board are lined up with the holes on the LCD screen, then gently push the controlboard. Then you will place the power supply.
g) Connect all of the cables from the various components to the controller board.
When connecting wires it is important to take precautions to prevent damage or harm to yourself. Always double-check where each is supposed to go. Make sure all connections are secure and insulated properly before powering on.
Below is the placement order for wires in the Voron 0.1. Make sure that you follow that order.
Also, ensure that you secure your wires with a guard cover and cable clips. The wires connecting the controller board should also be 1mm square or larger. Below shows the complete wiring structure for the Voron 3D printer.

3) Firmware Configuration
Next, you will need to configure the firmware. This can be a bit daunting for first-time users, but there are plenty of resources available online. Be sure to read the instructions carefully and follow the steps outlined.
The firmware tells the 3D printer what type of filament to use, how much to extrude and other important settings. There is a lot of firmware available, and one of them is Marlin. It can be configured using a text editor like Notepad or TextEdit. The configuration file is called marlin.h and is located in the same directory as your firmware binary file (.bin). Open the file and look for these settings:
- Thermal Settings: These settings tell the firmware which thermistors to use for the hotend and bed. You can find the correct values online if you are building from scratch or in the manual if you bought the kit. If you’re not sure, you can leave them commented out and they will be automatically detected by the firmware.
- Movement Settings: These settings set the maximum positions for the printer.
- Delta size settings: control how far each axis can move relative to its home position. Larger values will give more precision, but will also increase the print time.
- Stepper Settings: These settings configure the firmware’s stepper drivers: The steps per mm setting determines how many steps the printer takes to move a certain distance. The default max and min feedrates determine how fast the printer can move in either direction. These values may need to be adjusted depending on your printer and material.
- Thermistor settings: These settings tell the firmware which temperature sensor to use. The first line sets the hotend sensor, and the second line sets the bed sensor.
4) Software Configuration
The software controls the movement of the printer and sends commands to the firmware. The most popular software for 3D printing is called Repetier-Host.
This software is open-source and free to download. Once you have downloaded and installed it, open it up and look for these settings:
- Connection type: Select “Serial”
- Baud rate: Set this to 115200
- Device: Set this to the COM port of your printer
- Printing speed: 50 mm/s
- Max feedrate: 4000 mm/s
- Acceleration: 3000 mm/s/s
These settings will give you the best results. You can play with them to find what works best for you. Once you have configured the software, save and close it. Then the next step will be to do a test 3D print.
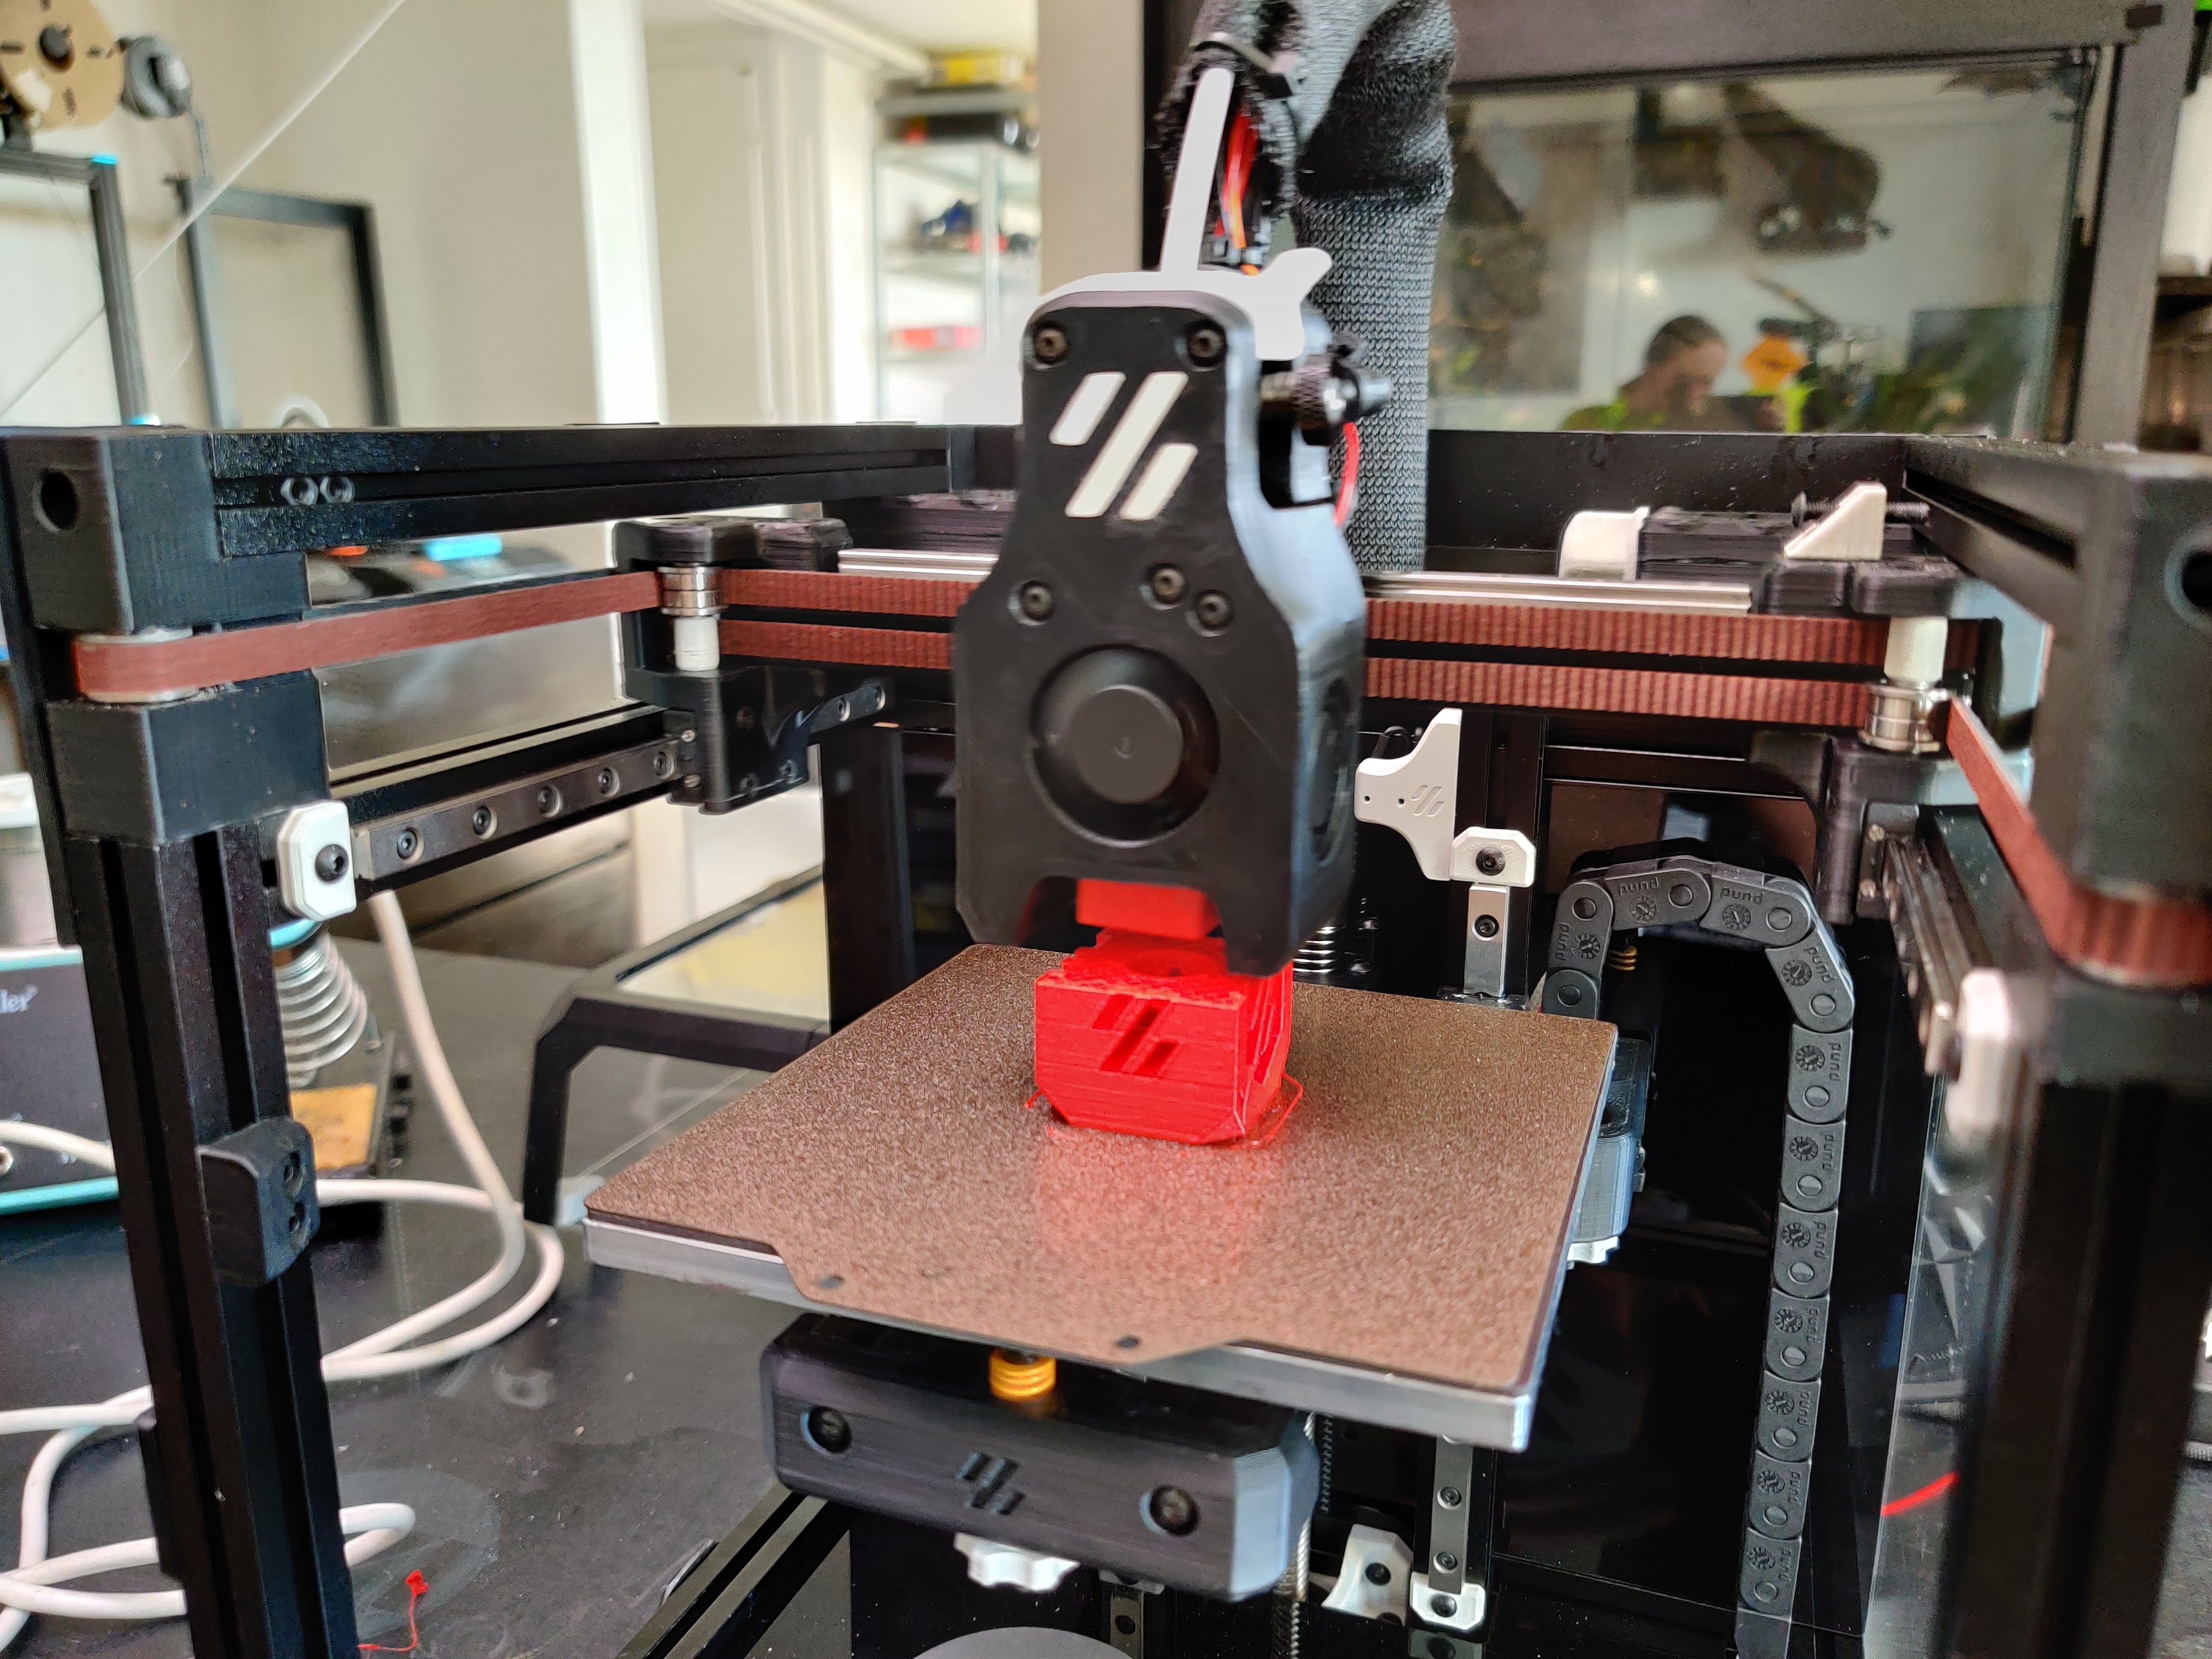
Test Results
We finally made it to the finish line, so how does it print? Even before any tuning, the print results were very impressive. It was after setting up pressure advance though, that it really came together. This printer can produce essentially perfect prints and that at an incredible speed. For PLA and ABS, the base speed of my “every day” profile is 150mm/s, which compared to the 60-70mm/s that are common on budget printers is more than twice as fast. Added to that the accelerations you can achieve without artifacts are around 5 times greater. This means that especially small details, where the printer doesn’t have time to reach its maximum speed, are printed a lot faster.
Trying to print as fast as possible without focusing on quality, I was able to reach a print speed of around 500mm/s in vase mode. The main limiting factor at this point is how quickly your hotend can melt the plastic. Naturally, an attempt at a speed Benchy was also in order, and after some tweaking, I was able to successfully print a regulation Benchy in only 9:48min. This is not quite a record, but keeping in mind that on most regular printers a Benchy will take one to two hours, this is very impressive.
Thanks to the enclosure, printing more advanced materials like ABS and even Nylon or Polycarbonate also becomes a possibility. You won’t be printing PEEK or Ultem on your plastic 3D printer any time soon, but that is no big surprise, considering they ideally need an ambient temperature of close to 200 degrees celsius. Continuing with consumer plastics, PLA, PETG, and also flexibles are no problem, you just might want to keep the door open and possibly even remove the top to make sure they can cool down fast enough.
First test
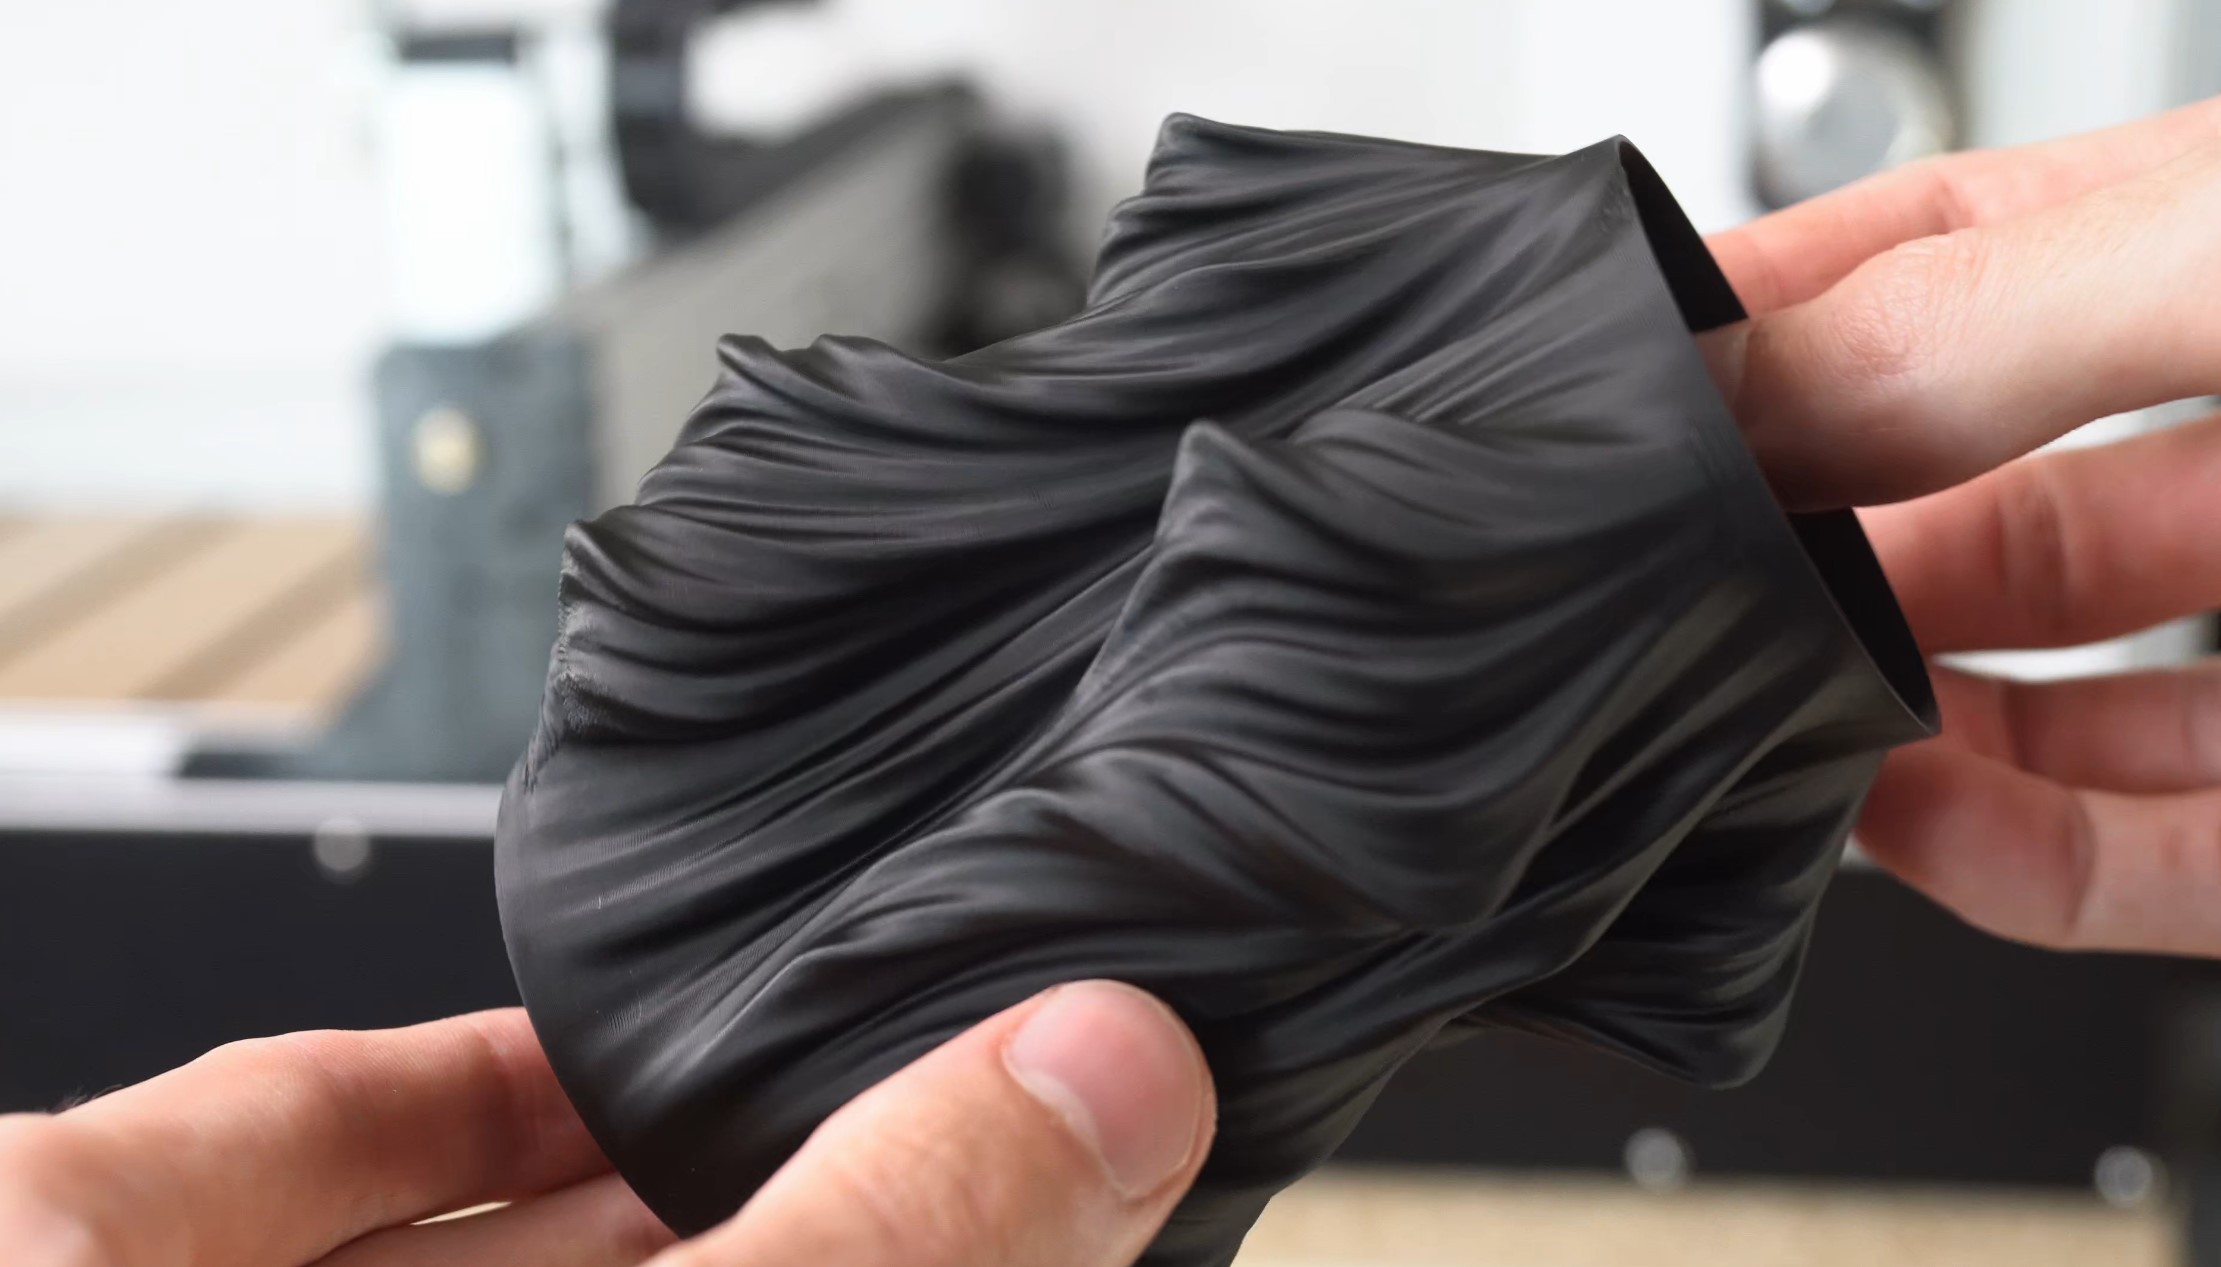
Now that you have built your shiny new 3D printer, it’s important to test it before starting to print your masterpiece. There are a few things you can do to test it and make sure it is working properly. One simple way is to print a small 3D object or part. This will help you determine if it’s printing correctly and if the correct settings were used.
You can also use this opportunity to test the quality of the print. A common file that is usually used by many 3D printing hobbyists is a 3D benchy. In addition to a 3D bency, you can also use other models like the calibration cube.

Additionally, you can test the speed and functionality of your machine by printing a file that includes multiple objects. This will help you determine iF it is able to handle multiple tasks at once and if it is printing at the correct speed.
You might be wondering, how can one start printing a file? A 3D printer usually understands a file called G-Code. This g-code file is created using 3D slicing software.
How Does a 3D Slicing Software Work?
A slicer “slices” the model into thin layers and generates G-code, which is a language that tells the 3D printer how to move and extrude material. Most slicers have a user interface that allows you to view and adjust settings such as layer height, infill, support structures, etc as shown in the slicer of SelfCAD below.

Once you’re happy with the settings, you can hit the “slice” button and the slicer will do its job.
The output from the slicer is usually a file with a .gcode extension. This file can be transferred using a USB, SD card, or over a network connection. When the 3D printer receives the file, it will follow the instructions in the G-code to produce the model.
There are many different slicers available, but some of the most popular ones are Cura, Simplify3D, and Slic3r. Each slicer has its own strengths and weaknesses.
The third method of testing is by checking the calibration. This involves making sure that the 3D printer is correctly aligned with the bed and that all of the parts are in place. You can use a caliper or ruler to measure different parts to ensure there is accuracy.
By doing the testing before starting to print, you can avoid any potential problems and ensure that your prints come out looking great.
Conclusion
Congratulations! You’ve just built your very own DIY printer and even learned how to customize the firmware as well as the software! There are a million different things you can do to customize it, so have fun experimenting. And be sure to share your creations with us on social media. We can’t wait to see what you come up with.