
All you need to know about how to earn money on 3D printing!
Whether you pick up your first 3D printer as the start of a curious hobby, or because you want to integrate it into your next big business idea, sooner or later most of us have the same thought: how can I use the 3D printer to make money? I was no different. I bought my first 3D printer because the concept of a machine that could fit on a desktop and make things intrigued me. I didn’t really have any idea what I would make with it, but I knew that as the technology advanced, I wanted to be along for the ride. It took a little over a year of printing models and learning lessons (most of them the hard way) before I asked myself that same question… Can I use this printer to make some extra money? Sure, there had to be a way, but how? Take a few minutes from your busy day and I’ll walk you through the steps I used to take my weekend hobby and turn it into a business that actually makes money.
Before we start, it is important to note that the laws and regulations around starting a business and selling items for a profit will vary from one location to another. Make sure you research your local laws and regulations, and take any necessary steps prior to starting your business or making a sale.
It is also important to note that this is not an advertisement for any products or manufacturers outside Endurance Lasers. The products and companies discussed below are products and equipment I have purchased for personal and business use, and everything written is based on my first-hand experience with them. I cannot guarantee your results with these products will be the same as mine.
About The Author
When I decided to write this article, I had the intention of doing so like any other. I thought I would write a simple how-to, complete with as much information as I could fit. As I thought about it, though, I realized that this was an article that could genuinely impact people’s financial wellbeing. With the financial struggle many face today, it seems more important to try to help people out than ever. As such, I decided to pull back the curtain a bit and become my own example. So, who am I, and what makes me qualified to write on this subject? My name is Mike Schuch. I’ve spent the better part of the last decade working as a machinist that specializes in research and development. My career has taken me through the defense and automotive industries, landing me in the tool and die industry today. About four years ago, I picked up my first 3D printer. It was a cheap printer I ordered direct from China for around $200 after upgrades. I was enthralled with the idea of 3D printing technology, but even still, that printer sat in my garage for a year and a half just collecting dust.
At the year and a half mark, I had some free time, so I decided to pull it out, dust it off, and give printing a shot. I had some test prints that came out great, I had a lot of prints fail, but I was determined to figure it out. I learned most of what I know about 3D printing today the hard way, one mistake at a time. Fortunately, it wasn’t for nothing. I am currently in the process of creating the additive manufacturing division of the machine shop I work for, and in my spare time, I do private contracting for companies and individuals alike. This covers everything from 3D modeling and blueprint making to reverse engineering and rapid prototyping. The one thing I didn’t expect, though, was just how much 3D printing would take over my world. It transformed from something that was just a hobby I barely entertained to something I use to make money for my family, and to help the company I work for build and grow. As I said above, I started out with one of the cheapest printers I could find. From there, I rebuilt several printers, converting them from cheap consumer models to high end industrial-grade printers and laser engravers, before finally using that proof of concept to justify getting true industrial grade printers. This puts me in the unique position of knowing the 3D printing world on both the industrial and consumer sides. The way I do it certainly isn’t the only way. It may not be the best way. If you continue to read on, though, I’ll walk you through how I use 3D printing to generate income as a business, using an actual real-world item I am designing and using, so that you can have a starting point to build from.
I wouldn’t be where I am today if it weren’t for the incredible people I was fortunate enough to meet that took the time to share what they know with me. As such, I pride myself on passing along what I know any chance I can. Not only do I encourage readers to do the same when the opportunity presents itself, but I encourage you to feel free to reach out to me should any questions or issues arise.
Getting Started
While 3D printing is fun, if your goal is to use it to make money, you must first look at it like a business. This means that our first step is to create, at a minimum, a basic business plan. This means that we will need to identify the following:
Mission Statement or Company Overview – This is basically just a short paragraph where you identify a problem you have identified that will be your company’s focus, and a brief explanation of the solution you have come up with to solve this problem.
Overview of Your Market Opportunity – This is a basic analysis of the market you want to move into. This is where you have the opportunity to not only explain why there is a market for your idea/service/product, but to identify the other services/products in your market to show why your idea is better or different. You want to identify your target audience, verify through market research that there is a demand for your product/service, and identify the competitors you will be up against.
What Product or Service You Aim to Provide – While we briefly touched on the product/service you aim to provide to solve the issue above, this is where you will explain what your product/service is, the key details that make it up, and what about it will speak to the customer most. This should be in-depth and focused.
Your Plan for Manufacturing, Sales and Marketing – This is typically a larger category, and sumarizes the specific “plan of attack” for your company. You’ll go into detail explaining how you plan to create your product, how your product will be marketed to its target audience, and what to expect in regards to sales for your product. This should typically be in-depth, discussing topics like how much of your budget you’ll allocate to each area, your specific marketing strategy (for example: I am going to use social media platforms to place ads directed specifically at my target audience in a multi-stage strategy. This will include detailed ads designed to draw the eye and peak interest for a period of two weeks in order to draw potential customers to our website. At the end of the two week period, we will advertise a flash sale lasting a very limited time to fulfill the needs of customers who had held off on purchasing.)
The Needs of Your Business – Your business needs cover a variety of categories. This may include things like:
- A brick and mortar location
- Wholesale distributors for manufacturing materials
- Specialized equipment
- Shipping/delivery options for your product
- Supplies (office, safety, packaging, etc)
Finances – The financials of your business are one of the most critical pieces to the puzzle. Most businesses spend the first 12-24 months in the negative before they are able to turn a true profit and drive toward success. This is the period during which most businesses fail. Being able to properly manage your business finances is the difference between success and failure. You’ll want to track the obvious things like taxes and bills, but you can (and should) track, monitor and plan your finances to the deepest level. Fortunately, 3D printing makes this easier than ever.
Since I already have my business up and running, I am going to bypass the business plan section. I strongly encourage you to take your time developing it, though, and be as thorough as you can. Not only will it be what potential investors will use to gauge your company and odds of success should you need them, but it will help you to stay focused and keep the business on track.
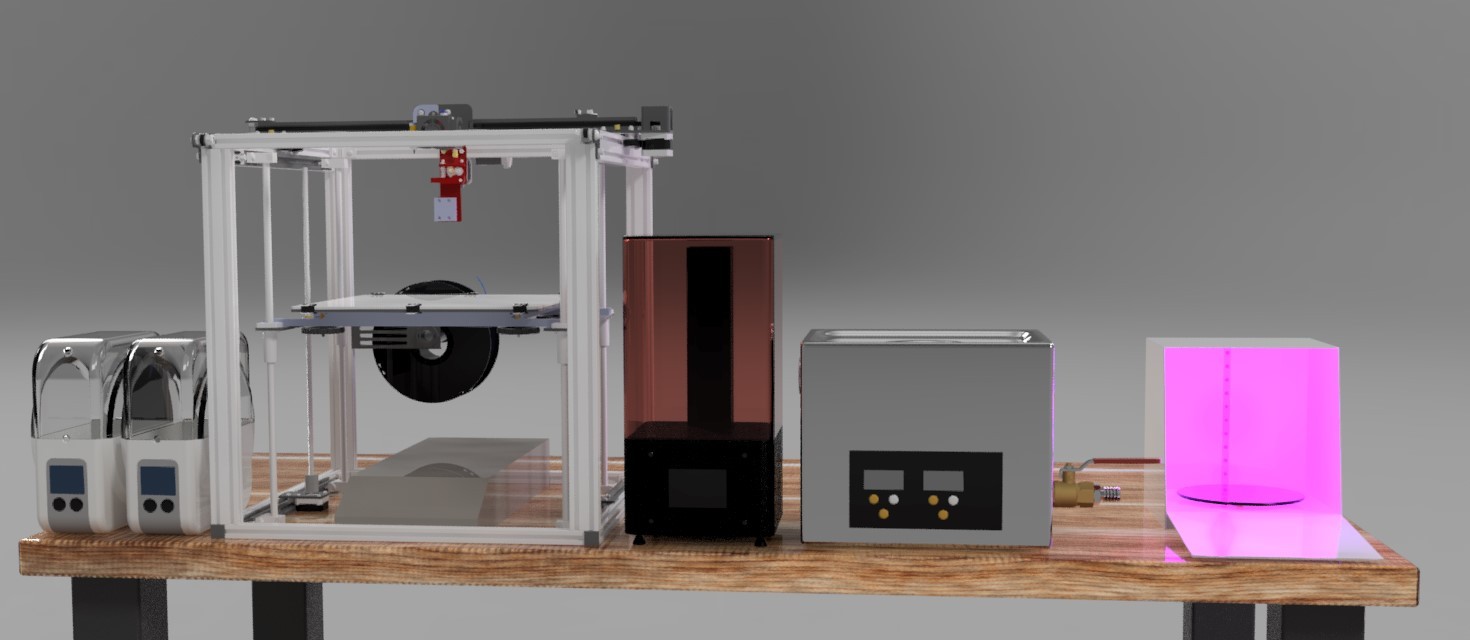
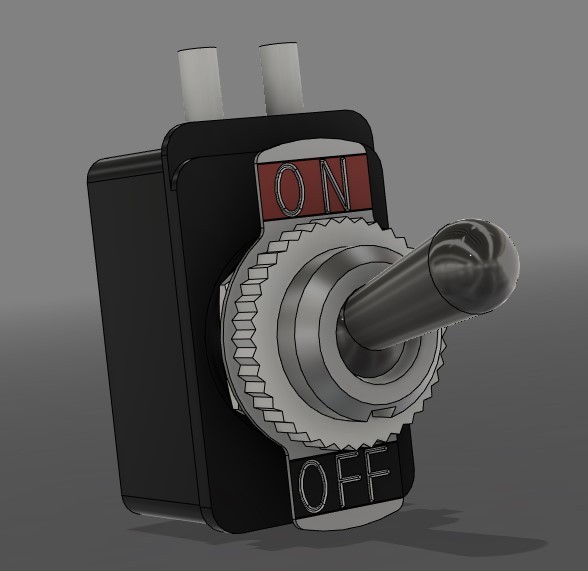
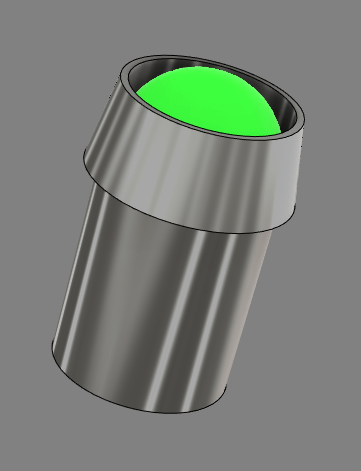
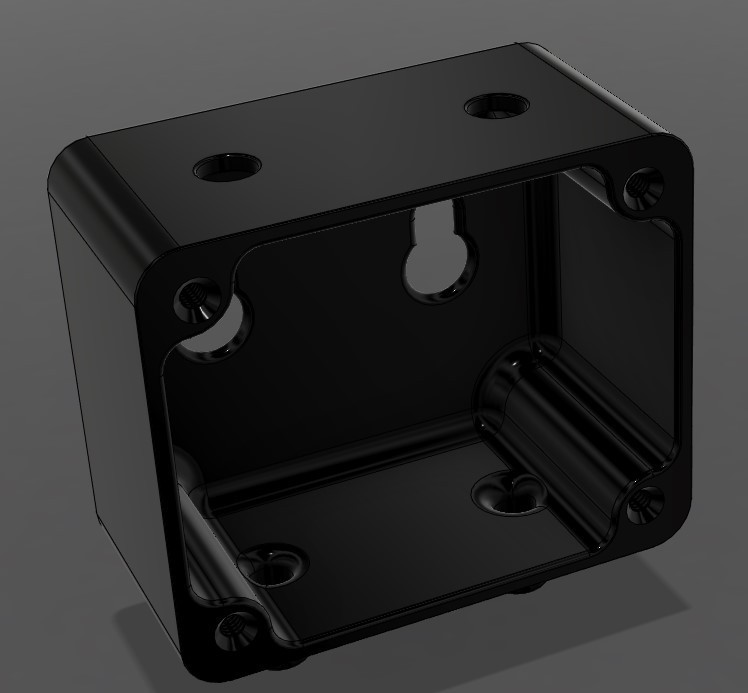
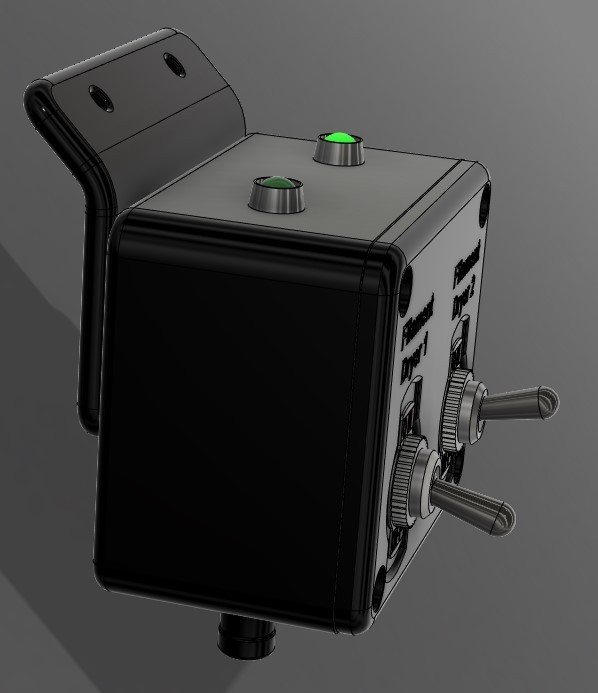
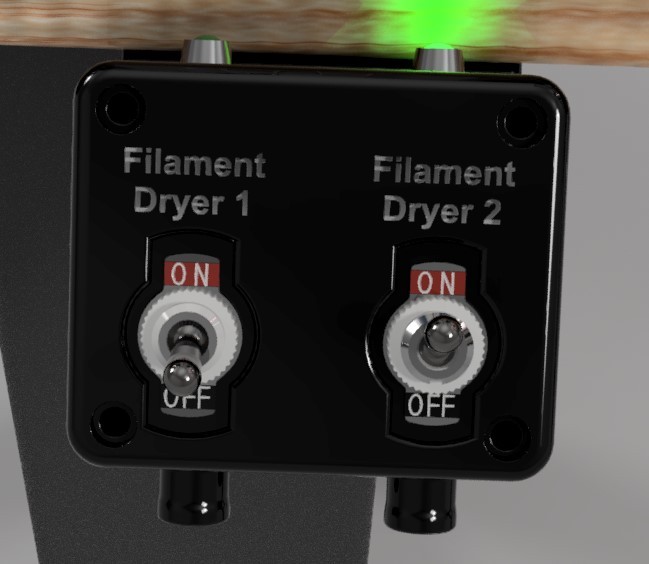
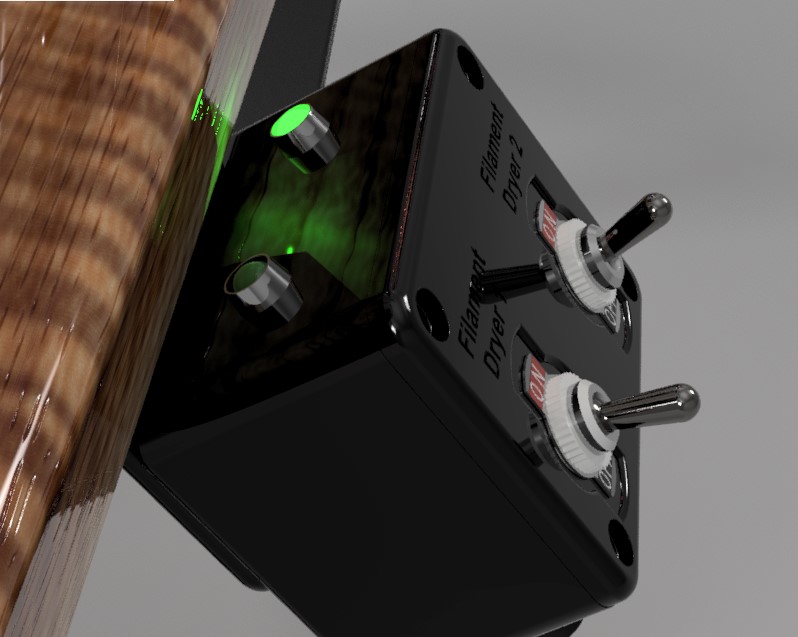
With that in mind, I’m going to create a real-world product that I need, and will use it to walk you step by step through the process. To give you a brief background so you know what to expect, I tend to work harder at being lazy than anyone I know. This is precisely what led to the product I’ve designed. My workshop at home holds a wide variety of machines, with just my 3D printing section holding six: a custom-built Ender 5 Plus FDM printer, two Sunlu S1 filament dryers, an Elegoo Mars 2 Pro resin printer, an ultrasonic cleaner, and a Sunlu resin curing UV light box. As my luck had it, each of these machines has a power button on the back side. In order to make my life easier, I decided I wanted a power control module that I could bolt to the front underside of my workbench. This module needed to be quickly removable if I needed to change machine locations, should be able to control the power of two machines at a time, should be custom labeled with what machine each switch controls, and should be able to visually indicate whether power is running to a machine or not. Additionally, it would be preferable if it could be wired in a way that looked neat and clean, rather than just having wires exposed. To summarize what I need from my power control module:
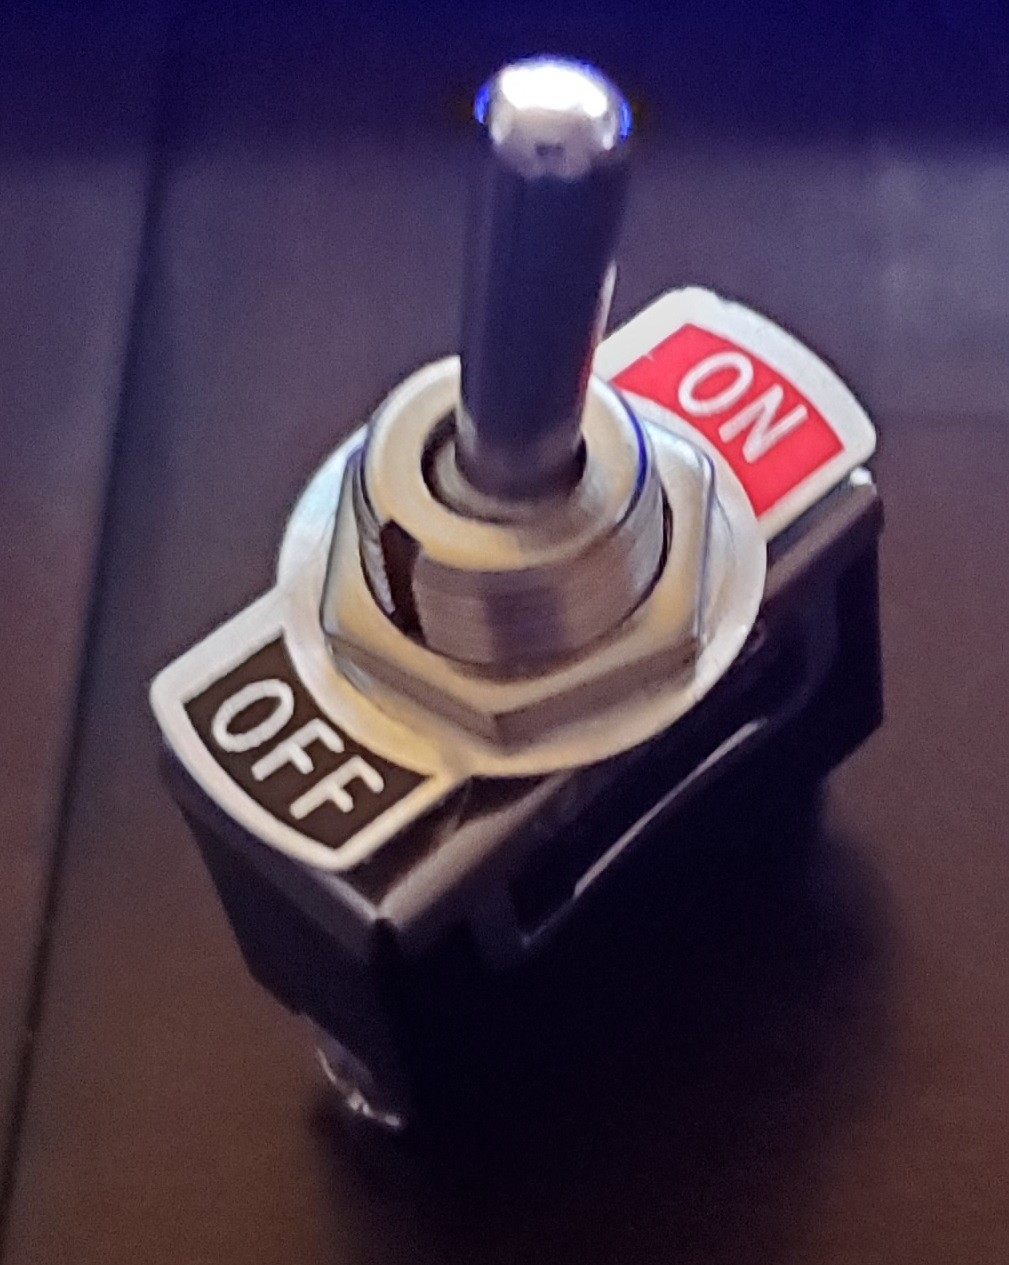
- Two On/Off switches
- Built-in labels for what each switch controls
- Should have a visual indicator when power is going to the machines (such as an LED light)
- The design should incorporate something to aid in cable management
- There needs to be a way to quickly remove the module from my workbench if I want to rearrange things.
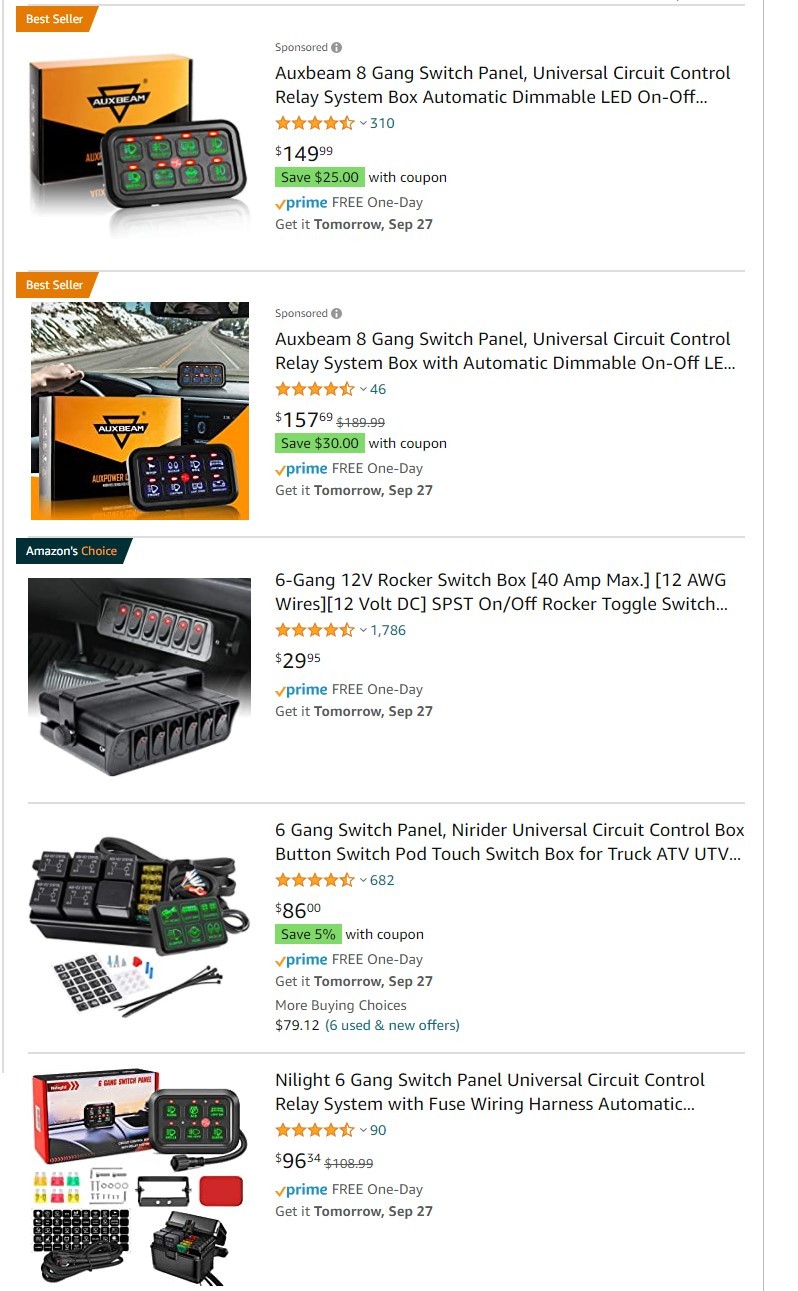
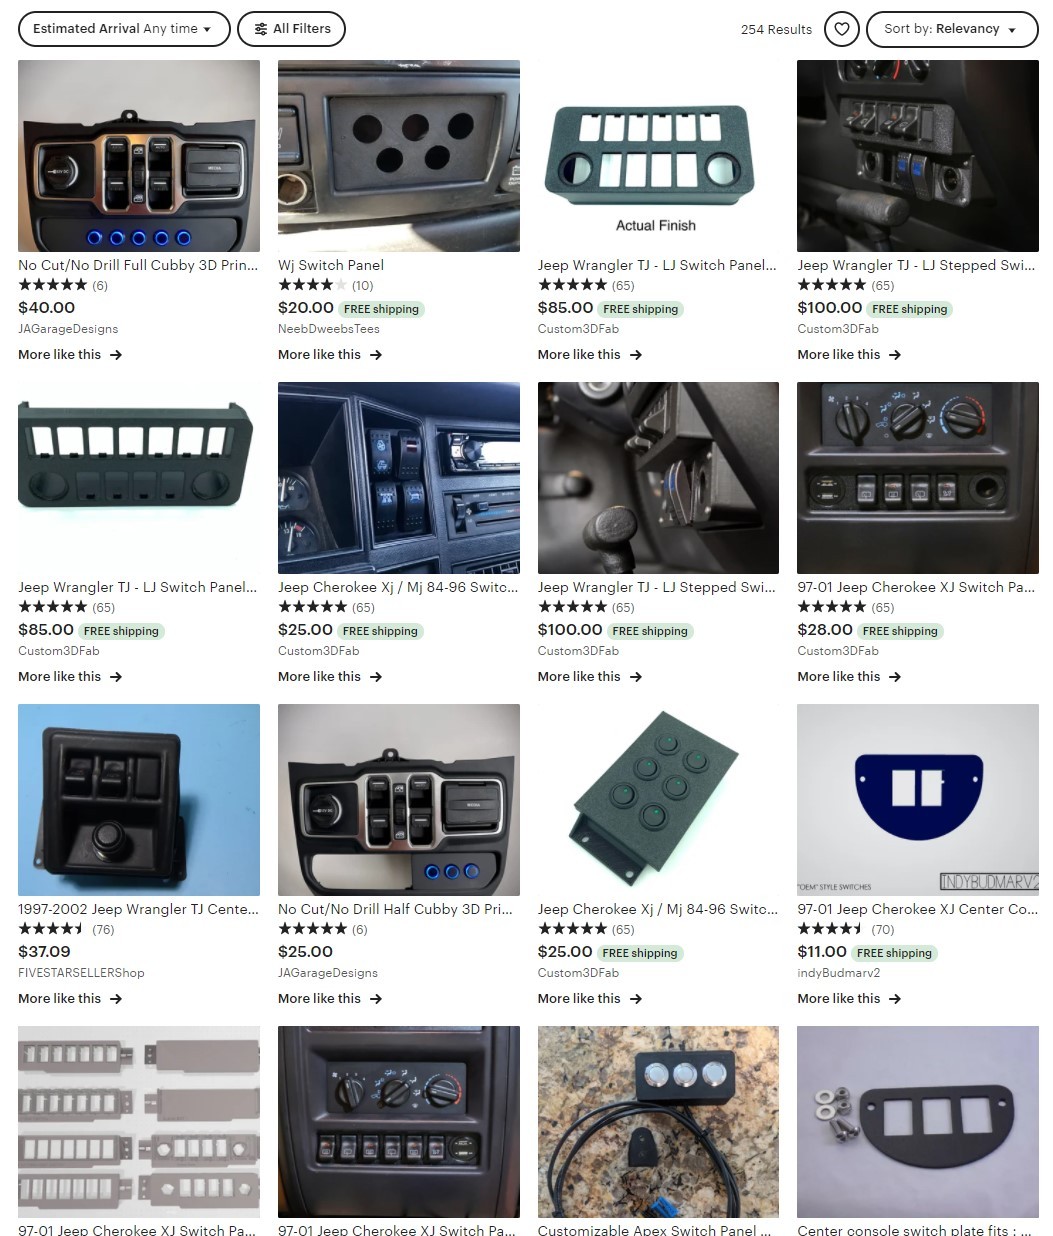
Since I have identified my target audience (in this case, myself), identified the problem at hand (that I don’t have an easy enough way to quickly control the power going to my machines), and a concept for a product that could solve this problem, I now need to look around and see what the market looks like. After all, there isn’t any point in spending the time, effort and money to design and manufacture this product if better and cheaper versions already saturate the market. A quick search on websites like Amazon and Etsy showed that while plenty of switches exist, none were easily located that matched the needs above directly. Of what was available, the pricing ranged anywhere from $25 to nearly $200. Most of these were designed for automotive use, which would mean on top of that cost, we would still need to make a proper housing to mount them to the workbench. I think we can do better than that. In order to be able to visualize what we have and need, I decided to 3D model my workbench setup (driving home that point about working too hard at being lazy).
Our next step in the process is going to be to design the product. Certain parts of our module, such as the LED light and switch can be purchased for far less than it would cost to manufacture. In these instances, there is no need to redesign the wheel.
Having physical parts as a starting point truly helps, as it gives you tangible pieces you can measure. You can then use these measurements as a reference point when designing your product. If you’ll be creating your entire product yourself and don’t have physical components to measure as a starting point, that is ok too. Start with a simple sketch or 3D model of the shape of your part, and then work your way through it little by little. As long as you have access to the original 3D model, you can make changes as you go without issue. If you intend on using a model made by someone else to print something for retail sale, whether it is a free model from websites like Thingiverse, or purchased from the artist, make sure you reach out to the artist or whomever owns the rights to the item for permission before creating your product. Some artists/owners will allow you the use for free, others may require a fee be paid, but a lot of time, effort and skill goes into creating 3D models, and it is only right to credit people for their work.
While I will cover measuring tools more in-depth later in the article, keep in mind that accuracy is your goal. Whatever you model is what your printer will ultimately create, so you want to try to keep things as close to ideal as possible.
As you create the model of your part, try to keep in mind things that may help or hurt the printing process. For example, while you can print extremely geometrically complex parts on a 3D printer, it will need to be able to be supported. You may be better off designing the part somewhat simpler. Additionally, breaking edges with chamfers or fillets will not only make your print easier to remove from the printer, it also makes your print much more structurally sound. Sharp edges and corners on 3D prints tend to be hot spots for failure. With FDM prints, you may experience layer separation, while with resin prints, stress fractures and micro cracks can occur in interior corners leading to breakage. As an added bonus, chamfers and fillets reduce the chances of burrs or edge imperfections, which not only means less post-processing for you, but a much more comfortable feel for the customer. For me, personally, I love a good fillet, so you’ll notice a lot of them in my design.
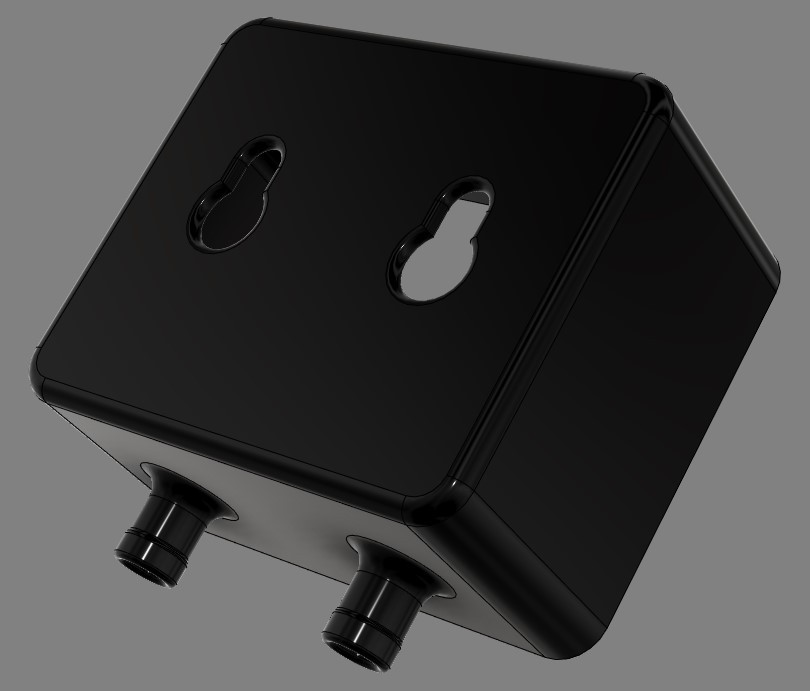
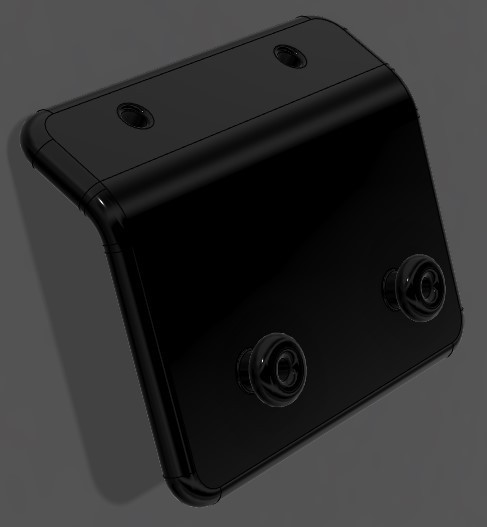
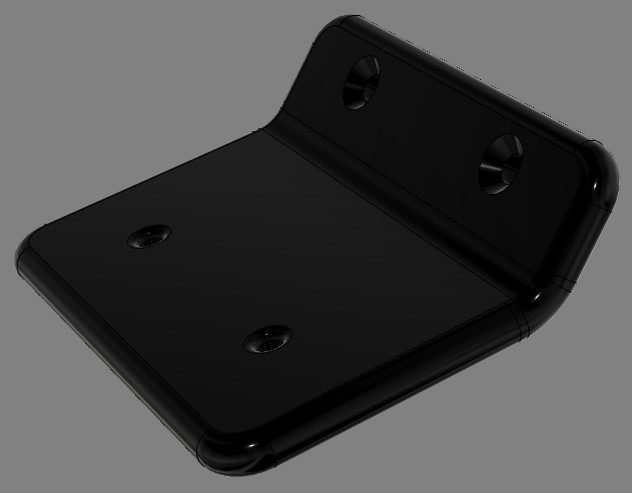
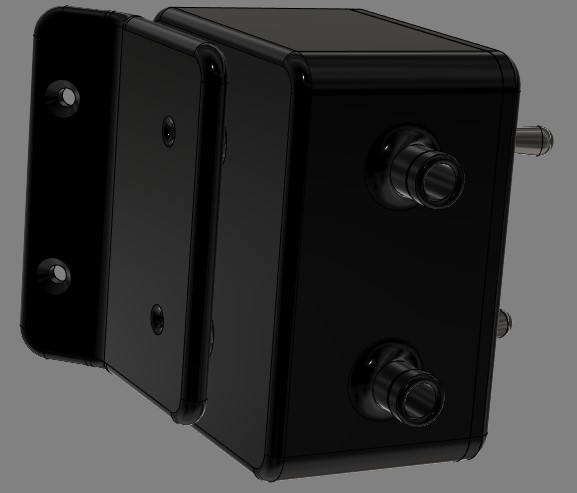
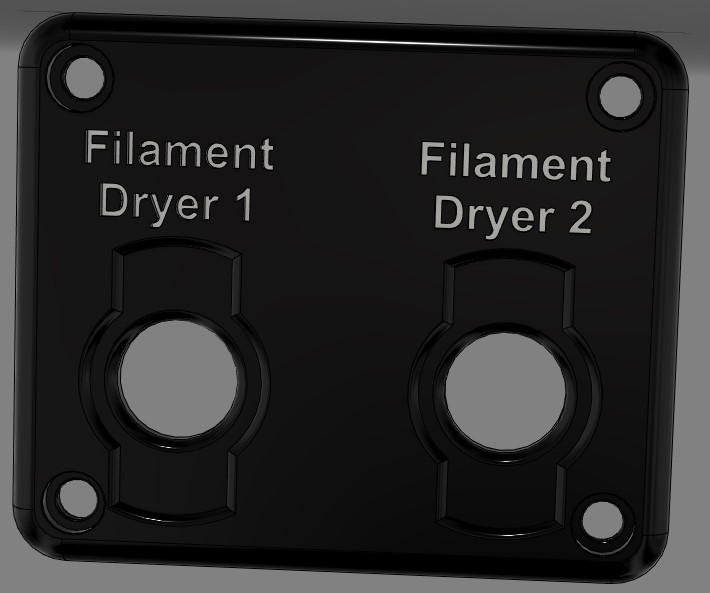
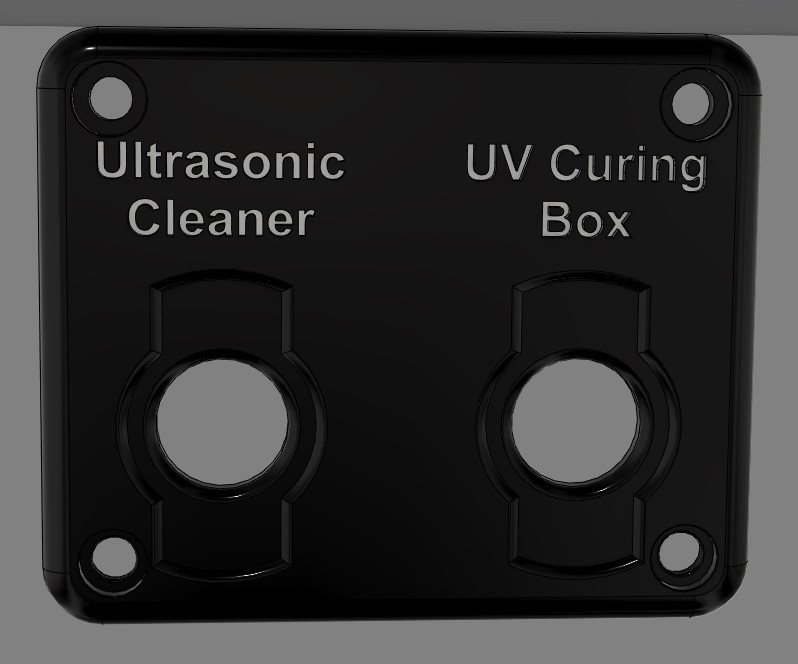
After a little bit of trial and error, I finally settled on a design that sounded appealing, and I set off to work. I wanted things to be smooth and sleek, something comfortable to touch while being appealing to look at. I decided I’d make the module rectangular in shape, with the switches and engraved labels on the front, and LED indicator lights on the top. The bottom would include ports for wiring to fit through that would be sized to fit 3/8″ cable management sleeves, and adding slotted holes to the back. These holes would be used for quick attachment/detachment from a mounting bracket that would mount at a 45-degree angle on the workbench, making it easier to read the labels. If that was a little hard to keep track of, worry not. Each full assembly consists of seven pieces: a bracket, a power control module box, two switches, two LED indicator lights, and an engraved top plate. Here are some photos of the parts modeled individually, as well as what I wanted the finished assembly to look like.

Selecting Your Printer and Material
Now that we’ve got the product model created as we want it, it is time to prepare for printing. In order to do that, we must start by deciding what printer would best suit our product. If we were trying to print parts that were smaller, with a very high level of detail, or a product that needed to be food/body safe, we would want to go with a resin printer. On the other hand, if we need a part that is larger in size or simpler in design, a filament (FDM) printer would be ideal. In this instance, my SLA resin printer was setup and ready to go, so that is what I used.
When it comes to materials, a lot has changed over the years. The number of options available on both the resin and filament sides has grown astronomically. It is crucial to pick a material that properly fits your product. Aim higher than is necessary, and you will end up throwing away money. Aim lower than your product requires, and you’ll end up with parts that end up with quality issues. For many items, normal consumer grade filaments and resins do a great job. From standard materials like PLA, ABS and TPU, to more specialized materials like polypropylene, polycarbonate, acrylic and carbon fiber infused materials, if you can find a consumer-grade option that meets the requirements of your product, you may be able to make your part for a fraction of the cost. In instances where more specialized materials are required, it’s time to upgrade from consumer-grade resins and filaments to industrial grade. These include materials that are impact and pressure-rated, resistant to extreme heat levels and chemicals, etc. While they cost substantially more than consumer-grade materials (ranging anywhere from 2-10x more expensive), that extra cost is nothing compared to covering repairs if a part designed for high heat melts, or a component designed for pressurized use fails and explodes. In my case, I need a material that is strong and rigid enough to hold up the module without sagging, but still soft and flexible enough that the bracket wouldn’t break if something fell on it, or crack when screws were inserted. With this in mind, I chose to use a material called Onyx Pro410 made by Loctite/Phrozen.
A final step in choosing your material is by factoring in any impact post-processing may require. For FDM printers, this can include sanding or tempering. For resins, this can include alcohol baths, UV curing, or heat curing. As an example of why this is critical, one of the resins I use is a ceramic resin made by Formlabs. This resin is a photopolymer resin with very fine particles of ceramic suspended within. It can be somewhat difficult to work with, but once your part has printed, it then requires special kiln firing. This firing process takes upwards of 30 hours, and ramps from room temperature, up to around 2,200 degrees Fahrenheit, and back down. Before this firing process, the print is soft to the touch and brittle, with the UV cured resin holding the ceramic powder in place. During the firing process, the resin burns away, and the ceramic powder sinters together. The end result is a version of your part made completely from ceramic, capable of withstanding working temperatures over 2,000 degrees Fahrenheit. The downside to this material is that unless you own a kiln capable of performing such a heat cycle, you will need to find a ceramic shop willing to fire it for you. Most ceramics shops do not fire their kilns that hot often, so whether you have one part or one hundred, you end up paying to use the entire kiln. If you were making a part that needed to withstand a working temperature of 600 degrees Fahrenheit, you would be better off paying $50 more for a resin like Formlabs Rigid 10K, as opposed to saving that $50 to go with ceramic and having to pay a $150 kiln fee.
Finances
While business finances encompass your entire project from start to finish, I am going to address them here. When it comes to running a business, there are certain expenses that will be incorporated into the cost of each product sold, while others are just generic business expenses that are not incorporated into the price of each product.
Examples of costs incorporated into individual product price:
- Manufacturing materials
- Parts purchased for that item
- Packaging materials
Examples of costs not incorporated into individual product price:
- Electricity
- Safety equipment
- Janitorial supplies
If you aren’t including the cost of these things into your individual product price, how do you pay for them? This is handled by ensuring each product sold maintains a proper profit margin. You want to take the cost of making the part, add in the cost of labor (time spent post-processing, for example), and then factor in your profit margin. In a normal manufacturing setting, that profit margin can range anywhere from 20-150% or more, depending on the item. When it comes to 3D printing, you generally need far less than a normal factory or manufacturing facility in regards to machinery, utilities, floor space and labor, so those numbers can be considerably higher. Of the profit margin for each part sold, that profit should be split into percentages including a percentage set aside for general business overhead.
While the goal is to earn as much money as you can, most people are going to start off small scale. So here is how I break down my cost analysis. There are a number of ways this can be done, but you want to do a cost analysis and pricing breakdown for every product you make. Using the part I designed above, we can make our analysis step by step.
First, we need to determine the materials cost of the part. Fortunately, 3D printer slicing software makes this incredibly simple. While I am going to be using Chitubox for this example, just about every slicing software on the market either comes with or has a downloadable extension for displaying material cost for your print. This takes into account not only your part, but materials used for supports, rafts, etc., making it much more accurate. Simply input the cost of your material, and it does all the hard work for you.
For this project, I used Onyx resin. This resin was bought at normal retail price, which is approximately $70 per 1-liter bottle.

Once the material data has been input, we need to set our printer settings. Most material manufacturers will provide recommended settings for their materials. I always recommend at least starting with those, and then making small adjustments as necessary. In this case, I stuck with the recommended manufacturer settings for my printer and their resin. With that out of the way, we are able to setup our model in the slicing software, and add any supports necessary. Once it has been sliced, your software will display the amount of material used, estimated print time, and the cost of material used. As an example:
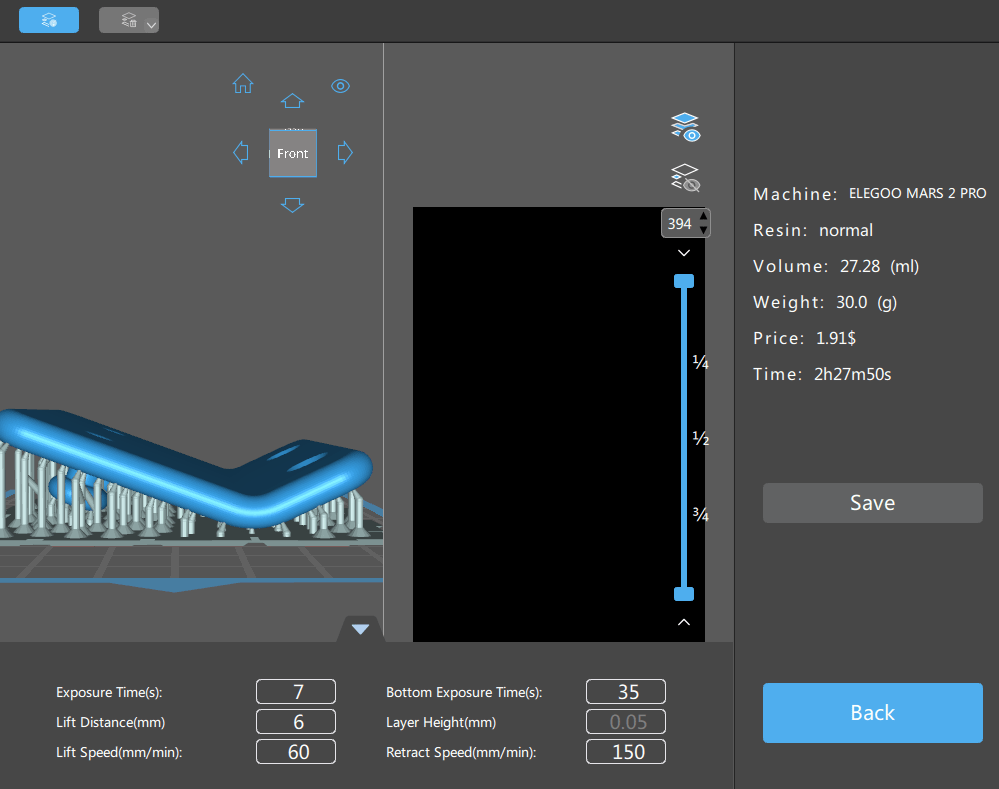
From that, we can see that each mounting bracket will cost $1.91 to print. After loading them all into the software, the materials cost for each part is as follows:
- Mounting Bracket – $1.91
- Engraved Top Plate – $1.83
- PCM Box – $3.92
- 2x Switches + 2x LED Indicator Lights – $3.40
This brings our total resin cost to $11.06. Outside of cleaning in an alcohol bath and UV curing, this resin requires no special post-processing. As a result, for each power control module made, it takes approximately five minutes to clean and cure, and an additional 10 minutes to wire and assemble. Since we know the materials cost, we need to add in our labor cost. So, how much is your time worth? I’ve found that the best way to determine this is to set a rate based on the task being performed. Much like an apprentice earns a different amount than a master carpenter, the same is true here. Both are critical components of the finished product, but their pay varies because of the different level of skill and experience required. Either way, your time is valuable, and you need to be compensated for it. No one should work for free, even at your own business. So, for me, I typically charge $20-30 per hour for simpler tasks like deburring and assembling parts and creating blueprints. At the same time, I charge $30-50 per hour for tasks that require the use of more skill and experience, like 3D modeling. In this instance, we have fifteen minutes worth of pretty simple assembly work. If we charge $20 per hour, we’d have a total labor cost in this module of $5. Since I don’t have any packaging requirements for this module, my total manufacturing cost is $16.06 for a fully customized power control module purpose-built for my needs. If you recall from earlier in this article, the cheapest option available was $25 for generic switches, with nicer options averaging $60-140, while containing no customization and still requiring work, effort and money to make them work for my purpose. As a result, we have several options. We could aim lower, and offer a fully customized version of the module for $50, undercutting the average. This would give us a profit of 33.94, or a profit margin of just under 68%. We could also aim high, pricing just above the average at $150. This would give us a total profit of $133.94 per module sold, or a profit margin of 89%. My personal choice would be to aim for the middle. I would price the module at around $80, giving us a profit of $63.94, or a margin of 80%. This would allow us to remain competitive with the other options available, standing out to the client by being fully customizable instead of generic and incomplete, while not shorting ourselves by underpricing the product.
So now that we know the cost breakdown for the module, where does that profit go? It is important to value your worth, while also allowing the company to survive and grow. With that said, you have to decide what method of splitting the profit will work best for your business. Will you pay yourself at an hourly rate? Will you pay yourself a commission percentage of each product sold? Will, you split the profit 50/50 between you and your business? For my business, the best option, in the beginning, was a combination of options. I paid myself the hourly rate allotted for each part I made, as it sold. Along with that, 20% of the profit of each product was earned as a commission. The remaining 80% of the profit was then rolled back into the business. All overhead was paid using this money, with whatever was unspent remaining in the business account. At the end of each month, the remaining balance would be split two ways: half would remain in the account to help cover things that came up and the beginning of the following month, with the other half being set aside for future business growth. This could be in the form of new printers, new materials, research and development on new products, etc.
As an aside, the reason I do not charge for 3D modeling services as part of the product’s cost is because I try to re-use my models as much as possible. This allows me to spread the time spent creating a model over numerous products. In this instance, the top plate has customized engravings. If I need another module for my ultrasonic cleaner and UV curing box, I don’t have to go create an entirely new model. I can simply open the model from my filament dryer module, pull up the filament dryer top plate, double click on the text, and adjust it to whatever I need it to say. In a matter of seconds, that one model can be used to create a second product.
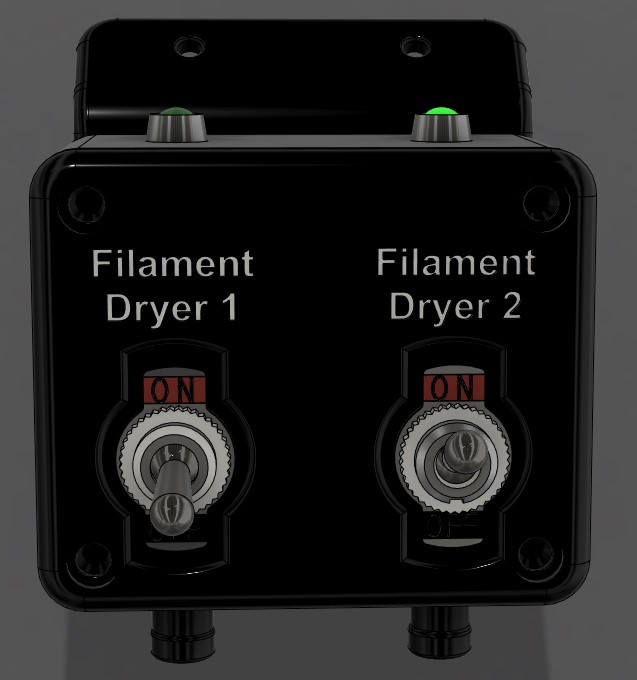
The Finished Product
So now that we know how the financial aspects of this module went, I think it’s time to take a look at the end result. After all, this would all be pointless if we didn’t end up with a quality product to meet the client’s needs. As a quick refresher, here are a few renderings of what the end goal was for this module:
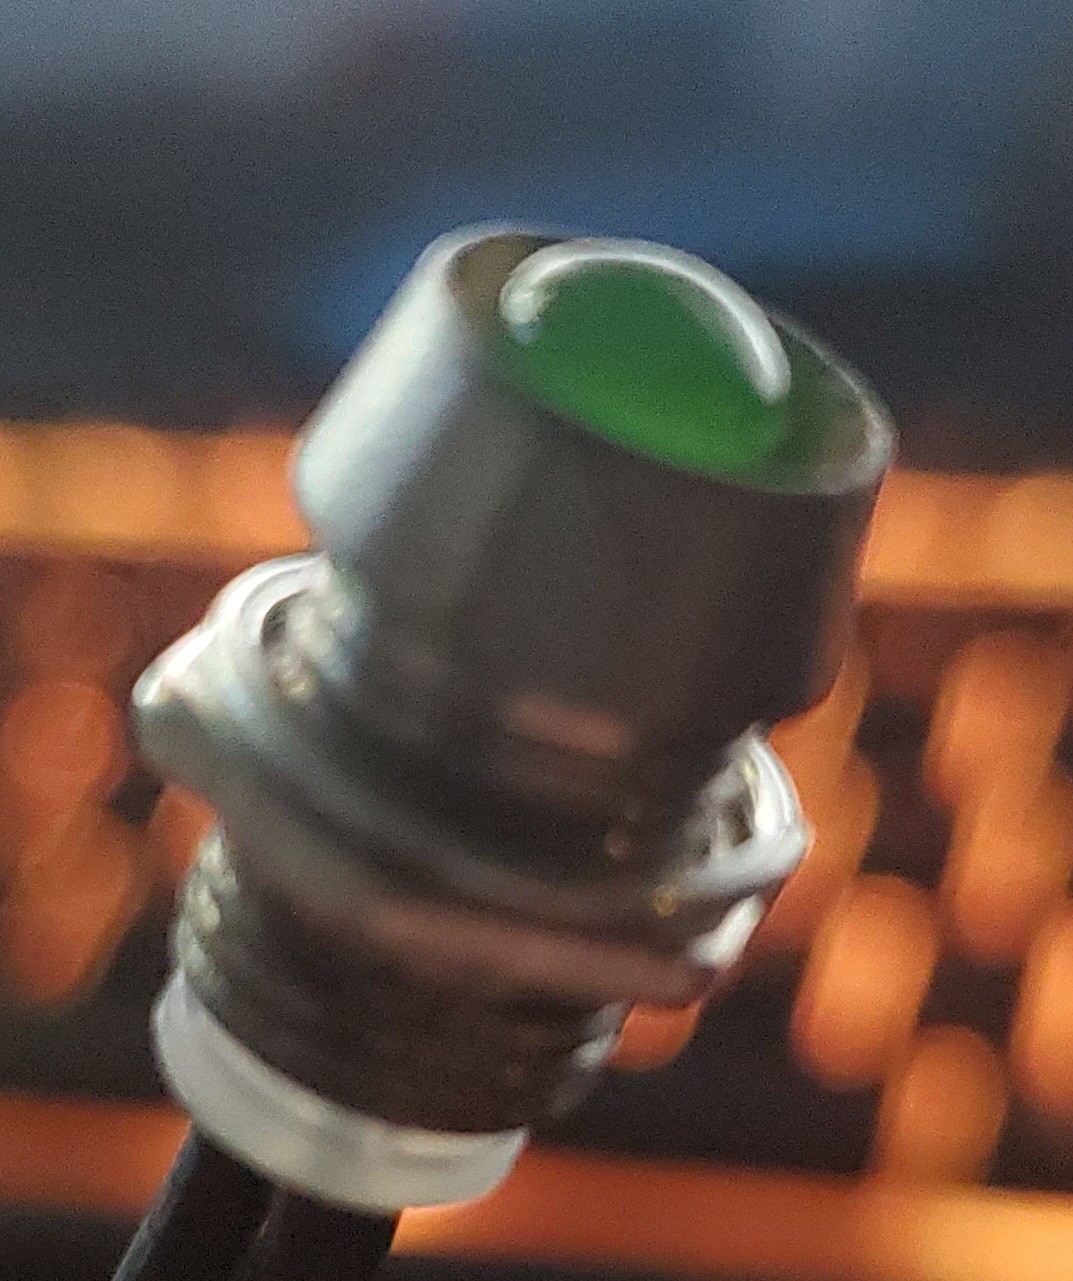
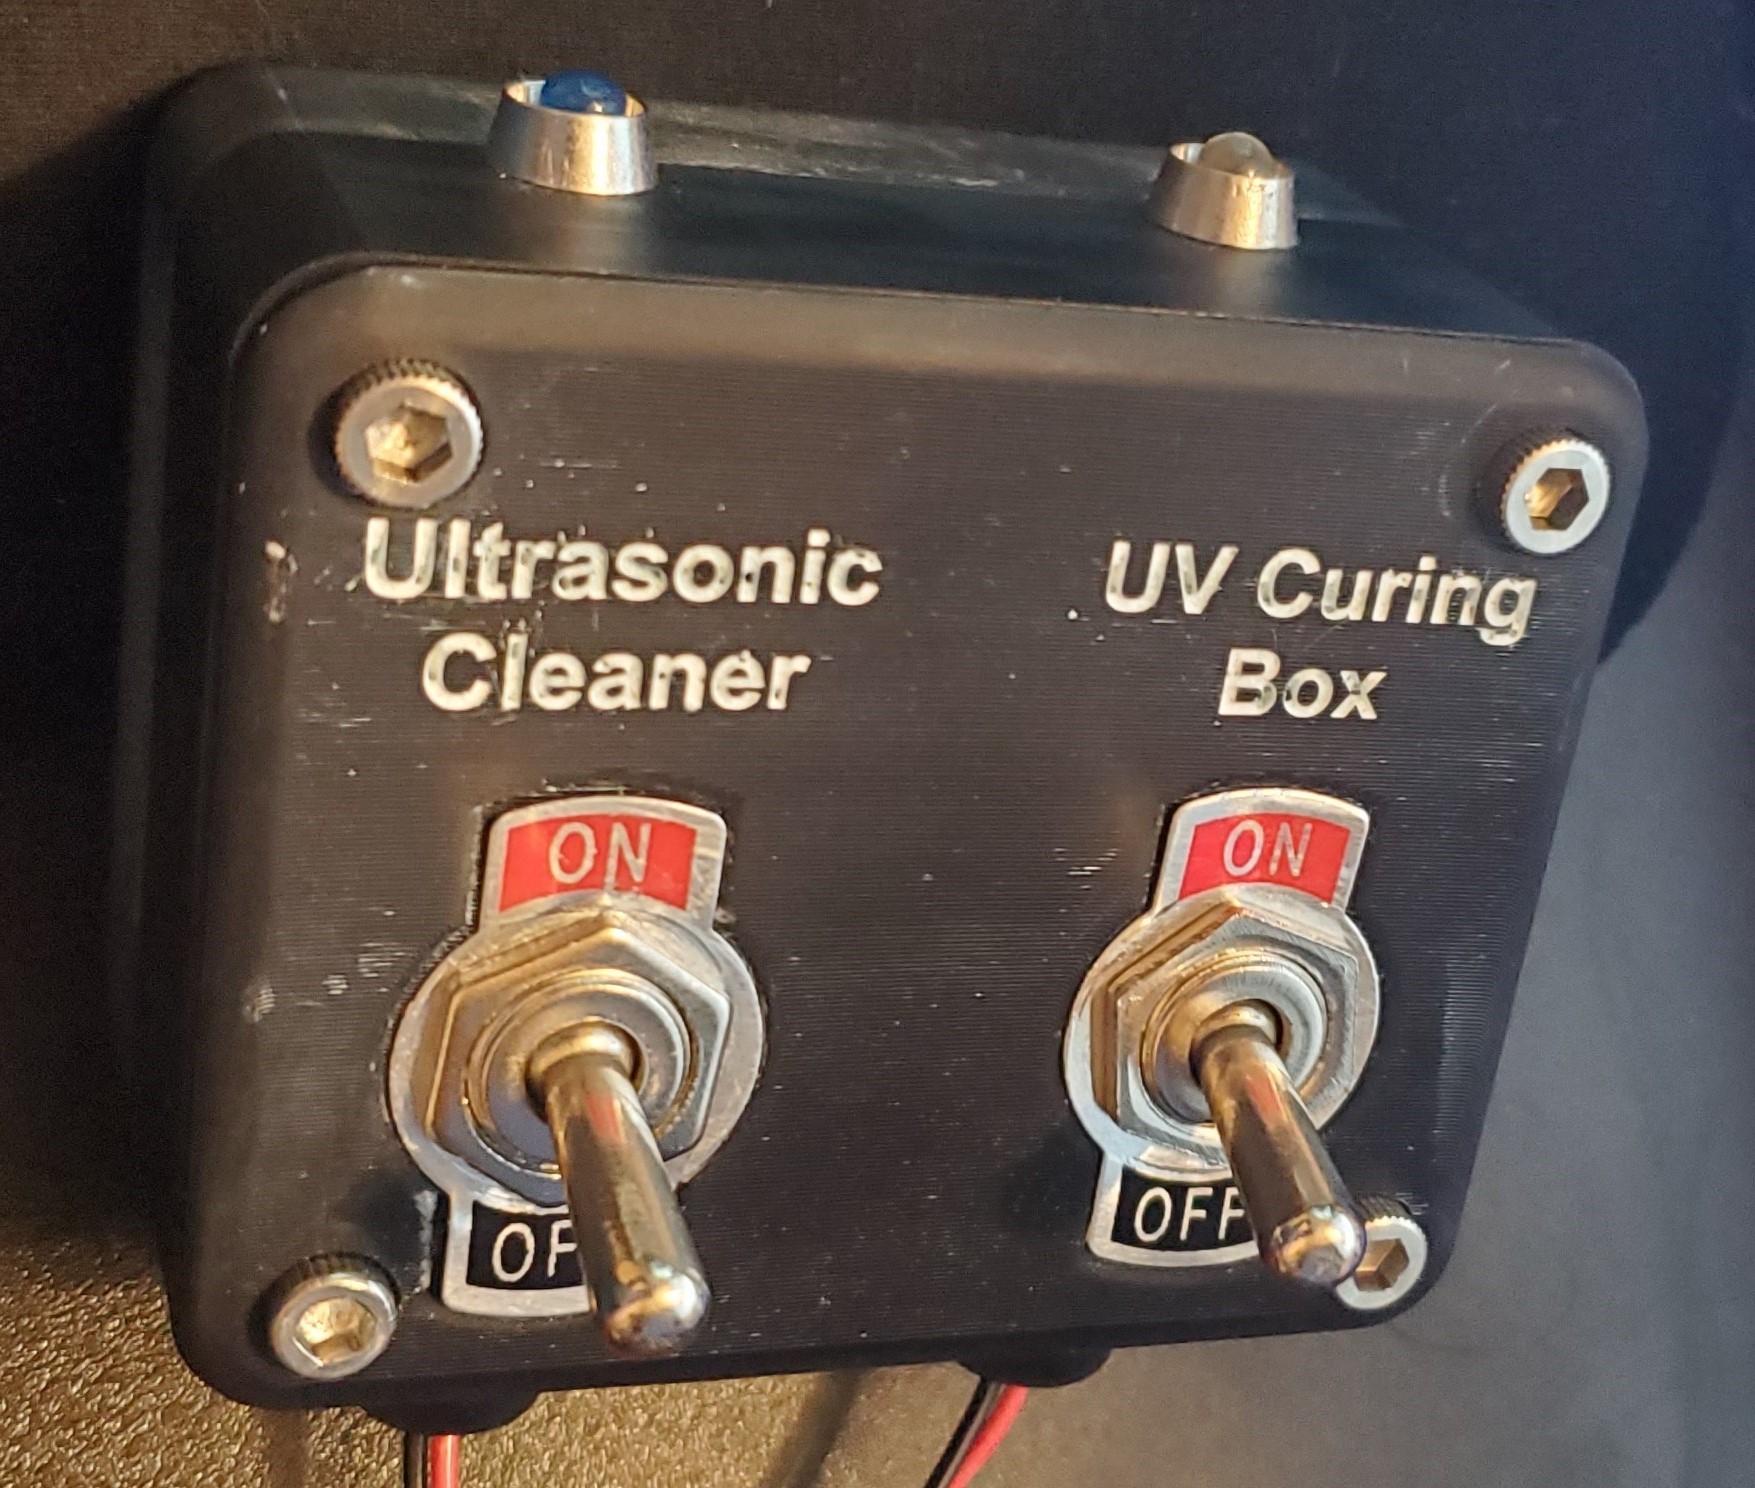
Now here is the printed and assembled end result. While the letter fill could use one more coat of paint and the assembly could use a good cleaning, I am quite pleased with how it turned out. I haven’t bolted it to my workbench yet, but I have no doubt it will look good and make my life just a little bit easier.

Quality Control
While quality control issues can be prevented, discovered and/or corrected throughout the manufacturing process, it should always be the final stage before any product leaves the door. You should ensure that your product is accurate, functional, and looks good. Using my photos above, I certainly wouldn’t send this power control module to a customer until the letter fill had been touched up and the module had been fully cleaned. You are creating a brand-new product that clients will be paying their real-world, hard-earned money for. Make sure you are delivering a product that not only would you be happy to receive, but that you can be proud to put your name on.
Dimensional Accuracy
Different products, as well as different parts of products, will have different levels of accuracy required. For example, the exterior dimensions of my module above didn’t matter to me at all outside of aesthetics. My parts could have been +/- 0.025” (0.635mm) and it wouldn’t have made a difference to me. On the other hand, in order for the threads on the screws to properly and securely engage with the threads in the box, without being so tight that there was binding or breakage, it needed to maintain +/- 0.007” (.178mm). A loose-fitting sleeve may only need to be +/- 0.01” (0.254mm), while a press-fit bushing would require a tolerance of +0.000-+0.003” (+0.000mm – +0.076mm). It is important to keep these things in mind both when designing your product and when performing quality control checks. Restricting tolerances too tightly can lead to perfectly good products being scrapped, while being too loose with tolerances can lead to assembly issues, breakage, and bad products reaching customer hands. It is also critical to ensure that the 3D printer and material you will be using can accurately maintain the tolerances your product requires.
In regards to measuring equipment, your tools of choice will depend on the size of the component being measured and the level of accuracy required. Measurement tools are only reliably accurate to one decimal place less than they read out. For example, if you have a pair of calipers that can read 3 digits after the decimal place (x.xxx), they will only be reliably accurate to two places after the decimal. This is because in most cases, the true measurement will be more than the number of decimal points available. As a result, the last decimal place shown is an estimate, rounded up or down from whatever number would have followed it.
So, if you had a part that needed to be 1.08” in diameter, and your calipers read 1.081”, the actual measurement of that part could be anywhere between 1.080” and 1.081”, rather than being exactly 1.081”. Since we cannot know for sure, these calipers would only be reliably accurate to the second decimal point, but would still work for the part being measured. The same is true for everything from a tape measure to a laser comparator, micrometer to scale.
Additionally, as a machinist, I can tell you that it doesn’t matter whether you own a $250 set of Mitutoyo calipers, or a $15 set from your local hardware store. What matters is their accuracy. I have seen hardware store calipers read out flawlessly, and I’ve seen a pair of high-end calipers get dropped and lose calibration. No matter which way you go, use a gauge pin, gauge block, or other precision ground item that you know is accurate to verify the calibration of your measurement tools regularly.
https://3dprint.com/284190/the-top-10-things-you-can-do-with-a-diode-laser/