This is specifically about the SainSmart Dust shoe for the 3018. https://www.sainsmart.com/products/cnc-dust- shoe-abs-cover-cleaner-for-3018-series-cnc-router-42mm-spindle-motor A lot of the principles are the same for all dust shoes though.
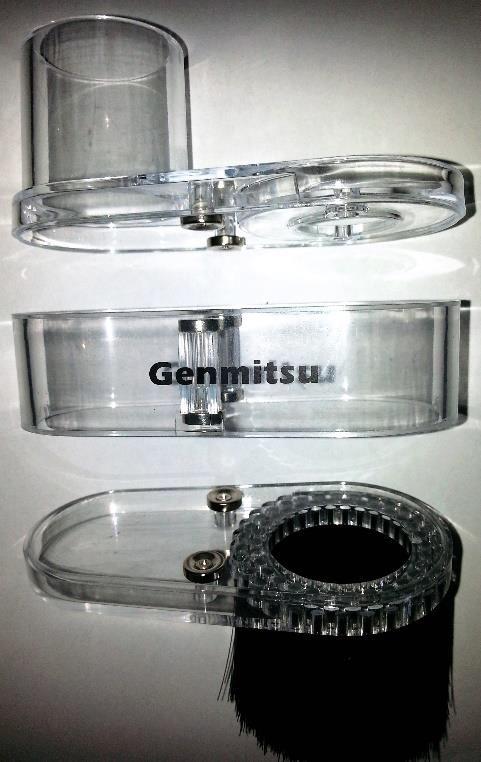
At first glance is it is well made and well designed. It comes in 3 parts which are all clipped together using magnets making it easy to fit, use and quite versatile.
The top part screws onto the bottom of the 775 motor which mounts it securely and still allows height adjustment by sliding the motor up and down in the motor mount.
The middle part, which I will call the shroud, clips on to the top and is held by magnets. Removing this part just needs about 5mm between the bit and the stock and allows easy access to the collet.
The bottom part, the bristles, clips on to the bottom of the shroud again using magnets. It also needs about 7mm clearance between the bit and the stock to remove and re- attach. With it removed the bottom of the bit is easily accessible allowing accurate setting of the position of all the axes.
Other Options
There are other ones available, lots that can be 3D printed if you have a 3D printer. But after printing, buying a set of bristles and fittings, mounting screws and magnets I think this one is actually cheaper, certainly easier, nice and transparent and can be used on a PRO and a PROVer with side panels and I like the design in 3 parts it makes it very easy to use.
Fitting
- Jog the Z axis up to clear the bed.
- Locate the threaded mounting holes at the bottom of the motor.
- Using the two supplied screws mount the top dust shoe bracket onto the motor. The screws need to be firm but do not overtighten.
- Rotate the motor in the mount to position the dust shoe. If your router has side plates fitted this should be to the front to avoid the Y axis movement fouling the side plates. If not then the dust shoe can be fitted with the hose at the front, left or right.
- Tighten the motor securing bolt.
- Clip the middle shroud onto the top dust shoe mount and the bristles onto the bottom of the shroud.
Attaching a vacuum
The mounting for the hose is designed for a 38mm Inside Diameter hose over the top or a 32mm outside diameter hose slid inside. My vacuum hose is 35mm Inside Diameter so an adapter is needed, in my case the tool attachment part that came with the vac fits perfectly. If this is not the
case you will need an adapter to suit your hose, these are freely available both for sale and as 3D Printed models. A UDTA can always be used, (Universal Duct Tape Adapter).
Mounting the hose

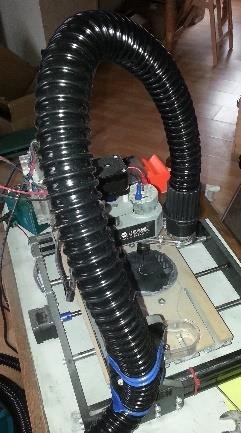
It is sensible I think to secure the hose to the router to keep it out of the way of the bed. I have attached mine to the outside of the left hand Gantry upright using a UETA (Universal Electrical Tape Adapter, the duct tape was too wide!) I will probably get round to designing and making a clip so it can be removed more easily. This keeps it out of the way of the bed as it moves backwards and will allow stock to overlap the bed. It also stops the dust shoe and spindle assembly from having to support the weight of the hose all the way to the floor. Make sure there is sufficient flexibility and length of hose left to allow free movement of the spindle at the limits of the Y direction.
Mounting a bit
To mount a bit first remove the bristles and shroud sections to give access to the spindle and collet nuts.

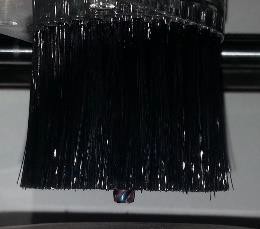
Mount the bit as normal, ideally the tip of the bit should be mounted to be level with the bottom of the bristles when they are refitted. When mounted like this the ends of the bristles will just be touching the top of the stock at Z zero. This is a bit stickout (bit tip distance from the bottom of the collet) of about 31 mm. The picture shown has the bit about 2mm too low so you can see it, but that position would still work well.

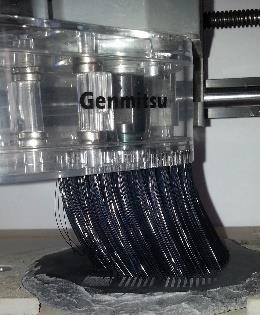
If the bit is mounted too high then the bristles will be compressed against the top of the stock as it starts a cut. It is best to avoid this, if possible, especially if you are using larger bits or cutting deep pockets, as the bristles may be caught on the sides of the pockets and get dragged into the path of the bit depending on the way the path is cut. This shouldn’t interfere with the cut but you might lose some bristles.
If this is a problem then I recommend leaving off the bottom of the dust shoe,
even with the bristles removed a lot, if not all, of the dust and debris will still be removed, depending on the power of the vacuum attached of course.
Setting Zero positions
Remove the bristles section of the dust shoe for visibility. Set the X, Y and Z zero positions as normal, once set jog the bit up to give about a 7mm clearance between the bit and the stock and refit the bristles section of the dust shoe before starting a cut.
Using as a Dust extractor
I am currently surfacing slate coasters using a 50mm diameter sanding disk. Obviously the bottom part of the dust shoe cannot be fitted when using a 50mm diameter bit, however it works very well as a dust extractor even without the bristles fitted.
My Overall Rating
4.9 stars! (Nothing is ever perfect!)
And I must thank SainSmart for sending me one as an addition to another order. Graham Bland, September 2021
