

Benbox, mDraw, CNCC LaseAxe software instructions
Full guidance about how to run 3 popular software for laser engraving: mDraw, BenBox, CNCC LaserAxe
Endurance Lab presents an overview of the software for laser cutting or engraving. In this article, I would like to focus on three popular programs: mDraw and Benbox, CNCC LaserAxe. First of all, we want you to note that mDraw is a cross-platform open-source software that can be installed on Windows, Mac OS, and Linux operating systems. Benbox works only with Windows.
CNCC LaserAxe is quite compatible with all Windows versions. (if you have a problem – ask us in a livechat)
Keep in mind that BenBox, mDraw, CNCC LaserAxe require firmware to run.
If you are not sure – you may ask us here:
The main differences between these programs are as follows: mDraw is easier to learn but is only for contour laser cutting or engraving. Benbox can work with different file formats and supports both contour laser cutting or engraving, and grayscale engraving. Grayscale engraving allows making patterns that look three-dimensional, but it takes much longer time than contour laser cutting or engraving.
Overview of the mDraw program
The look of the main interface of mDraw.
Click to enter the settings window. The default size of the working area is correct as a rule, but you can set your own size values.
Move the imported graphics files to the rectangular area and check if the image is inside the frames of the working area. Check the power of the laser and click to start engraving.
Overview of the Benbox Program
The characteristic feature of Benbox is the support of grayscale engraving and the possibility to edit images and texts right in the program.
The main interface of Benbox.
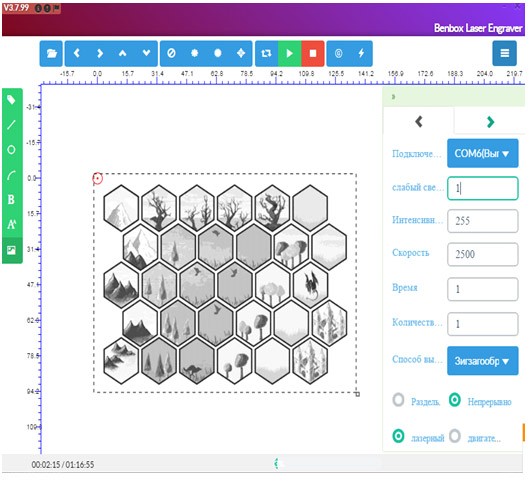
The main functions of the Benbox interface.
Functional meanings of the parameters in Benbox.
Parameters setting
1. Low light: minimum 0, maximum 255. Default
meaning is 16 in normal conditions.
2. Laser intensity: min 0, max 255.
Default meaning is 255 at normal work.
3. Speed (mm/min): engraving speed.
Min 0, max 3000. If the vector graphics speed is in the range
1500 – 3000, the Pen up and Pen downtime may be set from
50 to 250 ms.
4. Time (ms): wait time.
5. Engraving mode: Scanning by-line,
scanning by Z -shaped, outline scanning
(Note: outline scanning supports only BMP and DXF formats).
6. Discrete, continuous, laser mode, servo mode
(you’ll understand the work of each mode by test)
а. There’s an opportunity to edit graphic objects after their selection or delete them by clicking Delete.
б. To edit a graphics object click the violet area in the top right corner, then you will see a dialogue window.
Working Area
BenBox software demo video

Video available upon request. Just email to [email protected] or text: 12393020053 [whatsapp, viber, telegram, wechat]

Image editing
Find the location
Draw a straight line
Insert a circle
Insert an arc
Insert a Bezier curve
Insert a text
Insert a graphics object
1. Opens files: supporting raster files formats: JPG, PNG, GIF, BMP and other; in the outline, engraving mode supporting vector formats DXF;
(Note: BMP format recognizes outlines and can be used in the outline mode engraving)
2. Moves the pen holder up and down, to the right and to the left; the moving distance should be pointed as a Step parameter (for plotter systems);
3. Pen up a preview of rendering (for plotter systems);
4. Pen down a preview of rendering (for plotter systems);
5. Test setting of the Servo parameters;
6. Moving frame, used for the preview and check of the pattern size and position;
7. Start / Pause;
8. Stop engraving;
9. G-code control;
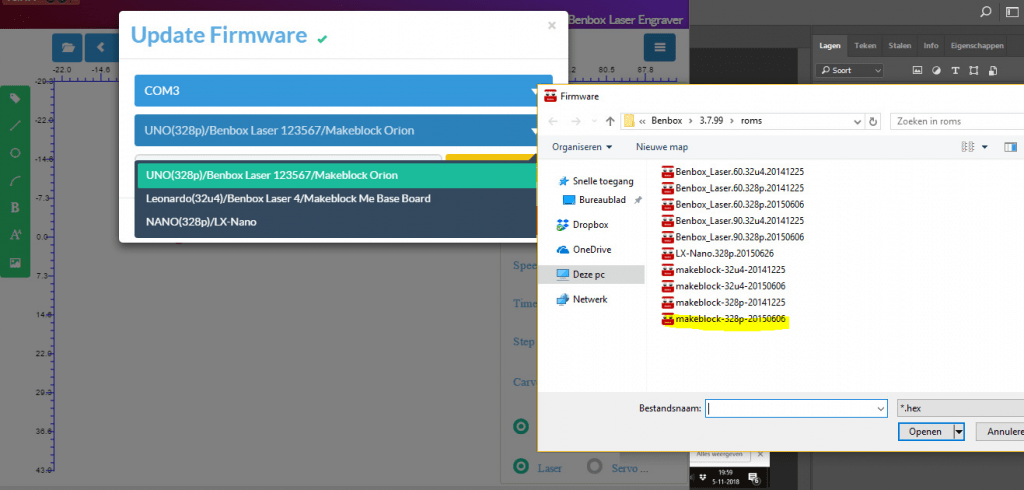
10. Firmware upgrading.
Please remember, that you need to experiment with engraving speed settings to obtain the best engraving result.
The Endurance team is always happy to help you and share its experience.
How to use CNCC LaserAxe software
“Advan” – advanced model mode is used for engraving/cutting of outlines and black-and-white images.
Pixel-> Millimeter is responsible for pixel density.
BlackWhite is a mode for the work with black-and-white images.
An outline is a mode to work with image outlines.
Grayscale 1,2 – these modes are used in the primary model mode, and not used in the advanced model mode.
R,G,B are used for colored pictures conversion.
PR (photo processing) – the start of photo processing.
Scale – image size setting.
Mirror – mirror image display.
Inverse – color inversion «black<->white».
Save – converted image saving.
1. Path/Speed – laser movement along a continuous line (for contours and black-and-white images).
2. Line/Speed – movement with a constantly switched on the laser (for filling).
3. Point/Line is used for grayscale engraving.
4. Point/Point is used for grayscale engraving.
Commentary: the lower and the slower the process – the higher the engraving quality.
XYCS – is set to make the X and Y engines work with the same speed.
PF – for pen tracing. The Z axis or actuator is needed.
LH – lift height of the pen (mm).
PrintSpeed – engraving speed (mm/min).
Point/Line Rate – burning duration: the less the value the longer (more milliseconds) the laser exposure.
Create – image conversion into the G-Code.
Save –G-Code saving.
Tab Pic/Txt. The primary model mode.
“Prima” – the primary model mode is used for grayscale engraving.
Open (select an image) -> Spacing (usually 0.1) -> PR (select the image procession method) -> Zoom (scale setting) -> Mirror / Inver -> BurnT ms (burning time setting) -> Power % (laser power setting) -> Start (engraving start) /
Pause / Stop.
It is possible to create text by pressing the Text button. After the font setting the text will be converted into an image. Then you can work with it the same way as with an image.
Tab Code G-Code selection.
Display setup in the software. Engraving/cutting start. Setup of the engraving process display (laser beam movement across the image) in the software and start of the engraving/cutting process.
Start Line – the line to start the G-Code.
RDrawing – display the points in the software, where the laser worked.
RTrack – leave laser movement traces in the software. Additional calculations for a PC.
Open – open the NC file with the G-Code.
CycleTime – the number of passes setting. Is used for cutting or deep engraving.
Run – engraving start/
Pause/Cont
Reset – interrupt engraving.
Manual Send – manual G-Code import.
Tab Auxilary (for finding engraving/cutting area on a workpiece).
Laser adjustment – is used for a 3-axis engraver (with the Z-axis).
Manual Operation is used to control the laser position. “K” – to control the keyboard arrows.
Range – draws a rectangular engraving area with the set Speed and stops at the four corners on the FC Residence seconds.
ASC – poses the laser beam in the center of the figure: by three points A, B, C for a circle) and by two points B and C for a rectangle).
Donwload a BENBOX Software Manual (PDF)
Intro into CNCC LaserAxe
CNCC LaserAxe detailed video
CNCC LaserAxe video guiadance (second edition)
Looking for a special video?
If you are looking for a special video or guidance, please, let us know!
Video available upon request. Just email to [email protected] or text: 12393020053 [whatsapp, viber, telegram, wechat]
Benbox firmware. How to change from Benbox to GRBL and vice versa
High-quality standard
Multi-level testing system.
Industrial components.
Ultra reliable
The guaranteed duration of the continuous operation ~48-72 hours.
True continuous power output
Our products have the rated power output as advertised – unlike Chinese analogues.
TTL mode
Can be turned on and off with 3.5-24V.
Variable power output.
Plug and play
Universal and compatible mount.
Compatible with most 3D printers and CNC machines.
Friendly return policy
Do not like the laser?
Simply return within 30 days and get a full refund.
Real-time advice
We assist and give advice by Phone / Email / Facebook messenger / Telegram / Whatsapp / Viber.
Professional support
We help to install and tune the laser. We offer qualified after-sales support.
Everything you need
We ship everything you need in one parcel to get started.
Immediate delivery
We ship all units within 4-24 hours. DHL express delivery allows you to get the package in 3-5 days.
Lifetime warranty
All our lasers are tested and could work up to 10000 hours.
Upgrade option
Do you have an old model? Upgrade your unit with more powerful one.
