TTL / PWM – how does it work with the laser.
How to find a PWM pin on your board with a multimeter.
Quite often we get questions about TTL and PWM.
How does TTL works, how should it be connected, what voltage is needed to control TTL, what to do if you want to control the laser intensity but you do not have a PWM on your board, etc?
Here we are going to highlight the key things about PWM & TTL.
TTL voltage
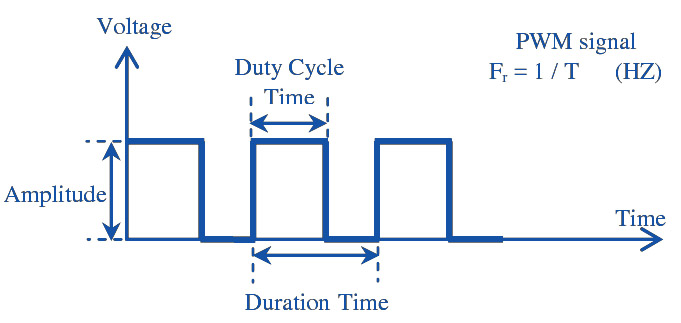
1. Endurance lasers support TTL+ with voltage control in the range of 3.5 – 24V (if you need to operate the laser with lower voltage – let us know and we will make a custom solution for you). It means that any voltage in this range will activate the MOSFET and the laser will work. The voltage value does not affect the laser power – it only affects the duration of the signal. For example, TTL will activate the laser at any voltage in this range, at any duty ratio, without changing the laser power.
In other words, if you have (1) 3.5V output with 50% duty ratio the laser will work with 50% power, and the same will be if you have a (2) 24V output pin and a 50% duty ratio but the average (if you will measure with a multimeter) voltage will be 1.75V for (1) one and 12V for a (2)
How to find a PWM pin on your mainboard.
2. If you do not have a separate PWM on your board and you want to control the laser – some boards can have different voltages on power output, for example, your power output can be 0-24V, in this case just connect the TTL wire to the 12V of your FAN1 (sometimes FAN2 on 3d printers) and use your existing power output to control the laser.
Most Fan pins have built-in PWM. And it can be easily observed since fans could rotate at different speeds.
Mostly all CNC boards have separate PWM pins for diode lasers.
What to do if there is no PWM pin on your controller board
3. If you do not have a PWM output but your board is compatible with an Arduino Nano then you may use the D11 output pin as a PWM to control the TTL.
4. On most CNC machines a spindle output or spindle speed output can be used to control the laser power by way of changing the impulse duration or by changing the voltage on the output slot. (make sure it is not exceeding 24V)
In continuous mode, there is the maximum frequency and you can toggle on and off the driver. The laser diode can be modulated at very high speeds. The MOSFETs and their driver must have an upper-frequency limit.
Right now our Mo1 works with 250-500 Hz (laser boxes ver 1.0, 1.1 )and our Mo2 PCB works with 25 kHz frequency (laser box ver 2.0).
Learn more about Endurance lasers boxes (laser drivers)
Everything you need to know about TTL signal. Watch this video now.
Measuring the voltage on a PWM output – a ver useful and interesting video
Live demo showing a drawing of a signal on an oscillograph.
Minimum voltage to run an Endurance laser (on Mo1 PCB). Real test.
Measuring PWM signal. A detailed video guide.
Changing laser power via TTL
10 watt+ laser with an Endurance laser box
Real-time advice
We assist and give advice by Phone / Email / Facebook messenger / Telegram / Whatsapp / Viber.
Professional support
We help to install and tune the laser. We offer qualified after-sales support.
Everything you need
We ship everything you need in one parcel to get started.
Immediate delivery
We ship all units within 4-24 hours. DHL express delivery allows you to get the package in 3-5 days.
Lifetime warranty
All our lasers are tested and could work up to 10000 hours.
Upgrade option
Do you have an old model? Upgrade your unit with more powerful one.
High-quality standard
Multi-level testing system.
Industrial components.
Ultra reliable
The guaranteed duration of the continuous operation ~48-72 hours.
True continuous power output
Our products have the rated power output as advertised – unlike Chinese analogues.
TTL mode
Can be turned on and off with 3.5-24V.
Variable power output.
Plug and play
Universal and compatible mount.
Compatible with most 3D printers and CNC machines.
Friendly return policy
Do not like the laser?
Simply return within 30 days and get a full refund.


