
Stepcraft allows you to change out tools in a fairly straightforward manner.
Electrical
You have two options for adding a laser to a StepCraft CNC:
- ON / OFF control which is easier but has some quality issues– This will be using the spindle relay to turn on and off the laser.
- PWM control – This will use a different pin to produce a PWM signal for power control.
Option #1: ON / OFF Control:
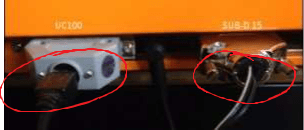
There is a DB 15 connector on the CNC. On this connector is a relay that you can control via software. The 15 pin connector is the one on the right.
From the instruction manual:
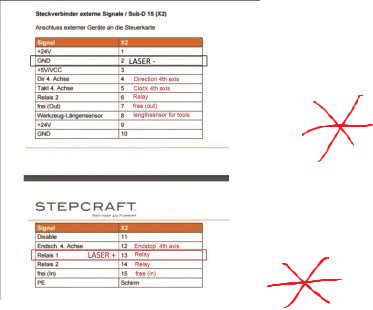
To connect the laser you will need to use the following on the DB15 connector:
- PIN 13 = LASER + on Driver Board
- PIN 2 = LASER – on Driver Board
Make sure the positive and negative is correct!
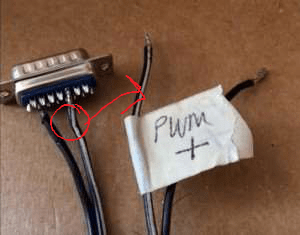
You can make your own D Sub cable if you know how to solder. You can pick them up at your local electronics shop. Or you can buy a breakout board from various locations online. Here is an example of a soldered cable.
Quick Notes Page 1
Option #2: PWM Power Control Setup
If you want to have power control, then instead of using pin 13 in the previous section for the laser “+” signal, use pin “7” instead. Remember to use the same pin in the OUTPUT setup as well.
To connect the laser you will need to use the following on the DB15 connector:
- PIN 7 = LASER + Driver Board
- PIN 2 = LASER – Driver Board
Software: Mach 3 or UCCNC-either works.
Mach3 Setup
For Mach3, you will need to set up the RELAY control from pin 13 and map it to an output. In Mach 3, it is easy to map it to any Output, but let’s use Output #1. Then, you can set it up in the Spindle setup tab. Make sure the Relay Control “disable spindle relays” box is unchecked. M3 map to output # 1.
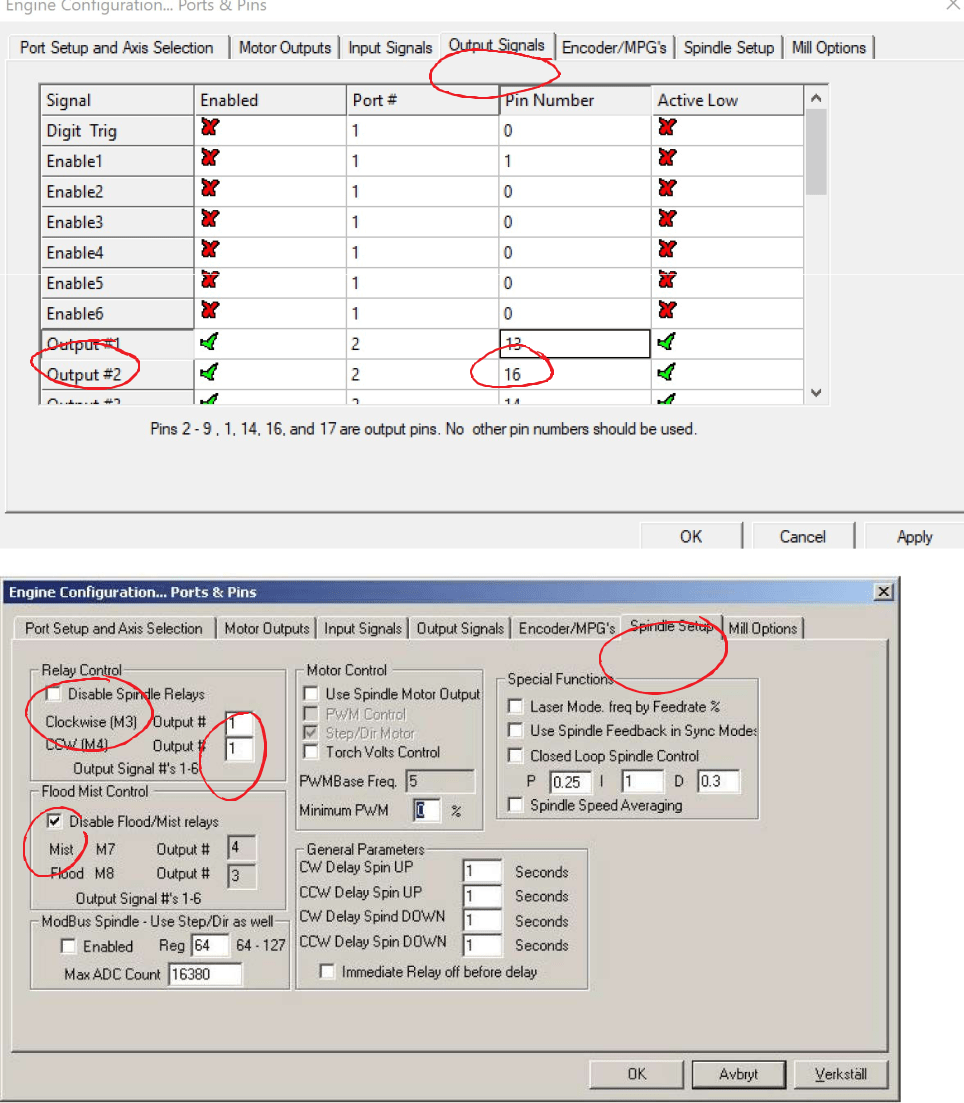
Then, to turn on the laser you will use:
Laser ON command: M3
Laser OFF command: M5
Quick Notes Page 2
If you want to use PWM control, do the following:
Using Spindle PWM to Control Laser
This is from http://buildlog.net/cnc_laser/mach_laser_power.html
The theory is that you want a specific frequency to run the laser at and then you can adjust the duty cycle to increase or decrease the power of the laser. It would be nice to adjust the power of the laser in easy 1% increments, so we will set it up that way.
We are first going to change the kernal frequency and the Spindle frequency.
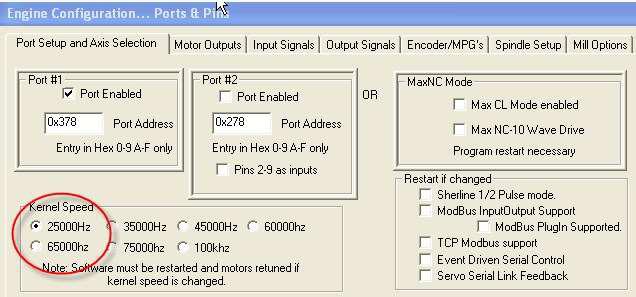
In the “Port Setup and Axis Selection” click the Kernal speed to 25000Hz.
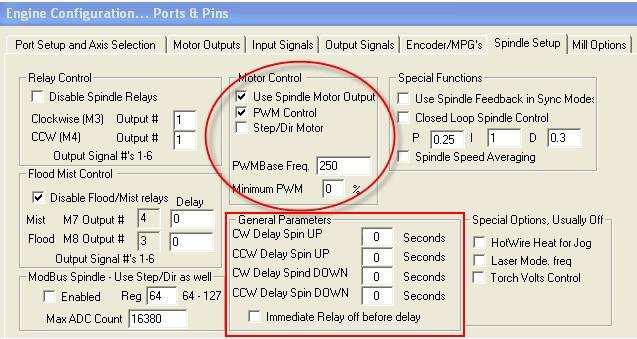
In the “Spindle Setup” tab, check Use “Spindle Motor Output” and “PWM Control”. Also set the base Freq. to “250” and the Minimum PWM to “0”. In the “General Parameters”, make sure all of the delays are set to Zero.
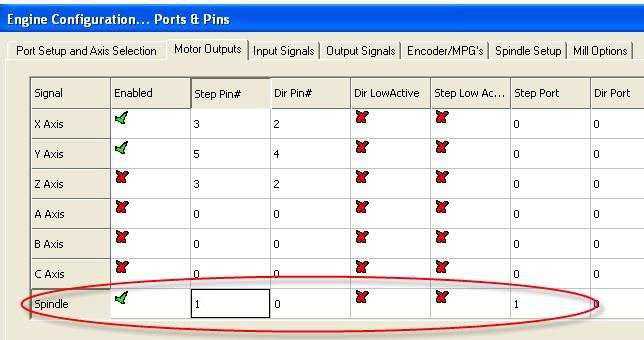
In the “Motor Outputs” tab, map the pins for the spindle to 1 and 0. Remember, this number is specific to your set-up and may require a different pin out. Just check in your instructions on which one it is.
Quick Notes Page 3
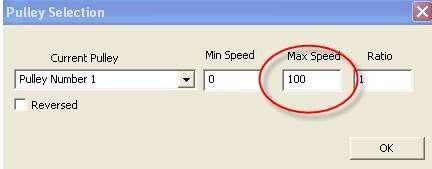
In the “Config” —> “Spindle Pullies” selection, enter “0” for Min Speed and “100” for Max Speed and a Ratio of “1”. This will then equate the spindle speed setting for laser power with a one to one ratio. Full power is 100 and off is 0 (or better to use M5).
To control this new PWM output in G Code, simply add an “SXXX” command to the normal spindle M Code of M3 or M4 where the “XXX” is the power of the laser. Some examples of the code are:
- M3 S100 – Laser ON at full power
- M3 S90 – Laser ON at 90% power
- M3 S50 – Laser ON at 50% power
The image below shows different duty cycles for 50%, 10% and 90% respectively.

UCCNC Setup (if not using Mach 3)
Many people are using the UC100 and the UCCNC software to run their machines. Here is a quick guide to setting up the machine.
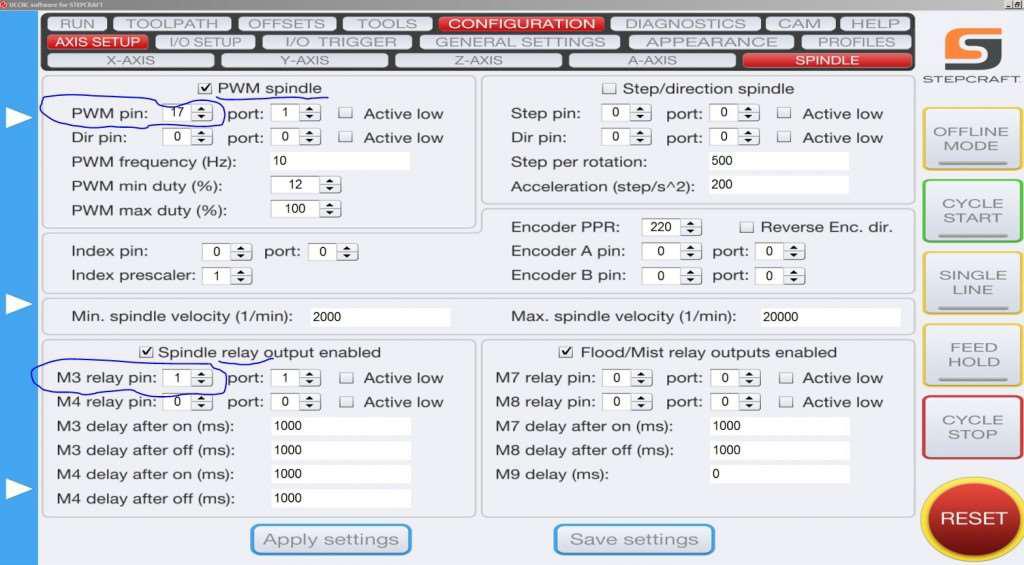
You will need to go into the “configuration” -> “axis setup” -> “spindle” tab. This is the screen that you will use to set the laser up as a “spindle”.
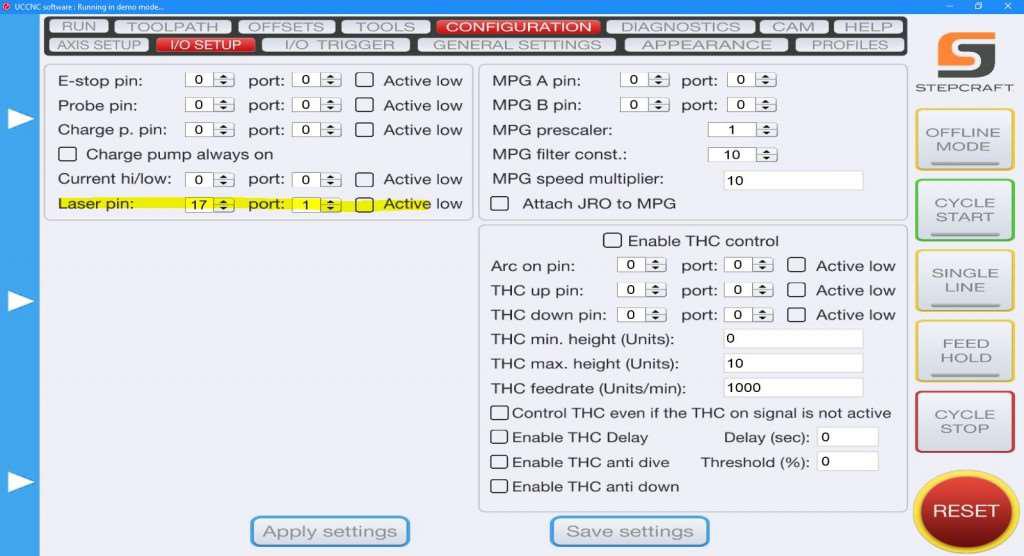
In the “Configuration -> I/O Setup” page, make sure to set the “Laser Pin” like below:
Quick Notes Page 4
****In the Electrical section, you either set your laser driver to be connected to Pin 13 (Relay) or Pin 7 (PWM). When setting up the UCCNC controller there will be a “mapping” between the pins in the software and the pins in real life on the DB15 connector. ****
UCCNC PIN 1 = STEPCRAFT DB15 PIN 13
UCCNC PIN 17 = STEPCRAFT DB15 PIN 7
For ON/OFF relay control:
- Uncheck the box on “PWM spindle” and check the “Spindle relay output enabled”.
- Set M3 relay pin to “1” and port to “1”. This will map to the Stepcraft Pin 13 that you have connected to the laser driver.
You can now turn on and off your laser with the “M3” command. Test it on the run screen by pushing the clockwise spindle button. For PWM control:
- Check both the boxes for “PWM Spindle” and “Spindle relay output enabled”.
- Set M3 relay pin to “1” and port to “1” in the spindle relay section.
- Set PWM pin to 17.
- Set your Frequency to a number you want. 100 or 500 is pretty good. Anything under 5000 will work.
- Set minimum duty % to 0.
- Set maximum duty % to 100.
Now you will have control over the power using the command:
M3 SXXX
where the “XXX” is a number between 0 and 100.
Quick Notes Page 5
Installing Endurance lasers on difference CNC machines – upgraded routers